by TheLastWonton | Jul 29, 2017 | Appetizers & Snacks, Beef, Pork & Lamb, Italian, Main Dishes, Pasta & Noodles, Recipes, Sauces, Dips & Condiments
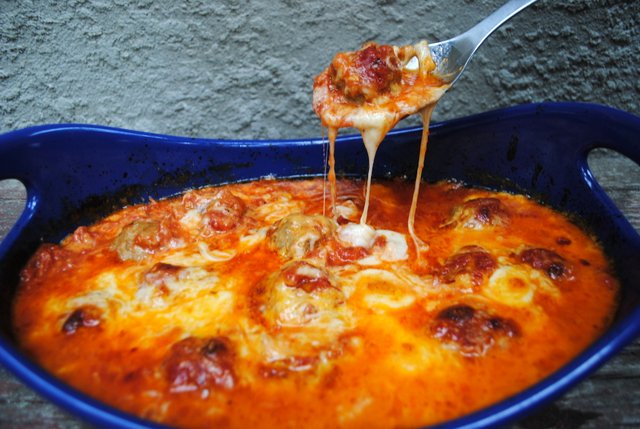
Tender, spicy, little meatballs baked in tomato sauce and a pool of luscious, molten cheesy goodness. Where's the spaghetti?
♪♫♥ On top of spaghetti
All covered with cheese
Just plop all the meatballs
Oh yes, please, please, please. ♪♫♥
This one is fun to serve, and fun to make. Easy too. No need to fry the meatballs first. No need to cook the tomato sauce ahead of time. Everything goes in one dish in the oven, all in good time.
The only other thing you have to do is cook up some al dente spaghetti, or your favorite pasta. And devour. With gusto!
* * * * * * * * * * * * * * * * * * * * *

* * * * * * * * * * * * * * * * * * * *
Adapted from Half Baked Harvest for
The Last Wonton. Thanks Tieghan, I love the way you roll!
* * * * * * * * * * * * * * * * * * * *
CHEESY LITTLE BAKED MEATBALLS – Serves 4-5
1/2 pound spicy (or sweet) Italian sausage meat
1/2 pound lean ground beef
2 slices thick soft white bread
1 egg
1/3 cup fresh oregano chopped OR 1 tablespoon dried oregano
1 teaspoon cumin
1 tablespoon dark soy sauce
1 tablespoon sambal oelek (Asian chile paste)
2 tablespoons olive oil
4 plump garlic cloves, minced
28-ounce tin san marzano tomatoes, crushed by hand
2 tablespoons sambal oelek
1 teaspoon sugar
Sea salt and freshly ground black pepper, to taste
8 ounces fresh good quality mozzarella, sliced
4 ounces (about 1 cup) provolone, shredded
4 ounces (about 1 cup) aged cheddar, shredded
fresh oregano for serving
Pasta cooked al dente for plopping the cheesy meatballs on top of.
Preheat oven to 450F. Grease a 9×13-inch, or similar size baking dish with olive oil.
Add the Italian sausage and ground beef to a mixing bowl. Take the bread and run it under water until dampened, but not soaked. Gently squeeze the excess water out of the bread and then crumble the dampened bread into pieces and add to the bowl with the meat. To the bowl, add the egg, oregano, cumin, soy sauce and 1 tablespoon sambal.
Coat your hands with a bit of olive oil and roll the meat into about 2 tablespoon size balls. Will make 12-15 meatballs. Place the meatballs in the prepared baking dish and place in the oven. Bake for about 12 minutes or until the meatballs are crisp on the outside, but not yet cooked through on the inside.
While the meatballs are baking, combine the olive oil, garlic, tomatoes, 2 tablespoons sambal, sugar and a hefty pinch of salt and pepper into a bowl. Once the meatballs are ready, pour the sauce over them. Cover the pan with foil and bake for 20-25 minutes longer or until the meatballs are cooked through.
Remove the foil and add the cheese. Place back in the oven until the cheeses are melted and golden, about 10 minutes. Serve plopped on top of your favorite pasta with a little extra fresh oregano. Mangiamo!

* * * * * * * * * * * * * * * * * * * * *
by TheLastWonton | Jul 23, 2017 | Asian, Beef, Pork & Lamb, Main Dishes, Veggies
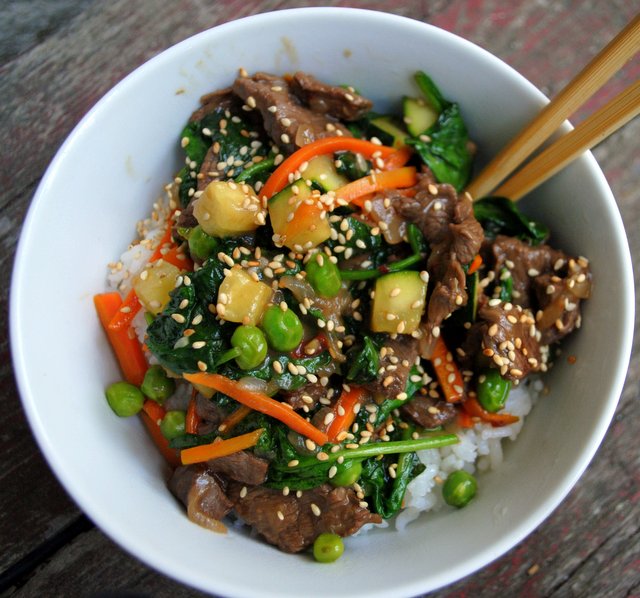
Tender, tasty, marinated Korean style beef stir-fried with a bunch of deliciously fresh veggies, plopped atop a little heap of hot steamed rice. Yum!
TOP TEN REASONS TO MAKE KOREAN BEEF RICE BOWLS
10. Clean up is super easy – one bowl and pair of chopsticks, per person.
9. Beef is thin, veggies are small, cooking is fast, and that's not all.
8. Little ingredients, big flavours!
7. Lots of fresh veggies.
6. Korean Soul Food makes the world a better place.
5. Marinated beef SIZZLES when it hits the hot wok.
4. Soy sauce and sambal are best friends.
3. You'll be happily singing, 'Just One Look', the whole time.
2. Comfort, nourishment, happiness.
1. One bowl meals are awesome.
* * * * * * * * * * * * * * * * * * *
Lots of garden fresh veggies

* * * * * * * * * * * * * * * * * * * *
Adapted from Steamy Kitchen for
The Last Wonton. Thanks oodles, once again, Jaden!
* * * * * * * * * * * * * * * * * *
Korean Beef Rice Bowls of Happiness

KOREAN BEEF RICE BOWLS – Serves 4
About 2 cups raw Asian short grain rice
1 1/4 pounds sirloin tip steak
3 tablespoons dark soy sauce
1 1/2 tablespoons brown sugar
1 tablespoon vegetable or canola oil, plus more for frying
Juice of 1/2 lime
1 teaspoon sambal oelek or other Asian chile paste
1 plump garlic clove, minced
1 teaspoon sesame oil
1 teaspoon grated fresh ginger (optional)
1 small sweet onion, diced
1 large carrot, cut into matchsticks (1 cup)
3/4 cup fresh (or frozen) peas
1 small-medium zucchini, diced
2 big handfuls fresh baby spinach leaves
Sea salt to taste
1 tablespoon roasted sesame seed
Cook rice according to package directions. Keep warm.
Cut steak into thin slices, across the grain. In a medium bowl, combine the soy sauce, brown sugar, 1 tablespoon oil, sesame oil and ginger (if using). Add the beef and toss to coat. Marinate 30 minutes, up to 4 hours.
Heat a large frying pan or wok on medium high heat. When hot swirl in about 2 tablespoons oil. Add onions and saute for 1-2 minutes or 'til edges are golden. Turn the heat to high and give it just a few seconds to heat up. Add in the beef, spreading the beef all over the surface of the hot pan, tossing with the onion. Saute for 2-3 minutes until just barely pink.
Add peas and carrots, cook for 2 minutes. Add zucchini, and a bit of salt to taste, cook for another minute. Toss in the spinach and cook for an additional minute. Sprinkle with sesame seeds. Serve on warm, rice. Yum!
* * * * * * * * * * * * * * * * * * * * *
by TheLastWonton | Jul 23, 2017 | Beef, Pork & Lamb, Main Dishes, Recipes, Sauces, Dips & Condiments, Sides, Vegetarian
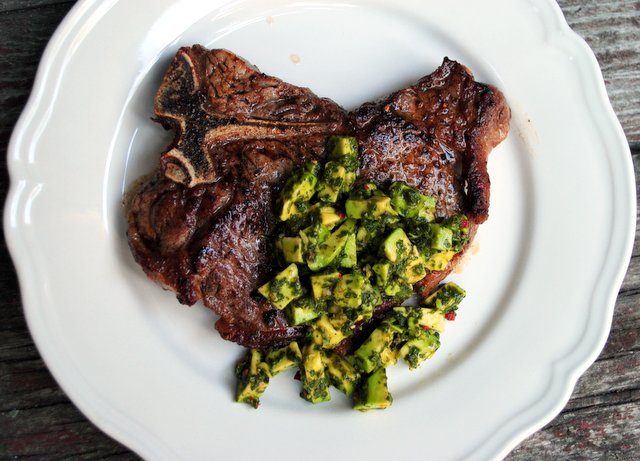
Fresh herby, tangy avocado sauce begging to be swooped over juicy, hot-from-the-grill steaks. Mahvelous merger.
Avocado Chimichurri…..
It's fast.
It's easy.
It's green.
It's sunshiney.
It's all tangy and creamy.
It's madly in love with tender, juicy, grilled steak.
It's packing a punch of flavours.
It's softly whispering of spicy heat.
It's always singing:
♪♫♥ Chim chimichurri
Chim chimichurri
Chim Chim Churreee
A steak is as lucky as lucky can be. ♪♫♥
Make a steak happy, today! Go green!

* * * * * * * * * * * * * * * * * * * *
Adapted from Joyful Healthy Eats for
The Last Wonton. Thanks, Krista!
* * * * * * * * * * * * * * * * * * * *
AVOCADO CHIMICHURRI for Grilled Steak – Serves 4
3/4 cup fresh cilantro, lightly packed
1 heaping tablespoon fresh oregano, or 1 heaping teaspoon dried oregano
2 plump garlic cloves
3 tablespoons red wine vinegar
4 tablespoons good olive oil
2 tablespoons fresh lime juice
1 teaspoon sea salt
1/2 teaspoon red pepper flakes
1/2 teaspoon freshly ground black pepper
Few squirts Tabasco (optional)
2 plump, firm, ripe avocados, diced
4 steaks, grilled to perfection
Place the cilantro, oregano, garlic, red wine vinegar, olive oil, lime juice, red pepper flakes, salt, pepper and Tabasco (if using) to bowl of a food processor fitted with metal blade, and pulse until all chop-choppy and evenly and well blended.
Place diced avocado in small bowl and add buzzed chimichurri sauce, Lightly toss to coat, being careful not to mush the avocado. If not using right away, cover and refrigerate. Let sit at room temperature for 15-30 minutes before plopping on tender, juicy, hot-from-the-grill steaks.

* * * * * * * * * * * * * * * * * * * * *
by TheLastWonton | Jul 13, 2017 | Beef, Pork & Lamb, Burgers, Main Dishes, Recipes
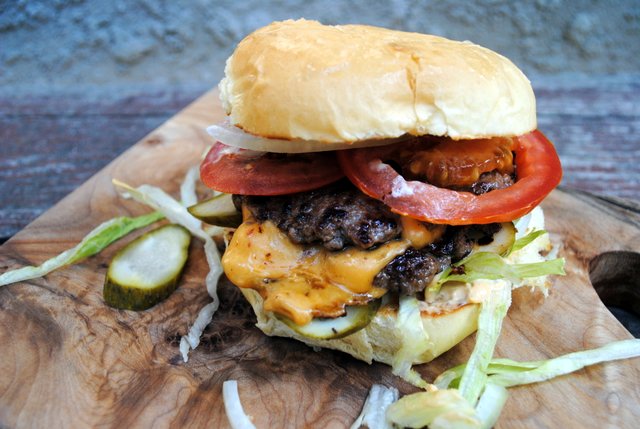
Rich, crusty brown outtards, juicy innards, melty cheese in between. Deliciously beguiling.
Beguiling burger patties = Damn good cheeseburger!
This isn't really a recipe, but a 'way'. A way to reap results that will make you softly exclaim, "Ohmygawdthatsgood!"
A means to an end. Cause and effect. Chain of circumstances. A delicious nexus.
Firstly, let me throw profuse gratitude and big, juicy, thank-yous to J. Kenji López-Alt, of SeriousEats.com for his Food Lab post, showing me the way to make these irresistible, smashed cheeseburgers.
Secondly, my condolences to those of you who only like big, plump, extra lean, gently handled, grilled burgers. I totally understand, really, I do. But, but……you don't know what you are missing.
Okay, now let's get on with these smashing cheeseburgers.
To get the ball rolling (Ha! I kill me!), pack two ounces of not-too-lean hamburger into a nice little ball. Not-too-lean 'cuz you need 'enough fat to get a good sizzle, without adding any oil to your pan'. If you do not have a kitchen scale, which I totally recommend for a whole schwack of reasons (like they are fun to use, and crazily accurate), then you'll have to guesstimate. A two-ounce ball is a bit bigger than a golf ball. Maybe like a golf ball with it's winter coat on.
Anyway, once you pack one ball, pack another ball. Two balls per cheeseburger.
You're going to cook these patties in a HOT stainless or cast iron frying pan/skillet. I use a heavy duty, high quality non-stick pan, with excellent results. However, The Food Lab states not to use a non-stick pan, as these pans should not get too hot. So maybe I do not reach the recommended high temperature, for the dry pan, before sizzling the patties, but I certainly do get the desired, rich, brown crust every time.
Cooking time in the pre-heated skillet is quick. Zip zap quick!!
You place the nicely-packed, two-ounce burger balls into the hot pan and immediately squish them FLAT, with a metal or hard plastic spatula. Press hard = flat = yum.
Within about one minute, the patties have developed a nice crust.
With the same 'stiff' spatula, carefully scrape up and flip those skinny patties. As soon as you flip them, plop cheese on top of one of the patties, then stack the second patty on top.
Within seconds you are ready to transfer these cheesed-patties to a bun that has been buttered and grilled in a pan, ahead of time, and layered with your fave condiments.
Chain of circumstances = smash, smash, flip, flip, stack, melt, stack, attack.


Many, many, thank-yous to J. Kenji López-Alt's Food Lab post, for these 3 how-to photos.
The Serious Eats Food Lab states: "See, by placing a ball of meat on a hot, un-oiled griddle and smashing it down firmly into a flat, thin disk, you greatly increase the contact points between the meat and the griddle, which in turn increases the Maillard reaction. That's the series of chemical reactions that create the rich brown crust that makes our steaks and burgers taste so freaking good. Maximum crust = maximum flavor = maximum craving"
Soooo, my friends, even if you are only remotely inclined towards skinny burger patties, do it. Seriously, you must. Smash away!
Just in case you need a little more convincing, this one's for you……

* * * * * * * * * * * * * * * * * * * *
SMASHED CHEESEBURGERS – Makes 1 burger
1 soft hamburger bun, buttered and pan toasted/grilled
Condiments and toppings of your choice, mayonnaise, mustard, ketchup, shredded lettuce, sweet onion slices, fresh tomato slices, pickles.
4 ounces ground beef, divided and packed into two 2-ounce balls
Sea salt and freshly ground black pepper
1 slice good melting cheese
Prepare toasty burger bun by laying toppings on bottom and top of bun, to suit your fancy. Have bun nearby and ready to receive your cooked burger stack.
Preheat a large stainless steel skillet over high heat for about 2 minutes. Place balls of beef in pan and immediately smash flat with a stiff spatula, using a second spatula to add pressure, if needed. Work fast. Smashed patties should be slightly wider than the burger bun.
Season generously with salt and pepper and allow to cook until patties are well browned and tops are beginning to turn pale pink/gray in spots, about 45 seconds to 1 minute. Using stiff spatula, carefully scrape patties from pan, making sure to get all of the browned bits.
Flip patties and place a slice of cheese over 1 patty. Stack the second patty directly on top. Remove from pan and transfer to waiting burger bun. Serve. Softly exclaim, "Ohmygawdthatsgood!"
* * * * * * * * * * * * * * * * * * * * *
by TheLastWonton | Jul 11, 2017 | Appetizers & Snacks, Sides, Treats, Vegetarian, Veggies
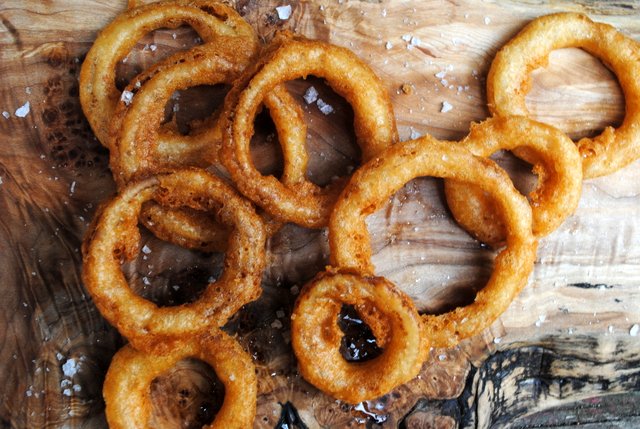
Crispy, crunchy, golden brown, retro deliciousness. Indulge!
Wikipedia states: "The exact origins of the onion ring are unknown, but in 1933 a recipe for deep-fried onion rings that are dipped in milk, then dredged in flour appeared in a Crisco advertisement in The New York Times Magazine"
Seems they caught on.
I don't know why, but onion rings are summery to me. And retro. Retro because as far back into my childhood, as I can remember, there were always onion rings. Maybe not often, but they were always there, lurking somewhere, in the back…..
Maybe the summery thing comes into play with fairgrounds and festivals, and of course, hamburger stands. In the olden days, those places we got burgers were always 'hamburger stands'. And they always had good, crunchy onion rings.
Nowadays I find we have to be a bit pickier before ordering up onion rings. 'Cuz we want them good, crunchy and reminiscent of those olden day goodies of our memories. Right?
I haven't made onion rings at home for a good long time, so before I dove in, I scooted all over the internet looking for best-kept secrets. After looking here, and looking there, I came to the conclusion that I already knew how I was going to tackle them. Some things just stick with you.
Clearly they must be crispy and crunchy and they must be made ONLY WITH SWEET ONIONS. Vidalia, Walla Walla, Maui, or your fave.
I think I hit the nail on the head using some delightfully squatty Vidalias, just a handful of simple ingredients and a little schwhack of icy beer.
Oh yeah, and then I made a crazy, mix up of flavours, Dunkeroo that made me think I was a damn fool not to have made it sooner.

* * * * * * * * * * * * * * * * * * * *
Adapted from my Mom's old recipe box and Dinner with Julie for
The Last Wonton. Thanks oodles Mom! And Julie, I like the way you roll, and thanks!
* * * * * * * * * * * * * * * * * * * * *

* * * * * * * * * * * * * * * * * * * * *
BEER-BATTERED ONION RINGS – 4-6 Appetizer servings
2 sweet onions – Vidalia, Walla Walla, or Maui
1/2 cup flour, plus extra flour for dredging
1/2 cup rice flour
1 teaspoon fine sea salt
3/4 teaspoon baking powder
1 cup ice cold beer, or soda water
Canola oil, for frying
Slice the onions crosswise about 1/4-inch thick, separating them into rings. Put about 1/2 cup extra flour, for dredging in pie plate.
In a medium bowl, whisk together flour, rice flour, salt and baking powder. Whisk in beer until smooth. Batter should have a texture somewhere between pancake batter and heavy cream.
Put about 2 inches of canola oil in a heavy bottomed pot, or wok, and set over medium high heat. When it's hot, but not smoking – a scrap of bread should sizzle when dipped in, you're ready, ready, freddy, to fry. In batches. Dredge onion rings in flour then dunk a few rings at a time in the batter to coat, letting excess drip off, into the bowl. Gently lay battered rings into the hot oil, turning with a chopstick or tongs as they turn golden brown, cooking about 1-2 minutes per side. If they are too dark, too fast, lower the heat.
Transfer to a paper towel lined cookie sheet and shower with sea salt. Serve warm with Dunkeroo, ketchup, honey mustard or lemon aioli, for dipping.
DUNKEROO
1/2 cup ketchup
1/4 cup mayonnaise
2 tablespoons malt vinegar
1 tablespoon dark soy sauce
2 teaspoons creamed horseradish
1/2 teaspoon freshly ground black pepper
Few shots Tabasco
Mix, mix, whisk, whisk, all together and voila. Serveroo dunkeroo with hot from the fryer, crunchy, golden brown onion rings.
* * * * * * * * * * * * * * * * * * * *
ps. These golden rings are quite yummy sprinkled with great quality Parmesan, while they are hot.

* * * * * * * * * * * * * * * * * * * * * *


