by TheLastWonton | May 5, 2017 | Appetizers & Snacks, Main Dishes, Mexican, Sides, Vegetarian, Veggies
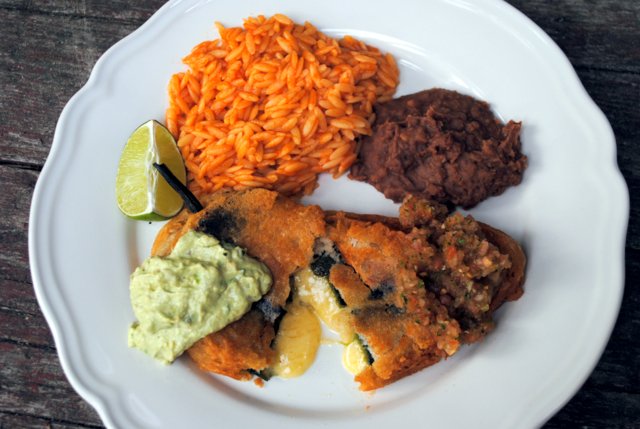
Mild mannered, tender, delicious, fresh Poblano peppers stuffed with creamy Havarti and lightly batter fried to golden, crispy perfection. Si, si, si!!!
Happy Cinco de Mayo!
We need nary a reason to munch on any kind of Mexican food around our house, but when there is a reason, we are so there. Al frente y en el centro! (front and centre!)
The chile relleno, literally meaning 'stuffed chile', originated in the city of Puebla. It consists of a charred, peeled, stuffed poblano pepper, which is a large, mild chili pepper named after the city of Puebla. These days many versions abound, including using Hatch, Anaheim, pasilla or even jalapeno peppers.
And, of course, stuffings vary as well, from cheese to beef to pork to corn mixtures and seafood.
We stay pretty darn cheesy at our house when it comes to rellenos, but do mix things up a bit, switching between cheddar, Monterey jack, Havarti and sometimes a mixture including little chunkers of a mild, creamy blue cheese. They're all delisioso! 
Traditional rellenos have a softer, poofier, eggy batter. I used to do my Mom proud, separating the eggs and carefully mounding that silken batter mixture on top of the chiles, ensuring an even coating. But somehow over the years, things have changed.
Now, I dip the cheese-stuffed poblanos into an almost-tempura-ish beer batter that transforms them into golden, crispy, sultry peppers of goodness. Each one hiding a treasure…. plush little puddles of cheesy deliciousness.
But I had you at 'sultry', didn't I?
* * * * * * * * * * * * * * * * * * *
CHILE RELLENOS – Makes 4
4 good size, fresh Poblano peppers
1/3 – 1/2 pound Havarti, Cheddar, Monterey Jack, grated or cut into slices
1/3+ cup flour, for coating
1 cup self rising flour
Hefty pinch sea salt
1 1/3 cups cold beer
Canola or other oil, for frying
Salsa fresca, guacamole, fresh lime wedges for serving – optional
Preheat broiler. Lay the peppers on a foil-lined baking sheet, so you can char the bedickens out of them, adding all kinds of flavour, flavour. Place pan up on tip top rack close to the broiler and let them bask about 5-10 minutes, until the skins are dark and bubbly. Flip peppers over and repeat on the other side.
When they're finito most of the skins should be black(ened). You don't want to leave them under the broiler too long or they will overcook and become mushy.

Now, while they're still very hot, placed charred peppers into a large Ziploc bag, seal and leave them be for about 20 minutes. This will allow the peppers to steam, which will loosen the charred skin and make it easy to remove.
When they're ready, remove peppers from bag and with your fingers gently pull off the black skin. Discard skins. Gently, carefully, slice open each pepper, lengthwise and scrape out seeds and membrane with a knife or spoon.
Stuff each pepper with strips of cheese, or little mounds of grated cheese. Close pepper back up as well as you can. I almost always get creative with toothpicks at this point to keep every little thing in place. The toothpicks are easily removed once the rellenos are fried.

At this point you can cover and refrigerate the stuffed peppers or plunge right into battering and frying.
Put 1/3 cup flour onto plate or pie pan for dredging.
In a medium bowl mix self rising flour and salt. Whisk in cold beer to make a smooth, not-too-thick, batter.
Pour enough oil in heavy frying pan to reach about 1-inch depth and heat over medium-high heat. Coat each pepper in flour, then dip carefully into batter and lay gently into the hot oil in pan. Fry (not too fast!) until lightly browned on both sides. Remove from pan, drain on paper towels, remove toothpicks, if used and Ta Da!!
Serve with salsa fresca and guacamole, frijoles and Spanish rice or orzo. Also great draped with enchilada sauce. Comamos!! (Let's eat!)
* * * * * * * * * * * * * * * * * * * *

by TheLastWonton | May 4, 2017 | Drinks & Cocktails, Hawaiian, Mexican
A bit of a twist on that famed old classic, this fiesty, fruity, tangy, tequila concoction will have you enthusiastically saying 'Okole Maluna'!

Never mind!
I can if I want!
So I am!

Yup, wham bam, thank-you wahine, I'm going to lend a bit of a Hawaiian vibe to this gloriously sinful, please-make-it-again-soon, classic cocktail.
I've always loved 'real' Margaritas, as far back as I can remember. Maybe it all started with my Mom's love of Mexico and her savvy sorcery creating all kinds of Mexican goodies, including icy margs.
Whatever brought me here, matters no more, no more, 'cuz I hit paydirt when I found the Barefoot Contessa's Pink Grapefruit Margarita recipe. After making Ina's version a couple of times, I changed things just a wee bit, not because it wasn't perfectamundo just as it was, but because some things make our own tastebuds smile, bigger.
From time to time I do whip up a good batch of these Sublime Grapefruit Margaritas, here at home in our foresty, creekside abode, when friends and family gather, but I always, always, make this perfect-for-sunset-watching cocktail when we sneak off to our other Home Sweet Island Home, Kona.
Kona. Margaritas. Love. Love.
Last time we were in Kona, we stayed in a charming, pampering, hillside home near the quaint village of Holualoa in Kona Coffee Country. Lucky us! Our vacation home was plunked on almost an acre, overlooking the blue Pacific far below and boasting some prolific avocado and lemon trees, in the yard. So besides blissing out watching tropical sunsets kiss the sky with heavenly hues, whilst sipping something icy, we also picked the fresh bounty from our trees, everyday.
 Look, look, at all this fresh-picked goodness, from just one day.
(Those avos are TO DIE FOR. But that's a whole other blog post.)
What, oh what, I ask you, is a girl to do with all those juicier than juicy, Big Island lemons?
"Hmmmm"………(she sighed, wondering, but then a silly smile softly, suddenly, spread across her face)
And so it was that Sublime Grapefruit Margaritas came to be savoured, celebrated and lingered over on a wonderful, big, gecko tickled, oceanview lanai up mauka. Okole Maluna! (bottoms up!)
* * * * * * * * * * * * * * * * * * *
SUBLIME GRAPEFRUIT MARGARITAS (Makes 4 cocktails)
1 lemon or lime cut in wedges
Sea salt, optional
1 cup ruby red grapefruit juice
1/2 cup freshly squeeze lemon or lime juice
1/2 cup Triple Sec, or other orange liqueur
1 cup gold or silver tequila
3 cups ice
If you like a salt rim on the glasses, rub cut lemon or lime around the edges of the glasses and then dip rim of each glass in a small plate of sea salt. Let dry a bit.
Combine grapefruit juice, lemon or lime juice, liqueur and tequila in a pitcher. Fill glasses with ice, then fill with Margaritas. Aloha!

Just in case you didn't know, geckos love to share icy drinks whilst sunset watching, too!
* * * * * * * * * * * * * * * * * * * * *
by TheLastWonton | Sep 23, 2016 | Candy, Treats
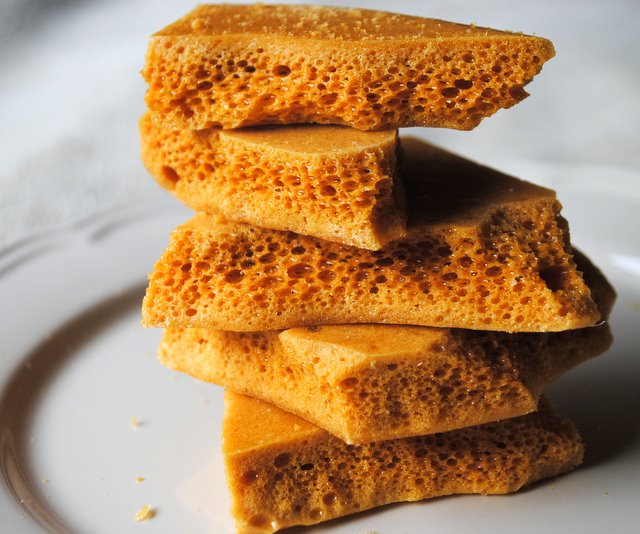
A crunchy, chewy, salty-sweet candy treat that'll take you back.
TOP TEN REASONS TO MAKE SPONGE TOFFEE aka HONEYCOMB
10. If you're a child of the 50's or 60's it'll remind you of this
9. Friends and family will think you're damn clever.
8. Bees everywhere will pay homage to you, so whenever one buzzes by……..
7. Your inner child will giggle for days afterwards.
6. Making it is as much fun as eating it.
5. Children and members of the opposite sex will be inexplicably drawn to you.
4. Your kitchen will smile.
3. Hippety hoppety Easter's on it's way.
2. You'll be in the running to win the coveted GOLDEN CRUNCH award.
1. You will never again be able to hide your awesomeness.
Now I've got you attention, don't I? Well I'm going to go one step further, "I double dog dare you to whisk up some sponge toffee in your very own kitchen today!"

Everytime I make this it turns out a little bit differently. The bubbles are different. Which is kind of cool. Maybe it depends whether I whisk the baking soda in a clockwise direction or un-clockwise. Not sure. But it always turns out, and it's always way fun to make.
I use Christine Cushing's recipe for a guideline. (Thanks oodles Christine) Sometimes I can't resist dipping the cooled honeycomb pieces in dark Callebaut chocolate. Happy, happy!
SPONGE TOFFEE aka HONEYCOMB
1 1/4 cups granulated sugar
1/3 cup light corn syrup
1 teaspoon good vanilla
3 tablespoons water
1 tablespoon baking soda
1. Grease a 9 or 10 inch springform pan with a little bit of vegetable oil Line the bottom and sides with parchment paper. Grease the parchment paper with a little more oil.
2. Add sugar, corn syrup, vanilla and water to a deep-ish, heavy bottomed pot. Stir to combine. Bring the mixture to a boil over medium-high heat, without stirring, and cook until hard crack stage; when the temperature on a candy thermometer reads 300F degrees. (I swirl the pot every once in awhile, just to mix things up a bit.) This should take about 8-10 minutes. During the cooking process, if there are any sugar crystals on the sides of the pot, brush the sides of the pot with a clean pastry brush dipped in water.
3. Remove from heat and working quickly, add the baking soda, whisking to incorporate. The mixture will bubble up quite a bit when you add the baking soda so be very careful not to touch the hot toffee. Immediately pour into the prepared pan. Let cool and set completely before touching. Break into pieces and serve. Store at room temperature in an airtight container.
*I've found that if you dip a few pieces in a variety of white, milk and dark Callebaut chocolate, tie them up in a nice little cellophane bag with a pretty ribbon and take them along as a hostess gift, you become very popular."
by TheLastWonton | Aug 31, 2016 | Appetizers & Snacks, Breads & Sandwiches, Burgers, Pickles, Recipes, Sauces, Dips & Condiments
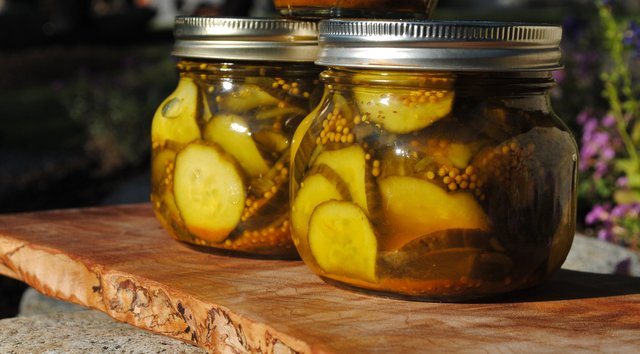
These small-batch pickles boast a tangy crunch, with a teeny edge of sweetness, making them pretty much irresistible.
Homemade summery, vinegarized goodness, wham bammed together, jarred, done. Well that was easy.
Just look at what I made. Like a picture. And ohhhh baby, if you like Bread & Butter pickles you are in for a treat.
I've had a crush on Bread & Butter pickles for as long as I can remember. I have my Mom to blame for that. In the olden days, in my elementary school years, when it was just too cold and blizzardy in Calgary to come home from school for lunch, I knew what deliciousness awaited in my brown paper lunch bag. A Cheez Whiz and Bread & Butter pickle sandwich. Happiness is….. And on a really fortuitous day, the cheese and pickle would be sandwiched in a Butter Bun from the National Bakery. Yum, yum!!
 This old time, happy memory comfort combo of flavours and textures still hits the spot, every once in awhile. But nowadays I like those pickles, more often, in gooey cheeseburgers, in still-hot-from-the-oven slow roasted pork sandwiches, tucked into a Brie grilled cheese, chopped into macaroni or potato salad or homemade Ranch dressing, resting atop a spicy kettle cooked jalapeno potato chip, or, or……and the list goes on.
All good reasons why I got all smiley and eager and gung-ho when I came across this recipe from the White on Rice Couple's great blog.
And damn sam, if Todd, of White on Rice Couple, didn't take it upon himself to figure out how to pretty much ensure that often elusive, glorious Crunch factor.
Since finding this recipe, with the easy peasy added step of letting the cut cukes rest and air dry overnight, I've already made 5 batches. Todd's crunch thingie totally works. Yippee! 
You just cut your cucumbers and onions, salt them and let them sit for a bit. Then rinse and spread out on paper towel lined baking sheets overnight, to dry out. Next day whip up the pickling brine and jar 'em up. And, like Todd, I found I didn't have to process the jarred new pickles as they sealed themselves within a very few short minutes. I just always make sure each jar is hot from the sterilizing water and that the brine is simmering between pours to fill the jars.
So, if you have some old-time pickle memories, (or even if you don't!) of how delicious Bread & Butter pickles used to be, quick, quick, get your hands on some skinny cukes and make these badass goodies.
* * * * * * * * * * * * * * * *
Big, enthusiastic Thank-you's to White on Rice Couple's briny inspiration,
and yet another must-make again and again recipe.
* * * * * * * * * * * * * * *

Crunchy, Sweet and Tangy Bread & Butter Pickles – Makes about 5 cups
Use skinny, crunchy Japanese or English cucumbers. I usually use 8 ounce jars, but tried the pint (16 ounce) jars this past time and they too sealed without processing. But of course, processing is an easy option.
3 pounds crispy, skinny cucumbers, sliced 1/4-inch thick, on a very slight diagonal
1/2 medium, sweet onion, sliced very thin
1/4 cup coarse Kosher or sea salt
2 cups white vinegar
1/2 cup water
1 scant cup of sugar
2 tablespoons mustard seeds
1 teaspoon celery seeds
1 teaspoon tumeric
Place the sliced cucumbers and onions in a colander, resting in a large bowl or in the sink. Toss with the salt and let rest for 1-2 hours. The cucumbers will release a lot of water during salting.
Rinse the cucumbers and onions and then place in a single layer on a couple of sheet pans lined with paper towels. Cover with another layer of paper towels and let dry overnight.
The next day, sterilize your jars. While the jars are still in simmering water, combine vinegar, water, sugar, mustard seeds, celery seeds and tumeric in a saucepan. Heat to a boil.
Fill your hot, sterilized canning jars with the cucumbers and onions, leaving about 1/2 inch of space from the top of the jars. Pour the hot vinegar mixture over the cucumbers and onions to fill the jars. Slide a chopstick down right along the sides of the jar to get rid of any air pockets, and then add a bit more brine if necessary. Wipe jar rims, put on lids, and seal the jars according to manufacturers instructions.
Store in the refrigerator and allow to sit for several days before opening, to allow the flavours to get all friendly with each other. Best served chilled, with a quietTa da!
* * * * * * * * * * * * * * * * *
Here's an invaluable, quickie, little vid, of this pickle recipe from none
other than the White on Rice Couple
https://www.youtube.com/watch?v=js7AmoqktyY
* * * * * * * * * * * * * * * * *
by TheLastWonton | Aug 10, 2016 | Chicken & Poultry, Italian, Main Dishes, Pasta & Noodles, Sides
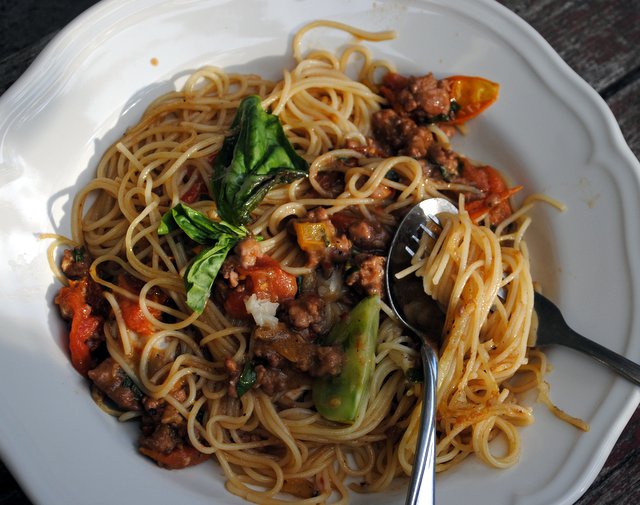
Fresh-picked heirlooms snuggled up all cozy with rich red wine, aromatic basil, gutsy Parmesan, plush balsamic and delicious ground chicken, tinged with the heat of dried chiles and simmered together to create a glorious puddle of summer flavours. Quick and easy. Sexy too!
Simple Italian fare.
When I hear those three little words, my tastebuds immediately start jumping up and down in delicious anticipation.
And of course we're rolling out those lazy, hazy, crazy days of summer right now…….those days of picking plump, sumptuous, multi-hued heirloom tomatoes. Every day.
Life is good and the cooking is easy.
This modest, sunny day sauce takes all those more traditional Italian flavours that we like to like, kicks them up with the freshness of summer, resulting in this yummy tangle that tastes like a celebration of the season itself.
Adding a good little schwack of Parmesan to the sauce, to finish, after it has had a quickish simmer adds a kicky richness that leaves you wanting for more.
So, if you've got a bunch of fresh heirlooms like us, just think…..simple Italian fare and whiz, whiz this one up. Buon Appetito!
* * * * * * * * * * * * * * *
Big, big Thank-yous to Half Baked Harvest food blog for such delicious
recipes and inspiration. Fantastico!
* * * * * * * * * * * * * * * * *
SIMPLE HEIRLOOM TOMATO BASIL CHICKEN PARM BOLOGNESE – Serves 4
2 tablespoons olive oil
1 pound ground chicken (I buzz, buzz nice, plump little boneless, skinless chicken thighs in food processor)
3 garlic cloves, minced
2 heirloom (or regular) tomatoes, finely chopped
1 generous cup heirloom (or regular) cherry tomatoes, halved
1/3 cup good quality red wine
1/3 cup butter
2 tablespoons balsamic vinegar
1 teaspoon crushed red pepper flakes
3/4 cup water
Sea salt and freshly ground black pepper, to taste
1/3 cup fresh basil, chopped
1/2 cup freshly grated Parmesan cheese
4 ounces fresh buffalo mozzarella, sliced or the same amount of Tallegio, sliced
1 pound spaghettini
Add 2 tablespoons olive oil to large skillet, set over medium-high heat. Add the ground chicken and brown all over, breaking up the chicken as it cooks. Season with salt and pepper and add garlic and cook about 3 minutes. Add all the tomatoes, plus any juice left on the cutting board to the skillet. Cook another minute and then add red wine, butter, balsamic vinegar, red pepper flakes and water.
Bring the sauce to an easy simmer, adjusting heat if necessary and cook about 10 minutes or until the sauce has thickened, just slightly. Season with salt and pepper.
Meanwhile, bring a large pot of salted water to a boil and cook pasta until just al dente. Drain.
Preheat broiler to high.
Remove the bolognese from the heat and stir in the Parm and basil.
Add the pasta to oven safe bowls, or oven safe skillet/pan/dish and spoon the sauce over the pasta. Add the mozzarella or Tallegio and place under broiler for 1 minute. Watch closely. Remove and serve immediately with more grated Parm. Così buono!
* * * * * * * * * * * * * * * * *

* * * * * * * * * * * * * * * * *


