by TheLastWonton | Jan 10, 2023 | Burgers, Chicken & Poultry, Main Dishes, Recipes
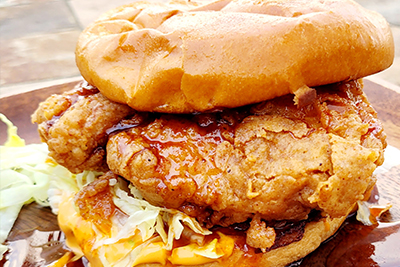
Crunchy, crispy, tender, juicy, fried chicken breasts tucked into very fortunate buns, along with a hefty drizzle of honeyed sriracha, and some freshly shredded iceberg. Chick-a-boom!

These chicken burgers have definitely become a craveable dinner for us, thanks to Don't Go Bacon My Heart food blog.
The breasts always turn out CRISPY, CRUNCHY, yet the chicken itself is never dry, or tough, but rather, I daresay, succulent. And the finishing touches of the 'fillings' just bring everything together. Flavour on flavour!
Though I never stray from the prep, the marinade, the spices, the coating methods and frying, I do like to try out different buns, from soft Portuguese rolls to Brioche, and beyond. Also along with always using the Honeyed Sriracha, I switch between shredded iceberg with mayo, (or sriracha mayo) to crunchy, fresh coleslaw. Both go perfectly, for us, and mayhaps for you, too.
I know that frying can seem like a hassle, but this recipe is really straightforward, and so worth it.
")
Before marinating in buttermilk, pounding the chicken breasts, with a mallet or rolling pin, ensures even thickness, so they cook evenly. Plus it tenderizes the meat.
And then there's the magic of spiced, buttermilk marinade, further tenderizing the chicken breasts, whilst getting those flavours intact.
So, if you are craving the crunch of that classic fried chicken, just make it yourself, and tuck it in a bun. It's finger licking good! Munch on that!

* * * * * * * * * * * * * * * * * * *
Oodles of thanks to Don't Go Bacon My Heart food blog for
this celebration of taste, for The Last Wonton.
* * * * * * * * * * * * * * * * * * * * *
CRISPY CHICKEN BURGERS ~ 4 Servings
4 Boneless, Skinless, Chicken Breasts
2 cups Shredded Iceberg Lettuce tossed with mayo (Or 1 generous cup coleslaw)
Runny Honey + Sriracha, 50/50 ratio (or to your spice level preference)
4 Burger Buns, pan grilled
4 cups (or more) Oil for frying – Canola, Peanut, Corn, Sunflower – you pick
WET MIX
1 1/4 cups Buttermilk
1 teaspoon EACH: Paprika and Salt
1/2 teaspoon EACH: Onion powder, Garlic powder, Freshly ground Black Pepper, Cayenne
DRY MIX
1 3/4 cups All Purpose Flour
2 teaspoons Paprika
1 teaspoon EACH: Baking powder, Salt
1/2 teaspoon EACH: Onion powder, Garlic powder, Cayenne, Freshly ground Black Pepper
1. Lay chicken breasts on a flat surface and cover with a sheet of cling film (pinch around the edges so no juices escape). Pound with a rolling pin or mallet until even thickness, but not so much they start to tear apart. You're looking for around 3/4" thickness. If the breasts are particularly long you can cut off the very end of the tail to make them more circular and burger shaped (keep in mind they will also shrink slightly when frying).
2. In a large bowl, combine 1 1/4 cups buttermilk with 1 tsp each: paprika & salt and 1/2 tsp each: onion powder, garlic powder, cayenne pepper and black pepper. Place in your chicken breasts, use tongs to fully coat then tightly cover with cling film and marinate in the fridge. 4 hours minimum recommended or up to overnight. but just as long as you have time for.
3. Take the chicken out the fridge 30 minutes before needed to bring close to room temperature.
4. In a large shallow bowl, or pie plate combine 1 3/4 cups flour with 2 tsp paprika, 1 tsp each: baking powder & salt. Add 1/2 tsp each: onion powder, garlic powder, cayenne pepper and black pepper.
5. One by one coat the breasts in the flour, making sure you completely coat well. Really get in all the cracks and crevices of the chicken. Place to one side.
6. In a large pot, deep pan, or wok, heat up your oil to 180C/356F.
7. In batches of 1-2 (depending on pot size), carefully place your chicken in the hot oil. The temperature will likely drop, and that's fine, but make sure the temperature stays at around 165C/300F as the chicken fries. Depending on the size and thickness of your breasts you're looking at around 4-5mins on one side, then flip and continue frying until golden.
8. Carefully remove and rest on wire rack with paper towels underneath (don't place directly on paper towel or they'll lose crispiness). Bring oil temp back up to 180C/356F between each batch.
9. Stack burgers in the following order: bottom bun, lettuce and mayo, (or coleslaw) chicken, honey sriracha, top bun. ENJOY!
 Don't you just love making a robust celebration or taste and texture,
right in your own kitchen?! Munch on that!
by TheLastWonton | Jan 8, 2023 | Appetizers & Snacks, Main Dishes, One-Pan & One-Pot, Pasta & Noodles, Recipes, Sauces, Dips & Condiments, Sides, Vegetarian
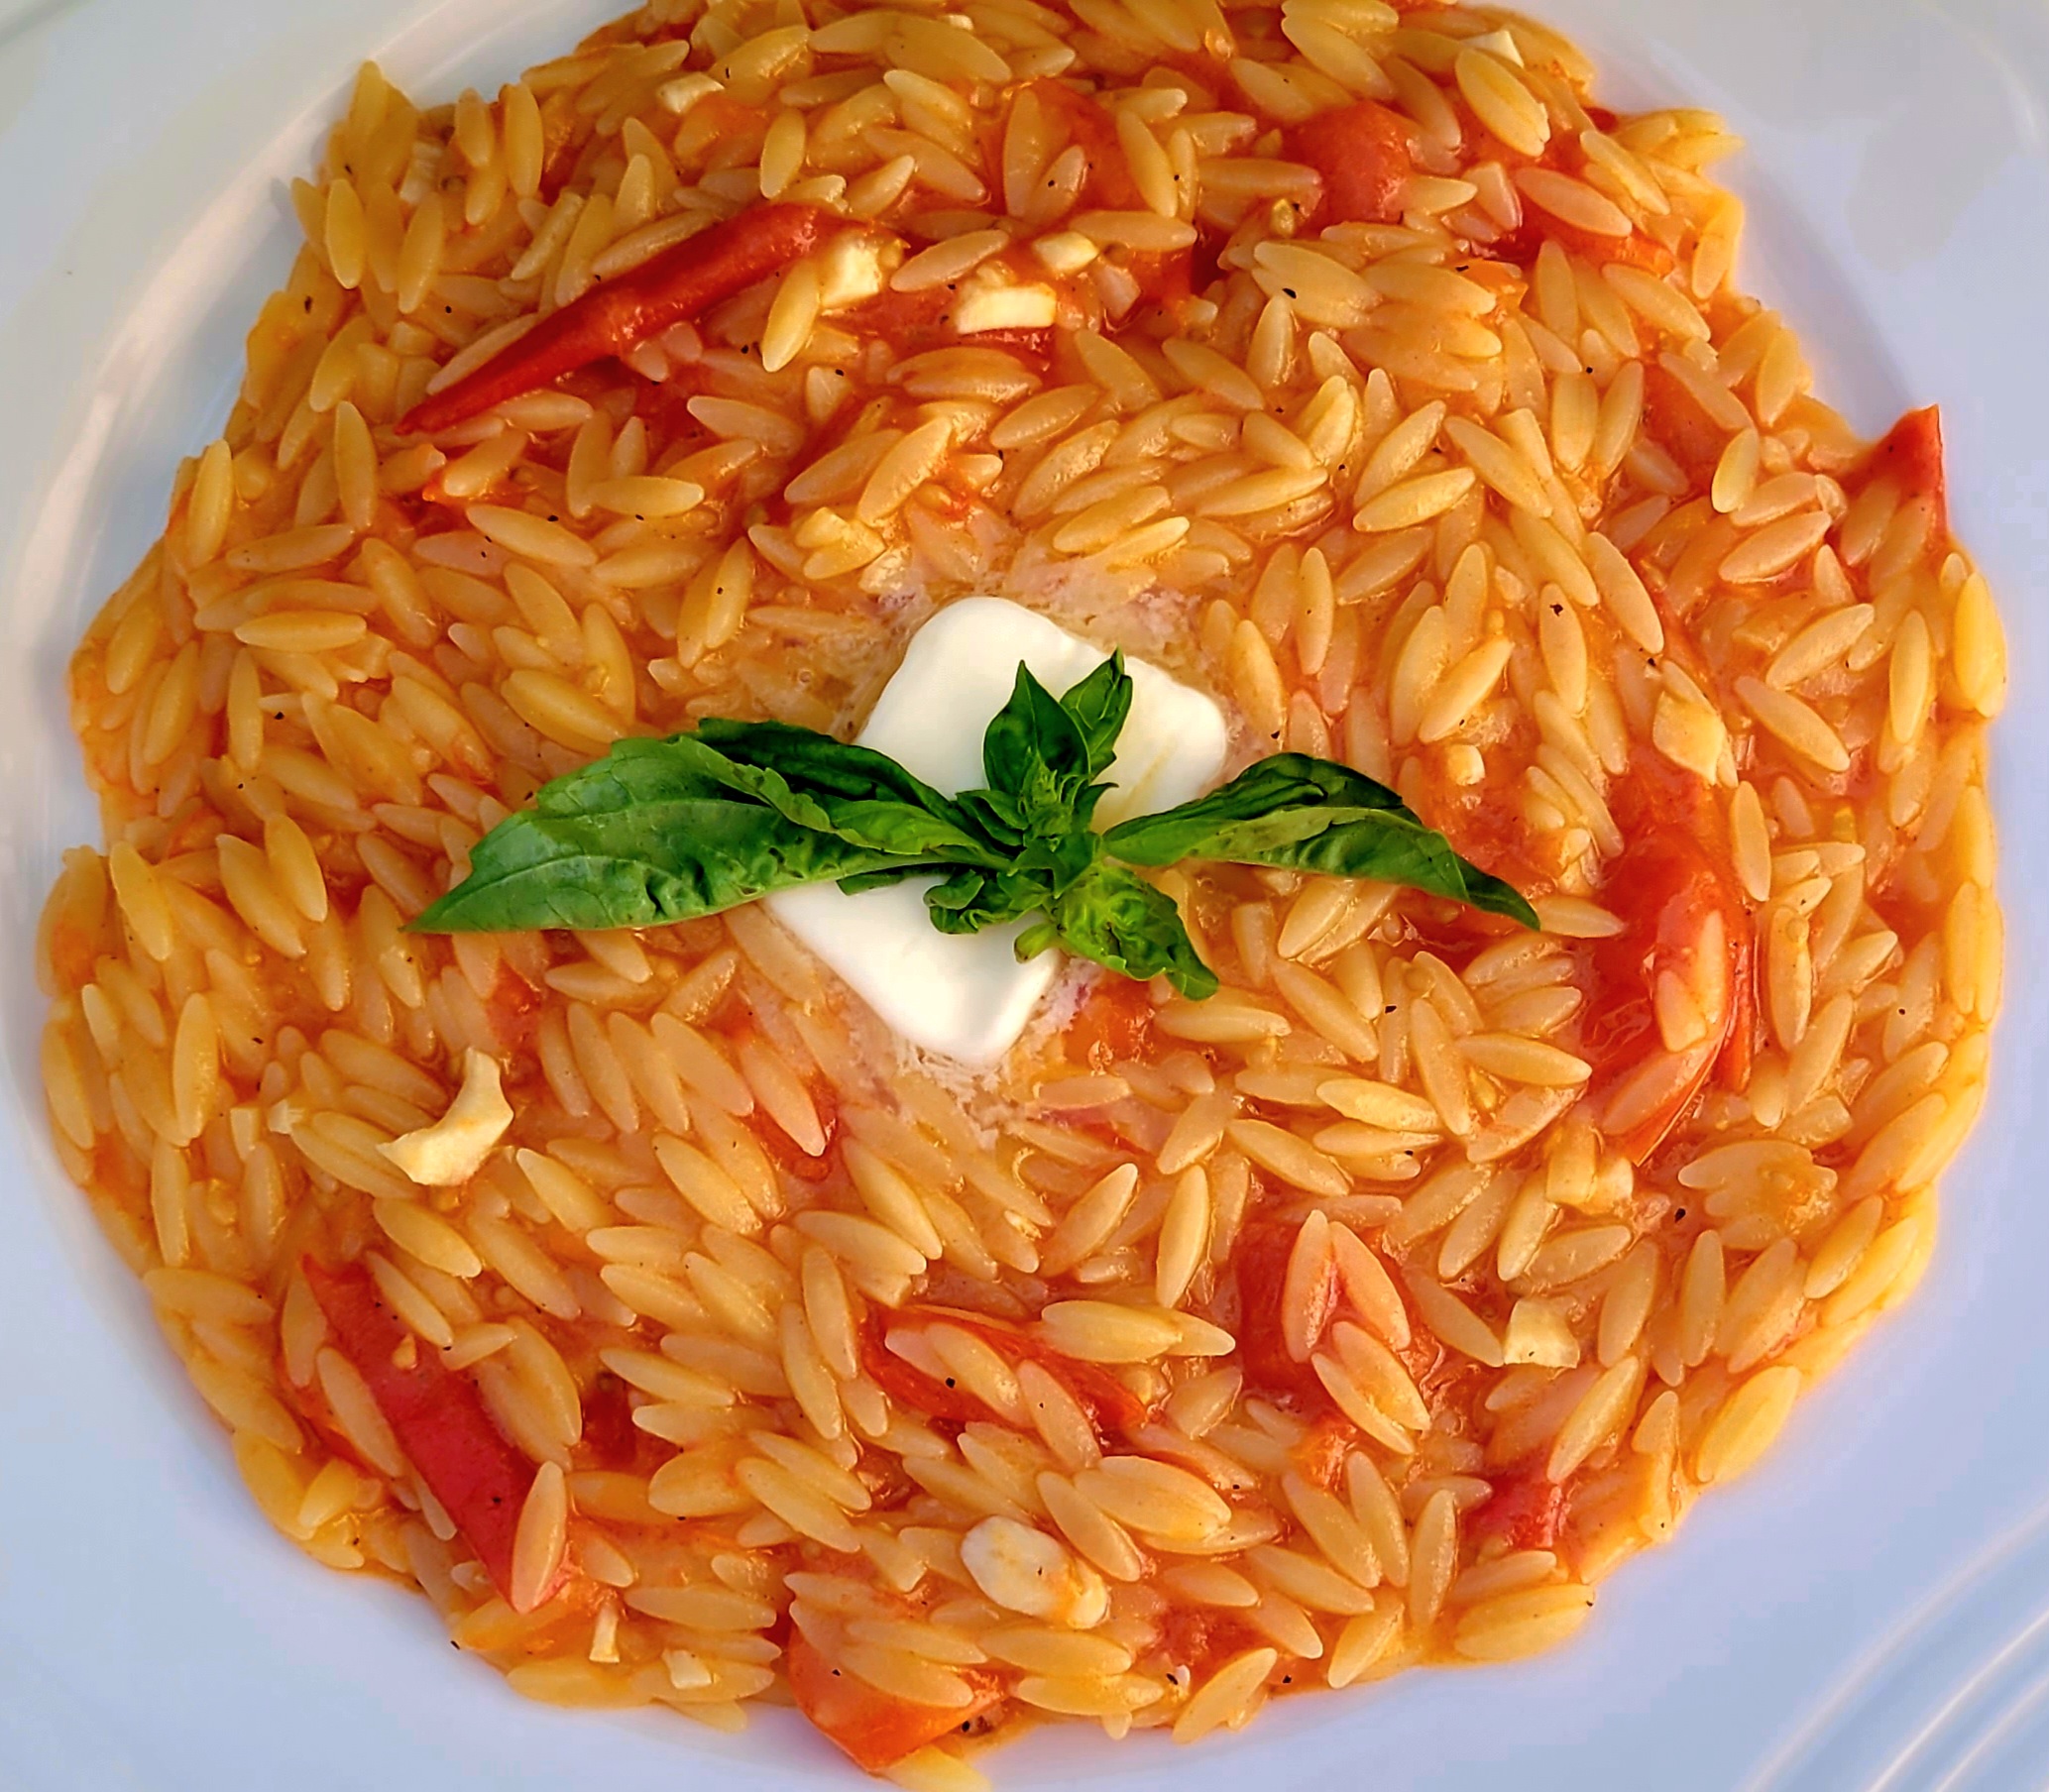
Sublimely simple pasta dish boasting the plush goodness of fresh tomatoes, the fragrant richness of toasted garlic and a wee, fiery, hot chili hit. Groovy!

One pan! And it comes together, wham-bam-thank-you-ma’am, every time. And, it’s just so, sooo, fresh tasting! Well, how could it not be?!
Fresh tomatoes – check, fresh cherry tomatoes – check , fresh garlic – check, fresh chili peppers – check, fresh basil – check!
And, of course, the cherry on top – a very subtle, indulgent, buttery finish. Plus, One Pan Tomato Orzo is great as a main course, or a hot diggity dog side dish. Bonus!
 This time around, making this recipe, that has become one of our favorites, I’m in our best-loved vacation spot – Kona, on the beguiling Big Island of Hawaii.
Which means the fresh, vine-ripened tomatoes I used are from the family owned Kawamata Farms in gorgeous Kamuela (Waimea), and the Hawaiian Chili Peppers from a garden, just over the way. I’m such a lucky duck!
Be sure that when you add your tomatoes to the pan, get right in there and mush, smoosh, mash, squish all that vine-ripened freshness into a glorious puddle of glistening flavour. I usually use a big spoon and a potato masher, but whatevah works for you.
As I mentioned One Pan Tomato Orzo is great on it’s own, but we’ve also come to savour it as a side dish with juicy grilled steak, tender roasted chicken, and even shrimp tempura. Boom-shaka-laka.
” Life is a combination of magic and pasta.” ~ Frederico Fellini

I love getting my plate of One Pan Tomato Orzo all tasty and lush with lots of grated
Parm, and less chopped Basil. Good thing is that Cliff looovvvesss fresh basil.
* * * * * * * * * * * * * * * * * * *
Many thanks to Mob Kitchen for this recipe inspiration
for The Last Wonton.
* * * * * * * * * * * * * * * * * * * * *
ONE PAN TOMATO ORZO ~ Serves 4
5 plump garlic cloves
5 tiny fresh Hawaiian chili peppers – or your chili of choice – or a sprinkle of dry chili flakes
Handful of fresh basil
4 plump, fresh tomatoes
250 grams fresh cherry, or grape, tomatoes (1 generous cup)
3 tablespoons butter, divided
500 grams orzo (just over 1 pound)
3 1/2 – 4 cups quality chicken, or veggie, broth
Sea salt and freshly ground pepper
Finely slice garlic and chili peppers. Chop basil. Quarter the large tomatoes.
Over medium heat, in large frying pan, add 1 tablespoon butter, sliced garlic and chili pepper. Gently fry for 2 to 3 minutes, stirring, until fragrant and garlic is toasty golden.
Add 1 tablespoon of butter to pan. Tip cherry tomatoes and quartered tomatoes into pan, season with salt and pepper. Cook for 10 minutes, mushing and smooshing the tomatoes, as they bubble and cook, adjusting heat if necessary.
Add orzo and 3 1/2 cups broth. Give it a good stir. Simmer for about 8 minutes, until al dente. If needed, add a bit more broth to the pan.
Season with salt and pepper. Add 1 tablespoon butter, and the chopped basil. Stir to combine. Spoon into bowls, or onto plates, serve and enjoy! Pasta la vista, baby!
by TheLastWonton | Jan 5, 2023 | Appetizers & Snacks, Main Dishes, Recipes, Seafood, Sides
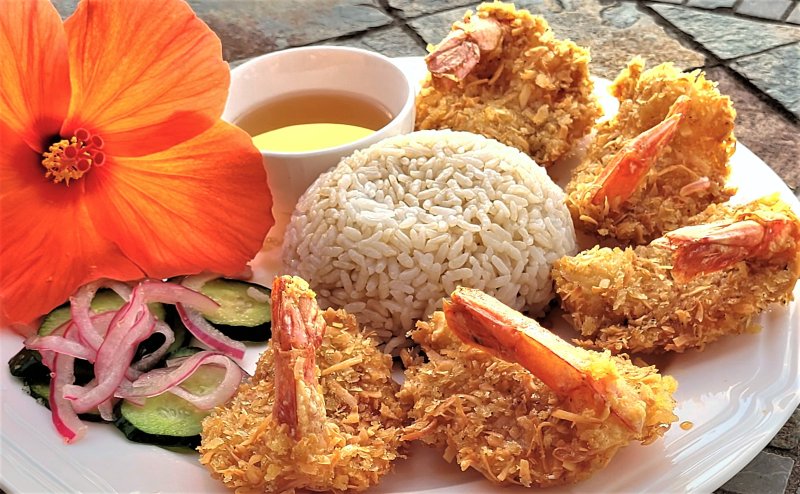
Enticingly golden, sweet, crisp-crispy finger food that will transport you to paradise, with just one bite. Chomp, chomp!
Oh how I love puttering, playing, and cookin' stuff up in a Kona kitchen. And then to go a step further and make some pupus (or lunch, or dinner!) that actually taste like paradise is as good as it gets.
A few days ago I came across a video of Matt Young, executive chef at the iconic, famed, restaurant, Duke's Waikiki, showing just how to make Duke's signature dish – Coconut Shrimp. I watched it a couple of times, then went back and watched it again, smiling bigger and more eagerly with every viewing.
That's it! I pulled out my old recipe notes on Coconut Shrimp I have made in the past but kept diverting to Duke's. And of course, by now, I have a big, ol' craving. My craving to cook certain things, is as hot-damn, as my cravings to munch. Lucky am I!
In no time at all I was zipping down to our local KTA grocery store to grab just what I needed. And whooeee, I found some 13/15 count, frozen, Wild Caught Red Argentina Shrimp, EZ-peel, tail-on. I possibly even giggled, on the spot, when I came across these shrimp.
Kona Coconut Shrimp you are about to become! 
Back to my Kona kitchen, I counted the shrimp out to thaw, and set up my 3-step breading station on the counter. First, flour for dredging the shrimp, then whisked eggs to dip in, before coating in a mixture of unsweetened coconut flakes and panko.
Wok ready, with a mixture of corn and canola oils – just because that's what I have on hand.
As this particular batch of coconut shrimp was for dinner I got some sticky rice going, and thinly sliced some red onion and local Japanese cukes to soak in Sunomono dressing for a bit. Dipping sauces were homemade Hawaiian Chili Pepper Water and Thai Sweet Chile.
Thanks for making me smile out loud Kona Coconut Shrimp!
* * * * * * * * * * * * * * * * * * * *
Big, big, Mahalos to Duke's Waikiki for this Shazam!
recipe inspiration, for The Last Wonton.
* * * * * * * * * * * * * * * * * * * * *

KONA COCONUT SHRIMP
1 pound jumbo shrimp (13-15 count)
4 eggs
1 cup flour, seasoned with a bit of salt and pepper
2 cups unsweetened coconut flakes
2 cups panko breadcrumbs
4 cups canola, corn or peanut oil, for frying
Peel and devein the shrimp, leaving tail on. With a sharp knife, make a narrow slice along the back of each shrimp to “butterfly” it.
You will need three small bowls. In the first bowl, add the flour and season with salt and pepper. In the second bowl, crack and whisk eggs. In the last bowl, mix together the coconut flakes and panko.
Working with one shrimp at a time, begin to crust the shrimp, coating well with each 'step'. Place shrimp in flour, then egg, then coconut mixture. Lightly press the coconut mixture on the shrimp, place on a plate. Continue this process until each piece of shrimp is coated.
In a deep sauté pan or wok, bring oil to 350 degrees. Gently drop shrimp into the oil and fry until golden brown, about 2-4 minutes, flipping shrimp halfway through. Remove with tongs or a slotted spoon. Look at that tropical texture, baby! Drain on a paper towel and serve immediately, with your favorite dipping sauces. Onolicious!
by TheLastWonton | Jan 4, 2023 | Appetizers & Snacks, Beef, Pork & Lamb, Breakfast & Brunch, Chicken & Poultry, Main Dishes, Recipes, Sauces, Dips & Condiments
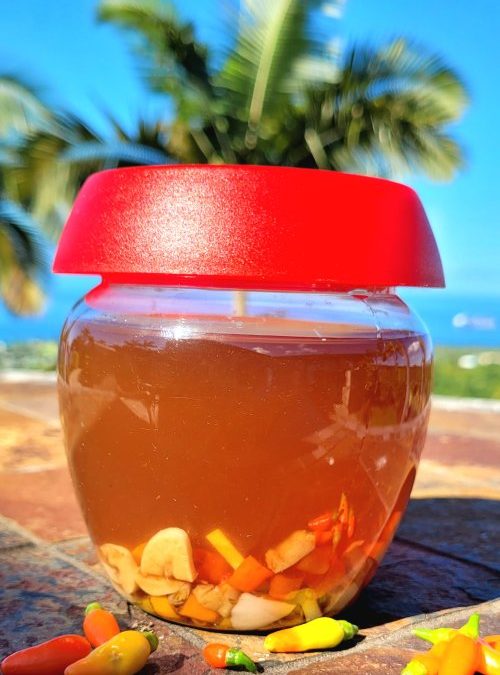
Splish, splash, drizzle, dip, dash! Hawaii's default hot condiment that most households and restaurants do their own way.

The most popular spicy condiment in Hawaii has been around for a good long time, whether it's Tutu's recipe or your favorite diner, down the street, it's just plain simple. And very Hawaiian. It's got a heck of a good kick of heat, without adding or changing any flavours of what you're eating.
So whether you dip your crispy fried tempura shrimp, drizzle on fried rice, splash that soup or stew, kick-up those pork chops, dash your poke, or whooeee your omelet, Hawaiian Chile Pepper Water is here for you. Versatility has made it a mainstay. In restaurants you'll often find it right beside the salt and pepper. Help yourself!
 "Hawaiian Chili Peppers are small peppers, growing up to an inch long on a large bush that can reach up to four feet high in height. The peppers grow pointing up to the sky. Hawaiian chili peppers mature to a bright red colour and are available year round.These small peppers are very big on spice, and rank high on the Scoville Heat scale ~ 50,000 – 70,000.
Look how many of those hot little buggers I can fit on an ordinary coaster!
If you can't get your hot little hands on Hawaiian chili peppers, then Thai chili peppers are a good substitute.
The ingredients for Hawaiian Chili Pepper water are simple, there is no wrong way, or right way, but many variations ~ water, chili peppers, garlic, vinegar, salt ~ some add fresh ginger, soy sauce. Play, until your taste buds jump up and down with spicy delight.
* * * * * * * * * * * * * * * * * * *
Big Mahalos to Keeping It Relle food blog, Pepperscale and Edible Hawaiian Islands
for your inspiration, explanations and all that jazz, for The Last Wonton.
* * * * * * * * * * * * * * * * * * * * *
HAWAIIAN CHILI PEPPER WATER ~ Makes about 2 cups
2 cups water
1/4 cup vinegar
2 teaspoons Hawaiian salt
10 Hawaiian chili peppers sliced (if you want more kick, add more chili peppers)
4 plump garlic cloves, sliced
1 hefty teaspoon shoyu (soy sauce)
Bring water to a boil, in a small pot. Reduce heat. Add vinegar, salt, chili peppers, garlic and shoyu. Simmer 10 minutes. Pour into sterilized jar. Refrigerate for 2 days, (let those flavours mingle) before splish splashing. Keep refrigerated.
(Hey Cliff, are those BBQ'd steaks ready yet?? Dippity Do!)
by TheLastWonton | Dec 14, 2022 | Appetizers & Snacks, Beef, Pork & Lamb, Breads & Sandwiches, Breakfast & Brunch, Burgers, Chicken & Poultry, Main Dishes, My Favorites, Recipes, Sauces, Dips & Condiments, Seafood, Sides
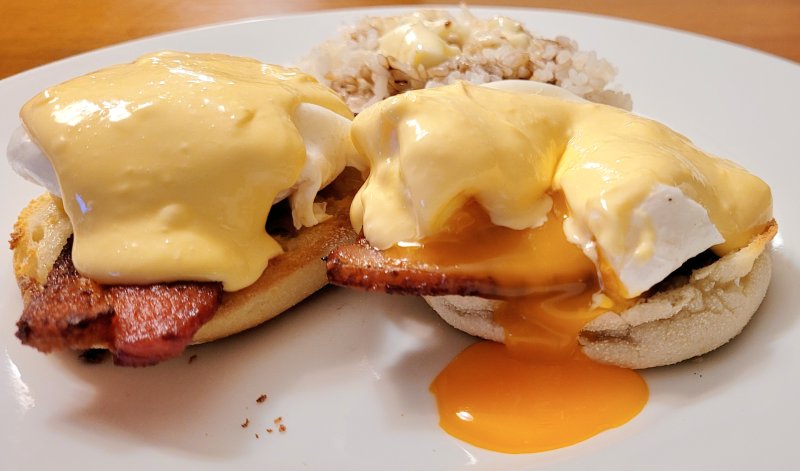
Yes, yes please! Quick and easy peasy, works-every-time, and comes together into a luxurious, seductive, rich golden, utterly buttery edible ode to joy. Welcome to the sunny side of life.
Since I found this recipe online, on Umami Girl food blog, I haven't been able to stop making it, whenever the occasion calls for it.
Once in awhile I used to make the ridiculously finicky, classic method and all that it entails. Sometimes it would work, sometimes not so much. But this immersion blender method works like a dream, every damn time. It's almost too good to be true. Yahoo!
And, just 6 ingredients ~ butter, egg yolks, lemon juice, hot water, Tabasco and salt.
As far as tips for perfectamundo results, use a 2 cup measure. I use a 2 cup measuring cup. Make sure your butter is bubbling, sizzling, hot. And that 1 measly tablespoon of water should be very hot, as well. The lemon juice, fresh, of course. And there you have it. Sublime, rich, buttery, softly tangy, deliciousness.
From here on in your steamed veggies, Eggs Benny, fish, steak and whatever else you can swoop with hollandaise will be singing your praises. Cool!
So what are you waiting for?

* * * * * * * * * * * * * * * * * *
Thanks to Umami Girl blogfor this celebration of taste, for The Last Wonton.
* * * * * * * * * * * * * * * * * * * * *
IMMERSION BLENDER HOLLANDAISE ~ Serves 4
2 large egg yolks
1 tablespoon fresh lemon juice
1/4 teaspoon fine sea salt
10 dashes Tabasco sauce
1 tablespoon very hot water
1/2 cup butter
Place egg yolks, lemon juice, salt, Tobasco, and water in a 2-cup glass measuring cup or the tall container that came with your stick blender. In a small pot, heat butter until fully melted and very hot and bubbly. Transfer butter to the 1-cup measuring cup for easy pouring.
Place the blender into the 2-cup measuring cup or the tall blender container, touching the bottom, and turn it on. Drizzle in the very hot butter in a slow, steady stream until it's gone. This should take 30 seconds to a minute and leave you with a beautifully emulsified Hollandaise sauce.
Boom-Shaka-Laka!

")


