by TheLastWonton | Apr 17, 2016 | Baking & Desserts, Breads & Sandwiches, Breakfast & Brunch, Fruits, Muffins
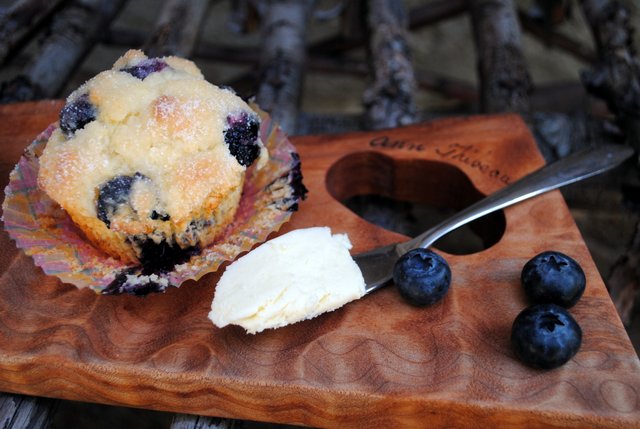
Tastes like Spring sunshine! Soft, tender, cakey muffins with blueberry-in-every-bite-innards and a sparkly, buttery, lemon sugar crown.
I know, right?! Yum!
This is one of my lonnngg-time, stand-by recipes that I have been making forever.
In my olden days, I was gloriously influenced by what was, at the time, THE cookbooks. You might say, the Best of Bridge series set the standards for Canadian cookbooks. The recipes were (are), if not straightforwardly easy, definitely user friendly and enticingly do-able.
So I did! I think we all did. From Cashew Pork Tenderloin, Mexican Antipasto, Death to Dieters Chicken Lasagna to Eggnog Supreme and Whipped Shortbread, and back again. From down home comfort, to impressive dinner party goodies, to cherished holiday recipes.
And of course, let's not forget that little added je ne sais quoi…….every one of the books in this series is sprinkled with smile inducing little quips.
Stick float. They wood.
There is one advantage in being married. You can't make a fool of yourself without knowing it.
A boiled egg is hard to beat!
Summer is that time of year when children slam the doors they left open all winter.
Thanks oodles Best of Bridge ladies for the amazing gift of being able to cook happy and end up with deliciousness every time, decades later.
And Mom, up there, for sparking the passion to cook, bake and make……besides all the effortless inspiration you imparted to keep on hand-crafting lusciousness, as often as possible, thanks for plying me with every new Best of Bridge cookbook as soon as it came out.
Which brings us back to blueberry muffins, from 'Enjoy' the second cookbook compiled by the Best of Bridge ladies, first published in August 1979.
I'm not kidding either, these golden muffins, kissed with deep purple stains, really do taste like sunshine. And they talk, too. Huh? Yup!
When you take the perfectly crusted, baked muffins out of the oven and set them on the counter to cool, before long you'll hear a bit of a whisper.
 "Pardon," said I today to Forest Grump, forgetting that my muffins were on the counter cooling.
"I didn't say anything", replied Forest Grump.
"Aaaaahhhh, that's okay", I said, "it was the muffins."
'Uhh-huhh!', said Forest Grump silently relaying the sentiment with body language only……..a strange enlarging of his eyes, raising of his eyebrows, and then dismissively turning away from me.
Louder now, from the counter top, "Adorn us! Please, Juuuudiiii adorn us!"
Right-o! Time to dip, swirl, swoop and….Ta-da!!…..sugary, lemony, buttery, sparkly crowns. Adorned!

* * * * * * * * * * * * * * * *
You may notice that beautiful board that my muffins are lazing on.
A big thanks to Ann & Moe from Thibeault's Table for their amazing
hand-crafted wooden cutting boards and table art.
* * * * * * * * * * * * * * * * *
SUPER BLUEBERRY LEMON MUFFINS – Makes 12
The only thing I've changed from the original recipe is that I cut back on the melted butter in the topping, just a bit, so that I can add the juice of the 1 lemon that I use for zest in the muffins. And I up the quantity of blueberries, a bit.
2 cups flour
1/2 cup sugar
3 teaspoons baking powder
1/2 teaspoon salt
Grated zest of 1 lemon
1 egg
1 cup milk
1/2 cup butter, melted
1 very generous cup fresh blueberries (frozen work fine too)
Topping:
1/3 cup butter, melted
Juice of 1 lemon
1/3 cup sugar
Preheat oven to 425F degrees. Line muffin pan with paper liners.
Mix flour, sugar, baking powder, salt and lemon zest in large bowl. Beat egg in medium sized bowl, add milk and butter. Add egg mixture to dry ingredients. Stir until just mixed (batter will be lumpy). Stir in blueberries. Fill muffin pans 3/4 full and bake for 18-20 minutes.
Topping: Combine melted butter and lemon juice in small bowl. Measure sugar in separate dish. Take slightly cooked muffins and swirl and swoop into lemon butter and then sugar. Ta da! Adorned and ready to scarf down.
And in the 'Bestselling' words of the ladies of the Best of Bridge, "ENJOY!"
by TheLastWonton | Apr 17, 2016 | Asian, Beef, Pork & Lamb, Main Dishes, Veggies
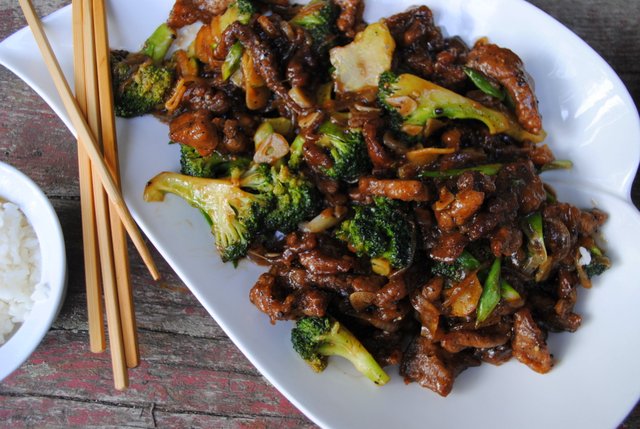
Chinese take-out, without leaving home……tender, delightfully crusty steak strips, cuddled up with al dente broccoli, cloaked in a sauce boasting the tang of garlic and fresh ginger, with an earthy punch of black pepper.
Next time I think I'll leave out the broccoli and try it with some fresh tomato quarters. Yeah, Mongolian Black Pepper Tomato Beef. Something tells me that the 'base' recipe here will be very versatile to play around with.
But, first things first. This rather tasty dish which effortlessly oozes a medley of flavours and textures is a true schmucking together of 3 recipes. I studied, I read and re-read, and then I started to meld the enticingly tasty sounding Mongolian Beef from The Woks of LIfe, Stir Fried Beef with Black Pepper from Viet World Kitchen and Steamy Kitchen's Chinese Broccoli Beef Noodle Stir Fry. Not that each one of these dishes wouldn't be rather scrumptious on their own, but I was on a mission you might say. And, golly gee, I think I hit paydirt!
And, I got to velvet. So if anyone asks me, 'What did you do yesterday?" I get to say, "I velveted!".
Velveting meat or poultry is maybe one of the best-kept Chinese restaurant secrets. There seems to be at least a handful of varying methods, but the end result should always reap juicy, tender, big flavour, meaty bites. Okay, okay, so maybe not a secret, so much as a technique that we home cooks don't often use.
Velveting involves marinating thin strips of meat in a base mixture of saltiness, liquid and cornstarch for at least 30 minutes to ensure every smidgeon of the meat is coated with the slurry. This layer of cornstarch forms a shield against the heat of the pan and prevents the moisture inside the meat from escaping when flash fried. The outside of the meat cooks zip-zap-quickly in the hot wok sealing in the meats' juices. Tender tastiness captured!
I did one little extra step of dredging the marinated steak strips in cornstarch, right before frying. That worked.
This is one of those recipes where you can get everything ready ahead of time, in little bowls, making it easy peasy to stir-fry when it's time for dinner. Bonus! And you get to velvet!
* * * * * * * * * * * * * * * *
Many thanks to The Woks of Life, Viet World Kitchen and yes, once again
The Steamy Kitchen for such delectable inspiration.
* * * * * * * * * * * * * * * * *

MONGOLIAN BLACK PEPPER BEEF BROCCOLI – 4 servings
1 pound ribeye (I pick well-marbled ribeye anyday!), tenderloin, or top sirloin steak, sliced against the grain into thin (1/4-inch thick) slices
Velveting mixture:
2 tablespoons Shaoxing wine, sake or extra dry white vermouth
2 tablespoons cornstarch
1 tablespoon dark soy sauce
2 teaspoons canola, corn or veggie oil
3-4 cups broccoli florets, par-steamed 4-5 minutes, set aside to cool
6 thin slices fresh, peeled, ginger root, halved
3 plump garlic cloves, thinly sliced
1/2 medium sweet onion, diced chunky
1 1/2 tablespoons coarsely ground black pepper
3 green onions, cut into 1/2 – 1 inch long pieces, sliced on the diagonal
Sauce:
3/4 cup chicken broth or water
1/4 cup dark soy sauce
3 tablespoons oyster sauce
3 tablespoons Shaoxing wine, sake or extra dry white vermouth (I used vermouth in both the velveting mixture + sauce)
2 tablespoons brown sugar
1 1/2 tablespoons cornstarch
Additional 1/2 cup cornstarch
About 1/3 – 1/2 cup canola, corn or veggie oil
In a medium bowl combine the steak strips with the velveting mixture ingredients. Marinate beef 1 hour.
Meanwhile, near your stove, set out par-steamed, cooled broccoli, sliced ginger, garlic, onion, black pepper and green onions.
Mix all sauce ingredients together in small bowl.
Put 1/2 cup cornstarch onto plate, for dredging the marinated beef.
Wok, ready.
Dredge the meat in the cornstarch, coating evening and shaking off excess. Heat oil in wok, on high. Just before the oil starts to smoke, spread 1/2 of the beef as evenly as possible in wok, and let sear for 1 minute (depending on the heat of your wok). Turn over and let the other side sear for another 30 seconds. Remove beef to sheet pan; tilt it slightly to let the oil drain to one side (lean on a cookbook or cutting board). The beef should be seared with a crusty coating. Repeat with the rest of the beef.
Drain all but 2 tablespoons oil from wok and add onion. Stir-fry for about 30 seconds to 1 minute, then add garlic and ginger, adding a tablespoon or so of oil, if needed. Stir fry another 30 seconds to 1 minute and add sauce, stirring as you do. Bring the sauce to a bubble, add broccoli and turn to coat in sauce. Stir fry about 2 minutes so broccoli is heated through, adjusting heat if necessary.
Add beef, black pepper and green onions and toss everything for another 1-2 minutes. Serve immediately with hot steamed rice. Mmmm……Velvety!!!

by TheLastWonton | Apr 14, 2016 | Appetizers & Snacks, Beef, Pork & Lamb, Greek Food, Main Dishes
Tender, crusty edged, oven-roasted ribs, touting an almost addictive pow of garlicky lemon-ness.
The first time I had Greek-ish ribs I was in my 20's.
At the time, Forest Grump and I were eager, rather hard-working, dedicated restaurateurs, doing it 'our way', at Chianti's. Those were the days, my friends.
But, I digress. Back then, on those rare evenings when Chianti's was closed, or sometimes when we managed to sneak out, lock up and get away a bit earlier than usual, we made a beeline for our fave little Greek restaurant, Talos.
Mmmm.….indulgent memories crowd in…..smooth hummus, dilly tzatziki, warm pita, creamy feta, briny calamatas, flaky spanakopita and bodacious retsina, that Paulo would lay out on our table, still makes my mouth water.
But my absolute fave was their salty, lemony, garlic-blasted ribs. Boom-shaka-laka delicious!!
Since those glory days, a few life chapters back, I've toyed with quite a few incarnations of those Talos ribs. And you know, whether done in the oven or thrown on the grill, I've decided, with a great deal of expertise (so to speak) Greek ribs are just damn good.
Last year I came across these particular Greek Ribs from the blog Art and the Kitchen. Since then I've made them quite a few times, usually for appies. But they're good too, as a main course, served with Greek salad and some cheesy orzo.
I've made a small handful of subtle changes to the original recipe, and used both back and side ribs. You can't go wrong, either or work tickety boo and turn out finger lickin' good.
The feisty flavours imparted into the ribs from this marinade will make your tastebuds grin. And that initial blast of high heat, in the oven, helps create those irresistible, crusty edges, that act as the perfect counterpart to the rest of the rib meat that is tender, but still boasts a satisfying bite. Right before you serve these babies up, hot from the oven, squeeze a good schwack of lemon juice over them. Yum-O!
Thanks Art and the Kitchen for this delicious rib recipe.
* * * * * * * * * * * * * * * * *
"Not what we have but what we enjoy, constitutes our abundance."
~ Epicurus
* * * * * * * * * * * * * * * *
ROASTED GREEK RIBS – 4-6 Appetizer servings
3 pounds baby back ribs (or side ribs)
4 tablespoons fresh oregano, chopped – or 2 tablespoons dried oregano
1/2 cup sweet onion, finely chopped
6 plump garlic cloves, minced
Finely grated zest from one lemon
1/3 cup fresh squeezed lemon juice
1/4 cup olive oil
2 tablespoons runny honey
1 tablespoon sea salt
1 teaspoon freshly ground black pepper
Pinch (or more) dried, crushed red chilies
Fresh lemon for squeezing on cooked ribs, before serving
Remove skin membrane from ribs. This is not an absolutely necessary step, but if left on the membrane can sometimes make your ribs a little tough. Using a sharp knife slice under the skin, on the back on the ribs, and pull skin off meat. Cut into single ribs.
Combine all other ingredients in bowl and mix well.
Place ribs and marinade in large ziplock bag, shake, shake, mix, mix and refrigerate 2-6 hours, turning occasionally to ensure all sides of the ribs get seasoned, all happy. *Don't leave the ribs in the marinade for too long, as the lemon can change the texture of the meat.*
Preheat oven to 400F degrees. Line large cookie sheet with foil, spray or grease with olive oil, place ribs on pan, with spaces between each.
Bake at 400F degrees for 10 minutes to get a nice sear on the ribs.
Reduce heat to 300F degrees and roast for 50-60 minutes, until cooked through. Do not overcook. Squeeze fresh lemon juice over the ribs before serving hot from the oven. Boom-shaka-laka!
by TheLastWonton | Mar 21, 2016 | Baking & Desserts, Fruits, Hawaiian, Treats
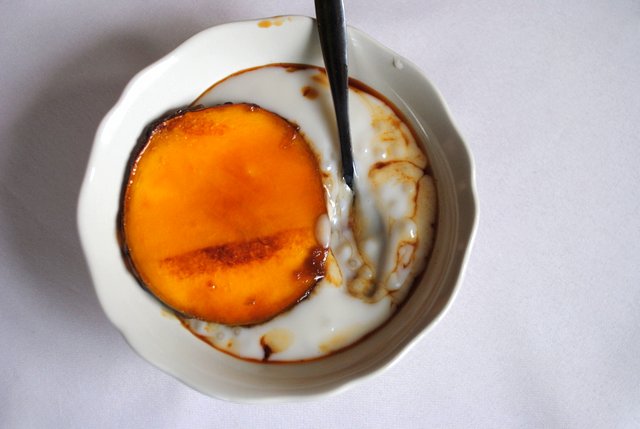
Crystalline tapioca beads, boasting chewy deliciousness, suspended in a creamy, coconutty pudding crowned with the exotic, warm sweetness of caramelized fresh mango. Tastes like Hawaiian sunshine in your mouth!
Tapioca pudding. It's retro, old-fashioned, brimming with sweet, smooth childhood-memory goodness.
But, then again, it's hip and divinely indulgent whether for a snuggly, rainy, Spring eve or served up all pretty for company, easily urging muffled oohs and aaahs, from dinner guests.
And look, look! This is so cool!
Look what it's made from….all the ingredients…… E V E R Y T H I N G G R O W S ……..from the good 'aina (earth, land)

Coconut Milk

Tapioca Pearls made from Cassava Root

Pure Cane Sugar and Brown Sugar

Fresh Squeezed Lime Juice

Pure Vanilla Extract made from Vanilla Orchids

Fresh Mango Cheeks
See!!! I told you it was cool.
This pudding oozes delicious, creamy coconut-ness, unadorned, but when dressed up with those fragrant, freshly pan-caramelized mango cheeks, it turns that classic, old dessert we used to know into mouthfuls of tropical, sweet indulgence.
And it's so easy to make! 
The best tapioca pearls to use for this recipe are quite small, but not those teeny weeny ones. And, as mentioned, most usually called 'Tapioca Pearls', but sometimes 'Seed Tapioca'. This size is perfect for this recipe, as it requires no soaking, so you can whip up some pudding on a whim. No matter what, that's always a good thing.
The photo to the right shows the tapioca pearls I usually use, resting in a teaspoon, to give you an idea of the size of those tasty little orbs.
When I first started playing with this recipe, we were happily whiling away our days and nights in Kona Coffee Country, so my experimentation with toppings took a definite Big Island twist. Every version of topping that I have tried so far, all worked perfectly with the tapioca…….sliced, fresh apple bananas dipped in lime juice, then finished with a good splash of dark Maui rum……grilled pineapple spears drizzled with warm butterscotch sauce……fresh, tart, tangy lilikoi (passionfruit) pulp scooped right on top and marbled into the pudding.
All versions are as good as the original, although, I must admit there is something overly alluring about 'caramelized mango cheeks'.
As this easy-to-make dessert has already pretty much become one of those go-to recipes around our house, I see tapioca puddings, in my future, adorned with fresh-picked Okanagan berries, quickly caramelized fresh cherries, plump peach slices splashed with slightly warmed brandy……Mmmm.
When you decide to give this pudding a try, go crazy, have your way with the toppings, this recipe begs you to play. But no matter what, do try it with the caramelized mango cheeks sometime. It'll make your tastebuds smile.

* * * * * * * * * * * * * * *
Thanks to Donna Hay magazine for inspiration for this great recipe
* * * * * * * * * * * * * * *
COCONUT TAPIOCA WITH CARAMELIZED MANGO CHEEKS – Serves 4
2 – 400ml.(13-14 ounces each) cans good quality coconut milk
(shake the can and make sure the milk is not too watery)
Generous 1/4 cup small tapioca pearls
1/2 cup sugar
2 tablespoons fresh lime juice
1/2 teaspoon pure vanilla extract
4 mango cheeks
1/3 cup brown sugar
8 or more tablespoons water
Place the coconut milk, tapioca pearls and sugar in a medium saucepan over high heat and cook, stirring frequently. Bring to a boil, reduce heat to medium or medium-low and cook, stirring constantly, for 18-20 minutes or until the tapioca is clear and cooked through.
Stir in the lime juice and vanilla until combined and allow to cool slightly. Scoop pudding into small bowls or dessert glasses. Can be made ahead to this point.
Press the mango cheeks in the brown sugar. Heat a large, non-stick frying pan over high heat and cook the mangoes, cut-side down, for 2-3 minutes or until caramelized and very slightly browned. Remove mango cheeks from pan. Immediately add water to the pan, and as it bubbles, swirl the pan to create a syrup with the caramelized sugar. Swirl, swirl, swirl.
Top each pudding bowl with a mango cheek and drizzle with the pan juices to serve. 'Ohoiho! Enjoy!
by TheLastWonton | Mar 12, 2016 | Appetizers & Snacks, Salads & Bowls, Sauces, Dips & Condiments, Sides, Veggies
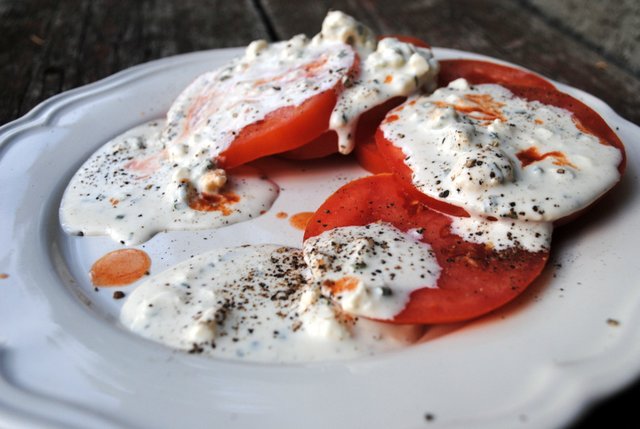
Cheesy, creamy, gloriously pungent, old-fashioned, homemade Blue Cheese Dressing that will make you go "Mmmmm".
I'm soooo glad I happened upon this dressing recipe whilst browsing about on Food52.com. Though I took just a few wee liberties to hone this recipe to make it to our liking, so that our taste buds grin foolishly with each bite, the original "Basic, Bang Up Blue Cheese Dressing" hit the spot when it comes to inspiration. 
This is that familiar, old-fashioned, creamy goodness, that we all know, amped up with a cheeky balance of boldness, an innuendo of honey sweetness and a delightful pow of heat, the combination of which almost, well actually most certainly, taunts the senses.
Since I started to make this recipe a couple of years ago we've found we love this blue cheese dressing on fresh heirloom tomatoes, or as dip for cucumber spears or crispy hot wings or zucchini fritters, slathered on BBQ'd steak or a hefty BLT, tossed with grilled fresh corn off the cob, or of course, draped over a crunchy wedge of iceberg with a crown of bacon bits, a la retro steakhouse.
I've also found that this institution of a dressing is pretty much flawless of it's own right. Play with it. Tweak the texture or seasonings to suit your fancy of the moment. I'm pretty damn sure that the results will always scream, "Dig in!"
* * * * * * * * * * * * * *
"Many's the long night I've dreamed of cheese – – toasted, mostly."
~ Robert Louis Stevenson
* * * * * * * * * * * * * * * * *
CHUNKY BLUE CHEESE DRESSING – Makes about 1 1/2 cups
4 ounces blue cheese (sometimes I use Gorgonzola), crumbled or chunked or mashed with a fork
2/3 cup mayonnaise
1/4 cup sour cream
1/4 cup well shaken buttermilk, or 2 tablespoons fresh squeezed lemon juice combined with 2-3 tablespoons milk
2 tablespoons white wine vinegar (plain white vinegar is fine, too)
1 tablespoon runny honey
1 generous tablespoon minced fresh, or freeze dried chives
Freshly ground black pepper
Tabasco
Mix the mayo, sour cream, buttermilk, vinegar and honey in a small bowl, whisking to combine. Stir in the blue cheese and chives. Season with a good little schwack of black pepper, to taste. Now you can add a few shots of Tabasco and just stir a bit to create some pinkish streaks, or mix it in to create a very slight pink tinge, or wait and splash some dabs of Tabasco on top of the dressing when you serve it up. You pick, you can't go wrong.
You can use the dressing right away, but it gets better if you let it rest in the fridge for a few hours so that all those ingredients mingle and get happy, happy. Mmmmm……

 "Pardon," said I today to Forest Grump, forgetting that my muffins were on the counter cooling.


