by TheLastWonton | Mar 8, 2015 | Appetizers & Snacks, Mexican, Sauces, Dips & Condiments, Sides, Vegetarian, Veggies
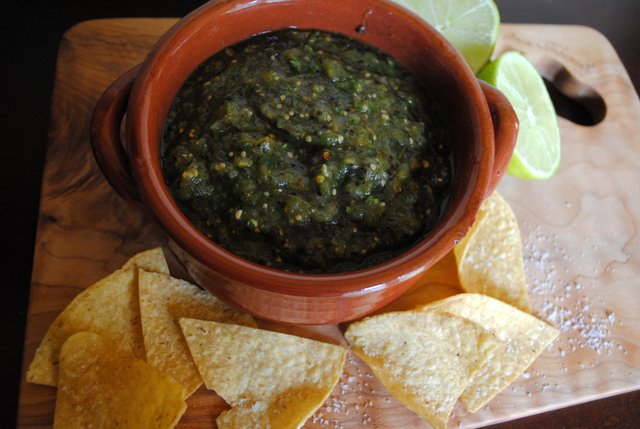
An addictively bracing green salsa that vibrates with the deep char goodness that comes from roasting the tangy tomatillos, fiery jalapenos and serranos, sweet onions and mildly smoky poblanos. Olé!
It's just about Spring. Zip-a-dee-doo-dah-zip-a-dee-ay!
With this delightful announcement comes an impossible-to-resist prerequisite to raise our needy little faces to the warming sunshine, to briefly bask, as we effortlessly feel easy gratitude for renewal.
My forest yard is coming alive. It's a squirrel-scurrying, deer munching, bird twittering festival out there.
Now that the snow and chilly willies are gone, and fingers of sunlight and warm breezes play about, it seems Mother Nature herself, is smiling upon us. The trees eagerly sway to a song known only to them. Thriving leaf and flower buds arrive daily on some vine here, or some bush there, new green shoots are pushing up from the forest floor and tender soft new needles are popping out at the tip tops and very ends of branches on the fir trees.
Green, glorious green, is the order of the day. Verde, baby!
So when I saw plump, firm tomatillos and shiny, fresh poblanos in the supermarket, I knew exactly what I was going to make. And I'm so glad I did.
Whether you just want a crispy tortilla chip and salsa fix, or you've got tacos or quesadillas in mind, this salsa rocks. Yup, it does! It's almost fantastico.
Whatever your oh-wouldn't-that-be-perfect-with-salsa cravings are at the moment, I daresay I've got the remedy for you. And, bonus, it's all happy and green and vibrant, just like Spring.
First of all, get your hot little hands on some fresh tomatillos, poblanos and serranos…

Peel, chop, roast. El yumo!

Throw into a food processor with some cilantro, lime and salt. Buzz, buzz. Arriba! Arriba!

Más por favor!! More, please!!!
* * * * * * * * * * * * *
Thanks to Buns in My Oven Food Blog for inspiration for this recipe
* * * * * * * * * * * * *
ROCKIN' ROASTED SALSA VERDE
If you want a kicky hot salsa, you know, hot-baby-hot, just add more jalapenos or serranos. But of course, it always depends on the heat of each and every pepper, as they vary widely. This is the usual combination of peppers that I use, which makes a hot salsa, but not HOT salsa
2 pounds tomatillos
1 nice large, firm, dark green poblano pepper
1 jalapeno
2 serrano peppers
1/2 large sweet onion
1/3 cup fresh cilantro
Juice of 1 plump, juicy lime
1 teaspoon sea salt
Heat your broiler on high.
Remove the husks from the tomatillos and rinse off any sticky residue from the skins. Slice the tomatillos in half and place on large baking sheet, cut side up.
Slice jalapenos and serranos in half, lengthwise. Remove seeds and membranes from the inside of the peppers for a milder salsa. Leave seeds and membranes intact for a hotter salsa. I always leave my peppers intact. Place pepper halves on the baking sheet with tomatillos.
Place the whole poblano on the baking sheet.
Cut the onion, into large chunks and scatter over baking sheet.
Broil for 10-20 minutes or until charred. (I almost always broil for 19 minutes to get the 'right' char.) Place the poblano pepper in a plastic or paper bag and seal. Let sit for 10 minutes to steam. Remove from bag carefully and peel the skin from the pepper.
Add the tomatillos, jalapeno, serranos, poblano, onion, cilantro, lime juice and salt to a food processor or blender and buzz, buzz, until smooth.
Cool before serving, if you can wait that long. We never can!
Store covered in fridge for up to 1 week.
by TheLastWonton | Mar 8, 2015 | Baking & Desserts, Breads & Sandwiches, Breakfast & Brunch
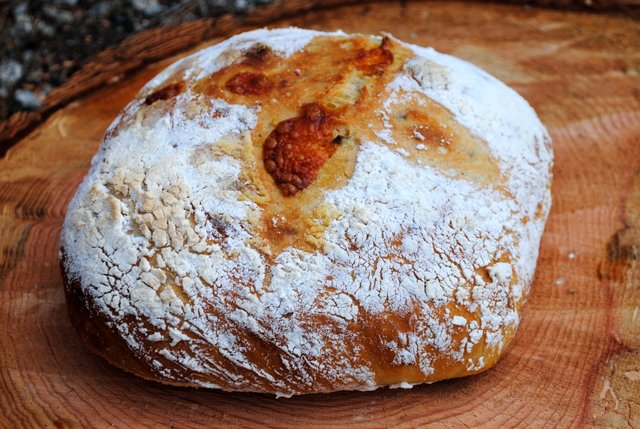
This easy peasy, no-knead bread with its crackly thin brown crust, that crunches between your teeth, and it's holier than thou, slightly chewy texture, ruggedly begs to be slathered in frigidly hard butter, and quickly munched, whilst still warm-from-the-oven.
This bread……..Oh Mama!……this bread is so good!
But wait! Even better. Well not better, but just as important. This bread……is ridiculously easy. Seriously, easy.
And forgiving.
This time I added little chunks of Cheddar and fresh chives. And just look at that beauty.
Sometimes I add oodles of nutty, roasted garlic cloves and gratings of tangy Asiago. Sometimes I add ribbons of caramelized sweet onions and wee cubes of creamy Havarti. Sometimes I add melt-in-your- mouth little chunkers of perfectly fried Hot Pancetta and chopped fresh basil.
Sometimes I just stir it up, naked, as it is, without adding a thing. But this is usually when I have a bigger plan for my favorite artisan bread. Toast. Yup! Oh…….my…….goodness.
This bread makes the best damn toast, ever. With anything spread on it….from thin slices of triple cream Brie, to tangy apricot jam, to plain old ordinary peanut butter, to that sharp McLaren's Imperial cheese topped with a layer of homemade crabapple jelly. (soft, happy moans) Oh sorry!! I get so easily carried away on the toast thing, with this bread.
Needless to say, besides flippin' delicious and easy, it's pretty much no fail as well. Is this the bread of our dreams? No kneading, or fiddling. No special ingredients, or mind challenging techniques. Just a smidgeon of effort and a little unattended waiting.
Let's do it!
 I just mix everything up in this 7 1/2 quart plastic container
that I got from SuperStore.
Then I plop on the lid, and let it sit all happy on the counter, in a cozy, warm spot, for about 3 hours.
Now, it's time to get tucked away in the fridge overnight, or for up to 24-48 hours. I told you this bread was cool!
The chilled resting seems to give the dough that certain je ne sais quoi that makes this bread so delicious, and deeply textured.
An hour or so before you're ready to bake the bread, sprinkle a bit of flour on the counter and on your hands and plop the sticky dough onto the counter. Coat the dough a bit with the flour, just enough to tame it's stickiness, making it easy to handle and shape.

Cut the dough into two halves, shaping each one roughly into a ball. Place on prepared baking sheet, inches apart, sprinkling generously with flour.

(You can also bake one at a time, saving the dough in the refrigerator for another day.)
Cover gently with a clean towel and let rest on a baking tray for 30-45 minutes. Right before placing in the oven score top of bread with an "x" or other decorative mark, cutting right through the dough.
Bake 30 minutes. Remove from oven and let cool 15 minutes before slicing. (If possible!)

I know, I know, it makes you want to rhapsodize, doesn't it?
Ha! Maybe this bread is a rhapsody!!! In and of itself. Let's see…
rhapsody – noun rhap·so·dy ˈrap-sə-dē
: a piece of music (sub. bread) that is meant to express a lot of emotion and does not have a regular form
: a written or spoken expression (sub. loaf of bread) of great enthusiasm, praise, etc.
* * * * * * * * * * * * *
Thanks Noble Pig food blog for yet another delicious recipe inspiration!
* * * * * * * * * * * * * *
EASY ARTISAN CHEESE CHIVE BREAD – Makes 2 round loaves
2 tablespoons dry traditional yeast
3 tablespoons sugar
3 cups lukewarm water (body temperature is perfect and will not damage the yeast)
5 to 5 1/2 cups bread flour – and a bit more for dusting
1 1/2 tablespoons sea salt
1 cup (or more if you're cheesy) sharp Cheddar, cut into small chunks
1/4 cup finely chopped fresh chives, or 2 tablespoons dried chives
1 tablespoon butter
1 – 2 tablespoons yellow cornmeal
Add yeast and sugar to your bowl, or dough mixing/rising container. Pour in warm water and give a bit of a stir with a wooden spoon. Let rest for 5-10 minutes.
Add 5 cups of flour and the salt. Start mixing with a wooden spoon, use your hands as necessary to fully combine the dry and wet ingredients. Mixture should be very sticky. Stir in up to 1/2 cup more flour, if needed.
Toss in Cheddar cubes and chopped chives, and work into the dough to evenly distribute.
Cover dough with plastic wrap or container top and set in warm place to rise for at least 3 hours. After 3 hours place dough in the refrigerator overnight.
An hour or so before you are ready to bake, butter the bottom of an 11" x 17" baking tray and sprinkle with cornmeal.
Sprinkle some flour on the counter and your hands and plop the dough from the container onto the counter, coating in flour, a bit, so it's easier to work with. Cut the dough into two pieces and shape each half into a ball. No need to make it perfect, those tucks and ripples, make lovely crusty edges. Place each dough ball on baking tray, several inches apart. Sprinkle generously with flour.
(You can also bake one at a time, saving the dough in the refrigerator for another day.)
Cover loosely with kitchen towel and let rest, in a warm place for 30-45 minutes.
When ready to bake, place a metal baking pan on the bottom rack of the oven. Fill it with water. This helps steam the bread, giving it a nice crust. Preheat oven to 450F, the water will heat up during the preheat.
Right before placing in the preheated oven, score top of bread with an "x" or other decorative mark, cutting right through the dough.
Bake for 30 – 35 minutes until crust is toasty brown. Remove from oven and let cool 15 minutes before slicing. You're thinking of singing a rhapsody, aren't you?

by TheLastWonton | Nov 22, 2014 | Main Dishes, One-Pan & One-Pot, Pasta & Noodles, Sides, Vegetarian
With roots that speak of Puglia, this brazen pasta, quite magically, dresses itself in a warm, buttery, silky sauce, with herbaceously fresh, outspoken flavours.
Never heard of it!!
So, it was some sort of church-bell ringing, champagne cork popping, relevation, when I did.
What??!! …..my mind kind of yelled at me. Really? You can do that?
Then I went quiet….and kept reading…..eyes quickly scanning the blog post and recipe…….
Ha, well I'll be damned!
And this my friends, this serendipitous online discovery, is why we are here today.
This pasta is really good.
I'm a pasta freak, so that makes me a little discerning when it comes to determining the scale of mouth-watering deliciousness. So, I reiterate, this is not that Oh-Mama-little-moans-of-pleasure good, this is just really good pasta, boasting a sauce with bold, simple flavours that kind of jump up and down in your mouth.
But there is some serious culinary magic going on here, with the preparation method. OMG!!!
Who would have thunk, that you can just plunk all these fresh, aromatic, simple sauce ingredients into a pot with the pasta, fire it up and 12 minutes later serve up a company worthy dish?
It's best not to cook the pasta until it's dry. You want to leave a little bit of that transformed, almost creamy sauce, in the bottom, so as the pasta cools a bit, it gets all perfectly coated and stays saucy.
Do remember as well, that somehow or other, this cooking method demands the most of every ingredient. I could taste every ingredient, in every bite.
Another time, I am going to try this same preparation using only cherry tomatoes and lots of garlic. I bet that'll be a keeper!
 Take note, too, that you want to use a pasta that has a little bit longer cooking time. I used Farfalle or bowties, that take 10-12 minutes to cook, according to the package directions. My pasta was perfectly al dente after 12 minutes of cooking, and maybe beginners luck, but I had exactly the right amount of saucy goodness left in the pot, with this timing. Linguine, penne or larger sea shells would probably work tickety boo, as well.
I like One-Pot Pasta better as a first course or side dish with chicken, steak or chops, rather than a main course feast. But Forest Grump would have happily had nothin' but a big heap of basily bowties.
And whatever you do, don't forget the crowning glory, of lots of freshly grated Asiago or Parm.
* * * * * * * * * * * * *
Grazie to Marin Mama Cooks food blog for inspiring me
to find my own version of One-Pot Pasta.
* * * * * * * * * * * * *
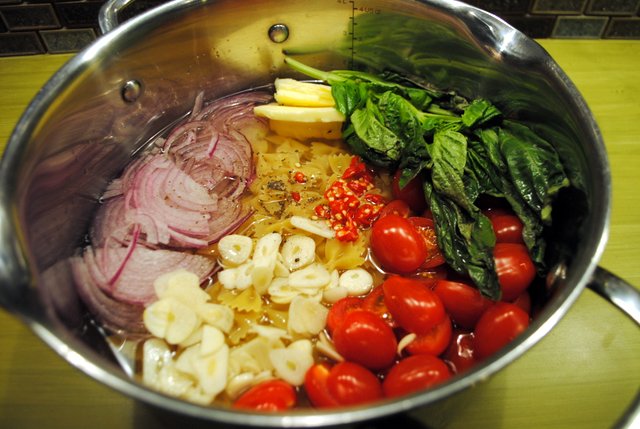
ONE-POT PASTA – 4-6 Servings
12 ounces Farfalle (bowtie) pasta, or another pasta with 10-12 minute cooking time
12 ounces cherry or grape tomatoes, washed, halved
1 small red onion, thinly sliced
5 garlic cloves, peeled, thinly sliced
2 sprigs fresh basil, with a couple of extra torn leaves for garnish
1-2 fresh bird's eye chilies, finely chopped or 1/2 teaspoon dried red chilies
4 1/2 cups good quality, preferably homemade, chicken broth
3 tablespoons butter
A couple of blasts of freshly ground black pepper
Freshly grated Asiago or Parmigiano Reggiano, or even old Cheddar, for topping the pasta
Using a large, straight-edged skillet or a large pot, put in the pasta, halved tomatoes, sliced onion and garlic, fresh basil, chilies, broth, butter and pepper. Put on high heat and bring to a full boil.
Once your broth comes to a boil, put your timer on for 12 minutes and adjust heat to medium high, making sure the pasta keeps at a steady boil. With tongs or slotted spoon turn and move the pasta mixture around a few times, while it cooks, so nothing sticks to the bottom of the pan.
After 10 minutes test your pasta, to ensure that your timing is 'on'. (Adjust cooking time, heat, liquid, accordingly, if necessary.) At 12 minutes, or when your pasta is al dente, turn off the heat and give your pasta a few tosses. Don't fret if there is a bit of liquid in the bottom of the pot, as the pasta will soak up that goodness as it sits.
Serve the pasta topped generously with grated cheese and torn fresh basil. Cin, cin!

by TheLastWonton | Nov 22, 2014 | Asian, Chicken & Poultry, Filipino, Main Dishes, One-Pan & One-Pot
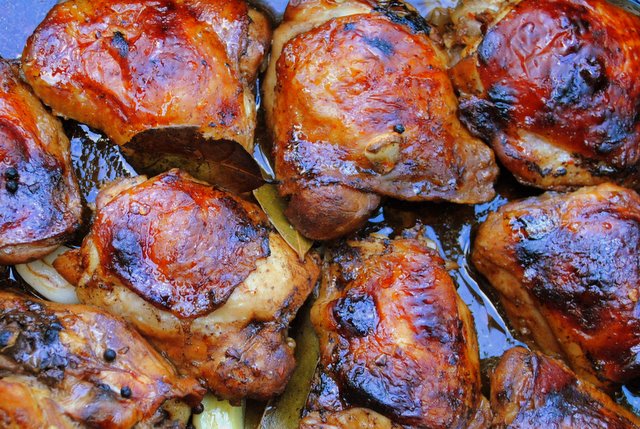
Tangy, peppery, tender, crispy-skinned, baked chicken, that will make you say, "Masarap!" Deeelicious!
♫♪♫♪ "Ain't no sunshine when you're gone!" ♫♪♫♪
Okay, okay, I fess up! Sure…..yup…..I do sing to my chicken adobo, as I happily tootle about my kitchen readying this easy peasy to prepare dish. It's simply one of those dishes that is serenade worthy.
You might say this garlicky, peppery, tart, Vinegar Stew is the unofficial dish of the Philippines.
And there are about a frizzillion different versions of it, with every Filipino homecook having their own favorite.
This staple dish is super versatile (that's like regular versatile, but with a cape) 'cuz you can 'adobo' beef, pork, chicken, seafood or veggies.
Not only that, but the ingredients and preparations are endlessly adaptable. Vinegar is pretty much, almost always, the main ingredient, with soy sauce, garlic, black pepper and bay leaves doing fine back-up. Then of course there's the most common variable ingredients; brown or palm sugar, jalapenos or bird's eye chilies, sometimes coconut milk and tumeric.
My favorite versions, both ingredients and preparation, vary, whether I'm adobo-ing beef, or pork, or chicken.
I do know one thing with certainty, this is my preferred version of chicken adobo to make. And yes, chicken is, indeed, my top choice to munch and enjoy, when it comes to adobo. Mmmm.
Ha! Maybe that makes me Chickie Adobo?
You know what else? You are just going to love how ridiculously easy this is to toss together, pop in the oven, and ta da! chicken adobo perfection.
So go on, grab a baking dish, throw together the marinade, which double duties as baking seasoning which becomes a perfect saucy drizzle to crown your chicken, rice and veggies.
Makes you want to sing, doesn't it?
* * * * * * * * * * * * *
Thanks oodles, to EatingClub Vancouver blog for the delectable inspiration
to fire up my own version of Roast Philippine Chicken Adobo
* * * * * * * * * * * * *
BAKED CHICKEN ADOBO – Serves 4
8 perfectly plump, bone-in, skin-on, chicken thighs
1 cup white vinegar
1/3 cup dark soy sauce (I use China Lily)
2 tablespoons whole or very slightly crushed black peppercorns
10 garlic cloves, peeled, sliced lengthwise, in half
2 bay leaves
1-2 fresh jalapenos or bird's eye chilies
Mix all marinade/seasoning ingredients in baking pan that is large enough so the thighs are not crowded. Add chicken thighs and let bask in those flavours for about 30 minutes, turning once or twice to coat well.
Preheat oven to 350F.
Bake chicken approximately 45 minutes. Increase oven temperature to 450F. Bake the chicken 10-15 minutes more, until cooked through and skin is crisped and brown.
If you wish, take the chicken thighs out of the pan, and set aside. Pour pan juices into small pot and reduce the marinade and chicken juices until slightly thick, or desired consistency.
(I rarely reduce my pan juices, as they are delicioso, just as they are, and we don't mind them liquidy.)
Serve chicken hot from the oven, with steamed rice and veggies, all drizzled with pan juices. Masarap!
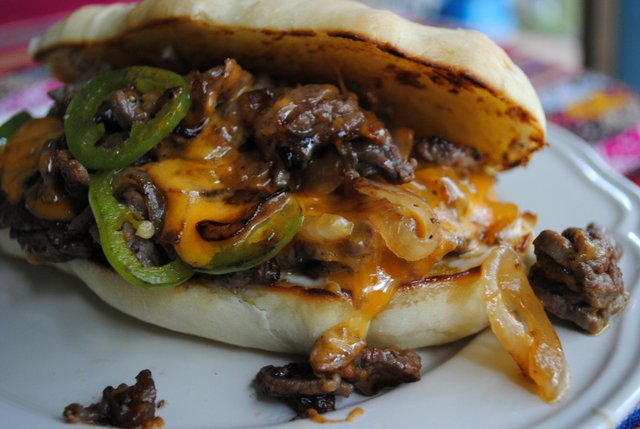
by TheLastWonton | Oct 31, 2014 | Beef, Pork & Lamb, Breads & Sandwiches, Main Dishes
Cheesified, flash-fried, tender ribeye, muddled with sauteed sweet onions and fiery, fresh jalapenos.
Wikipedia says: "The cheesesteak was developed in the early 20th century "by combining frizzled beef, onions, and cheese in a small loaf of bread," according to a 1987 exhibition catalog published by the Library Company of Philidelphia and the Historical Society of Pennsylvania."
They had me at 'frizzled beef'. Frizzled ribeye, no less! Those Philidelphians!
And then I found a super good recipe for Cheesesteak on The Little Kitchen foodblog. I did change things up from the original recipe quite a bit, but definitely got the best hot tips for putting together a damn good cheesesteak sandwich. Damn good.
I left out green peppers and mushrooms, opting for the spicy kick of fresh jalapenos, instead. Yum! But, of course, you might want to opt those green peppers and mushrooms right back into the mix.
Forest Grump devoured two freshly made cheesesteak sandwiches, with gusto, smacking his lips and exclaiming, "Mmmm….Mmmm….Mmmm".
Thanks for that, The Little Kitchen. My home is happiest when Forest Grump is Mmmm-ing.
Given the chilly winds of November are about to have their way with us, the timing couldn't be better for exactly this kind of devilishly delicious comfort in a bun. So get out there and grab a couple of beautiful ribeyes, frizzle them up and see who you can get Mmmm-ing.
* * * * * * * * * * * * *
"Too few people understand a really good sandwich."
~ James Beard
* * * * * * * * * * * * *
JALAPENO CHEESESTEAKS – Makes 4 sandwiches
4 fresh hoagie rolls, split and lightly buttered
4 tablespoons mayonnaise
1 large sweet onion, halved, sliced
2 good-size fresh jalapenos, sliced very thin
2 beef ribeye steaks (about 1 1/4 to 1 1/2 lbs) (partially frozen**, so you can easily slice very thin across the grain and then chop roughly again, so they are small pieces – as pictured, below)
Sea salt & freshly ground black pepper
4 tablespoons butter
8 slices Cheddar, Havarti or Provolone
 **I buy fresh ribeye and then stick them in the freezer for 1-2 hours, just until slightly frozen, so that I can slice them supah thin. Works like a charm, everytime!**
Heat large, non-stick skillet over medium-high heat and grill the cut and buttered side of the hoagie rolls until toasty, golden brown. Spread both sides, lightly, with mayo. Set aside.
Add 1-2 tablespoons butter to the large non-stick skillet over high heat. Add the sliced onions and jalapeno. After a couple of minutes, if necessary, adjust heat to medium-high and cook and flip, about 5-8 minutes, or until golden brown and cooked down. Remove from pan, onto a plate.
Wipe the skillet, with a paper towel, add 1-2 tablespoons butter and return to stove, over high heat. Add sliced steak to the pan, season generously with salt and pepper and cook for 2-4 minutes. 
Add in onions and jalapenos, and fry and flip for 1-2 minutes. Divide the meat & veggies in half, separating a bit, with a flipper, and lay the cheese slices on top and allow the cheese to melt for 1-2 minutes.
Divide the cheesy, frizzled beef and veggies into four and scoop and slide onto prepared hoagie rolls, pressing down a bit, so that all that succulent frizzleness becomes good friends with those hoagie rolls.
Cut each sandwich in half, and serve up hot and juicy, with chips or salad. Mmmmmm!


