by TheLastWonton | Jan 17, 2012 | Baking & Desserts, Fruits, Pies, Treats
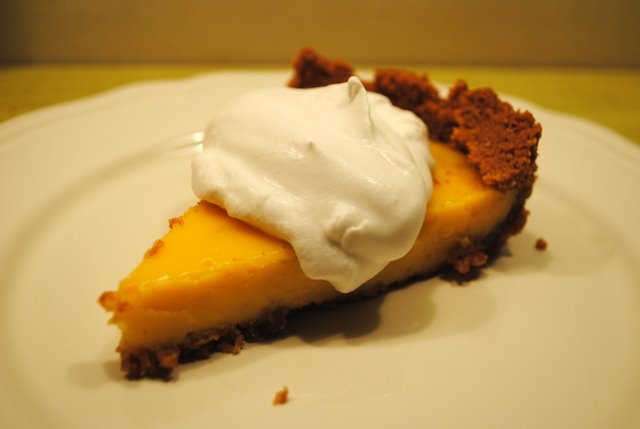
Sweet, puckery mouthfuls of lime goodness topped with fluffy, creamy dollops that speak softly of coconut. Yes, please.
Sunshine. In your mouth. This un-Key lime pie simply, purely, tastes like sunshine. Florida sunshine, at that. You know that exotic, infamous, edgy kind of sunshine that you only get in Florida? That's what I'm talkin' about.
Each creamy mouthful takes the BRRRR right out of these snowy, chilly, grey  winter days. One piece of this silken lime pie easily sends you, smiling, on a sweet, sunny sojourn, even if ever so briefly.
Stubbornly reluctant to let go of the warmth of these glorious tropical daydreams I had an 'Ah ha!" moment. Instead of the usual whipped cream topping, I chilled the heck out of a can of ordinary coconut milk, sprinkling in a bit of sugar and vanilla as I whip, whip, whipped.
You know what happened next, right? Soft, snowy white clouds of cream that whispered gently of swaying coconut palms and that, shazam, fell instantly in love with Creamy Lime Pie.
You know you waaahnt some!
CREAMY LIME PIE with Whipped Coconut Milk – **Makes one 8 or 9 inch pie
1 – 8 or 9 inch graham cracker crumb crust
3 large egg yolks, beaten (I used farm eggs, with wonderful deep golden yolks, making my pie a deeper hue)
1 – 14-ounce can sweetened condensed milk
Grated zest from 1 lime
1/2 cup fresh squeezed lime juice
1 – 14-ounce can good quality coconut milk, chilled several hours or overnight
2 tablespoons sugar
1 teaspoon vanilla
Preheat oven to 325F. In medium bowl, beat egg yolks with sweetened condensed milk, lime zest and lime juice. Whisk or stir until evenly combined and slightly thickened. Pour into prepared crust. Bake 30 minutes. Cool. Serve chilled or at room temperature, dolloped with whipped coconut milk.
For whipped coconut topping, chill mixer bowl and beater in freezer for at least 30 minutes. Pour in chilled coconut milk, sugar and vanilla and beat on high until soft to medium peaks form. Chill.
**I suggest using an 8-inch pie plate, or a shallow 9-inch pie plate. If using a deep dish 9-inch pie plate or a 10 inch pie plate, double all filling ingredients and bake 40-45 minutes.
by TheLastWonton | Jan 5, 2012 | Baking & Desserts, Pies, Treats
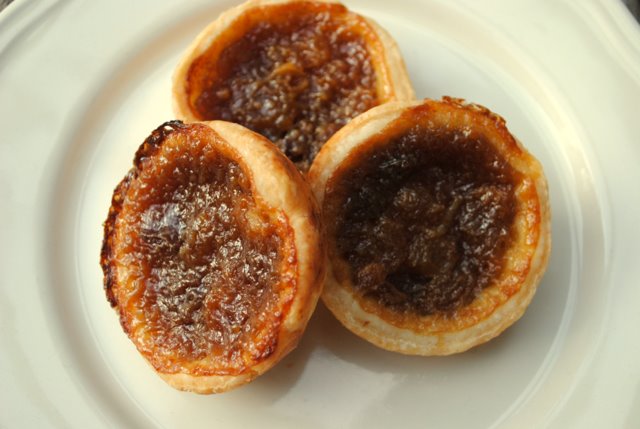
Sweet, gooey, sinfully buttery, quintessentially Canadian, flaky little pastries.
Timeless. Seductive.
Exuberantly, and with great flair I just crossed one, long-quested item off of my culinary bucket list. I did it!! Wooohooo. These are them!!
These scrumptious little goodies are without a doubt, in my estimation, the best butter tarts I have ever made. It took me a verrrry long time to get here. Lots of recipe hunting and tweeking, experimenting, trial and error. But I have arrived. At butter tart nirvana. It's a happy place to be.
Cousins to the all-American pecan pie and British treacle tarts of Chitty Chitty Bang Bang and Harry Potter fame, pioneer-invented butter tarts are truly and proudly Canadian.
The earliest published butter tart recipe dates back to 1900 from Barrie, Ontario in The Women's Auxiliary of the Royal Victoria Hospital Cookbook. The filling recipe I used is said to be the Top Secret, renowned recipe from Wilkie's Bakery in Orillia, Ontario passed down through generations of Wilkies and having won National competitions as The Best Butter Tarts in Canada.
It's likely that I may not have really found great-grandmother Wilkie's treasured, award-winning recipe. But, right here, right now, I come brandishing the only butter tart recipe I will ever use. Man are they good!
Thanks Lennie for posting Award-Winning Butter Tarts on Food.com. And, just in case, 'cuz you know, just maybe…….big, big thank-yous to Great Grandma Wilkie.
"Seize the moment. Remember all those women
on the 'Titanic' who waved off the dessert cart."
~ Erma Bombeck
BUTTER TARTS – Makes 24
Flaky Tart (or pie) Pastry
2 1/2 cups flour
1 teaspoon Kosher or sea salt
3 tablespoons sugar
1 cup cold lard, cubed
1/2 cup + 2 tablespoons ice water
1 tablespoon vinegar
Butter Tart Filling
3/4 cup raisins (a mixture of raisins and currants would be wonderful too)
7 tablespoons soft butter
Generous 1/3 cup packed brown sugar
Pinch of Kosher or sea salt
3/4 cup corn syrup
1 1/2 large eggs, lightly beaten (Weird, but you must!! Beat 2 eggs in measuring cup, then use 3/4's of the beaten eggs)
1 teaspoon good vanilla or 1 tablespoon dark or amber rum (rum & butter tarts…..mmm!)
For Pastry: In medium bowl, whisk the flour, salt and sugar until evenly combined. Using pastry blender, or your hands, work in lard until mixture resembles fairly fine crumbs, with a few larger pieces. Add ice water and vinegar and stir like crazy with a fork until dough clumps together.
Divide in half. Press into disk on floured surface. Roll out the dough, evenly, turning and flouring to keep from sticking, if nessary. Cut into 12, 3/4 – 4 inch rounds. Gently place the rounds into a 12-cup tart (or muffin) tin, coaxing dough, tenderly, into perfect little tart shells. Repeat with the rest of the dough. Chill until ready to fill. (You may have a bit of left-over dough. If you do, make jam turnovers. That's what my mama always did.)
For Filling: In a small bowl, place raisins and cover with hot tap water; let stand for 30 minutes. In a medium bowl, using a wooden spoon, mix together soft butter, brown sugar, salt and corn syrup. Stir, stir, stir until creamy smooth and well incorporated.
Add beaten egg and vanilla or rum. Mix well. Drain raisins. Retrieve tart shells and divide raisins equally into all shells; then divide butter mixture into all tarts, filling each about 3/4 full.
Bake at 400F for 15-20 minutes; filling will be lightly browned and bubbly.
Us Canadians fall into three camps when it comes to butter tarts and are passionately loyal about our favorite type: runny, gooey, or firm.
No surprise, I'm a gooey girl from way back……so when you bite into one, your eyes close and you immediately understand sweet, gooey seduction. I baked my tarts 17-18 minutes.
If you like dribbley goodness, bake tarts 15 minutes. If 'firm' does it for you, bake tarts the full 20 minutes, or maybe baby even a couple more minutes, if needed.
by TheLastWonton | Sep 22, 2011 | Baking & Desserts, Cake, Pies, Treats
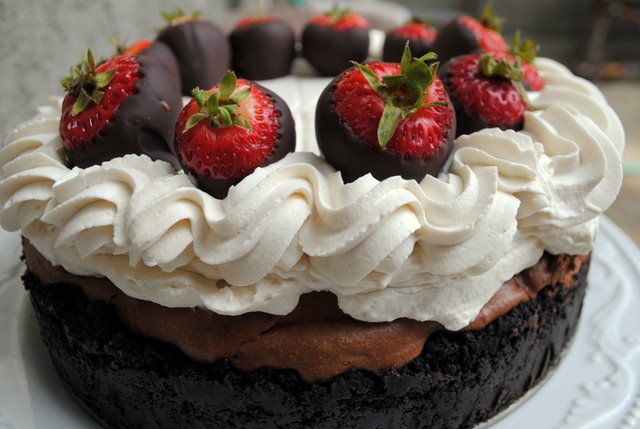
Ridiculously sublime chocolate pie. Indulge.
Pretty, isn't it? Sinfully rich and delicious too. But, here's the clincher, it's easy peasy to make ahead and have ready for dinner party day. Aaaahhhhhh….. A perfect dessert? Mayhaps.
Some recipes in my collection I've made only once or twice, some a handful of times, some dozens of times, but likely (I lost count long ago) I've probably made this Chocolate Mousse Pie hundreds of times. But we have to go waaay back to explain…..
'Twas the 1980s in the beautiful orchard city of Kelowna, when Forest Grump and I worked day in and day out at what still remains one of our favorite labours of love, Chianti's. Our little going concern of a mom-and-pop-made-from-scratch restaurant, had line-ups out the door most weekends and many regulars came craving yet another piece of Chocolate Mousse Pie. We also served those crazy delicious, real-deal New York style baked cheesecakes in an ever changing variety of fresh fruit and carmely flavours. But it was the mousse pie set the standard and became one of those things people kept coming back for.
Still, years later, Chocolate Mousse Pie has become a requested family favorite for birthdays,
anniversaries, Christmas parties and other special occasion gatherings. Truth be known, I'm always quite thrilled when someone requests this dessert because it's best made the day ahead (yay!) and it really is pretty darn easy. (yay!) And best of all it always, always delivers!! Every velvety mouthful boasts decadent, gorgeously chocolate, creamy sweetness. Some people even smile and close their eyes when savouring this particular dessert. One of my favorite testimonials.
Give this one a try, it might just become one of those stand-by, special occasion desserts that you can feel so good about counting on. And aside from that, when you bring it out to serve, you get say, "Wipe that chocolatey smile on your face right now!"
"Giving chocolate to others is an intimate form of communication,
a sharing of deep, dark secrets.
~ Milton Zelman
CHOCOLATE MOUSSE PIE – 12 to 16 servings
Crust:
2 cups chocolate wafer crumbs
1/3 cup butter, melted
Filling:
2 3/4 cups good quality semi-sweet chocolate chips
2 cups whipping cream
4 tablespoons icing sugar
4 egg whites, room temperature
2 eggs
4 egg yolks
Topping:
1 1/2 cups whipping cream, sugar, vanilla
Chocolate dipped berries
For crust: Combine crumbs and butter in the bottom of a 9 or 10 inch springform pan. With a soup spoon press crumbs on bottom and part way up sides of pan. Refrigerate.
For filling: Melt chocolate, until completely smooth, in top of a double boiler over barely simmering water. Let cool. Meanwhile whip 2 cups whipping cream with 4 tablespoons icing sugar until quite stiff. Refrigerate. Beat egg whites until stiff. Set aside. Get ready to give yourself a little bit of an upper body workout. Add whole eggs to melted chocolate, stirring vigorously with a wooden spoon to completely incorporate. Add egg yolks and mix until thoroughly blended. Come on, stir!
Now, stir or whisk a little of the beaten whites and whipped cream into the chocolate mixture to lighten. Keep adding cream and whites in 2 or 3 more additions, whisking gently until completely incorporated. Pour into prepared crust and chill at least 6 hours, or preferably overnight.
For topping: Whip 1 1/2 cups whipping cream with 2 tablespoons sugar and a teaspoon of vanilla until quite stiff. Loosen crust on all sides using a sharp knife. Remove outer ring of pan. Place pie on serving plate. Smooth a good layer of whipped cream over top of the mousse pie, then decorate edges with a piping bag, if desired. Plop on some Callebaut chocolate covered strawberries and voila!
by TheLastWonton | Sep 18, 2011 | Appetizers & Snacks, Baking & Desserts, Breads & Sandwiches, Breakfast & Brunch, Sides
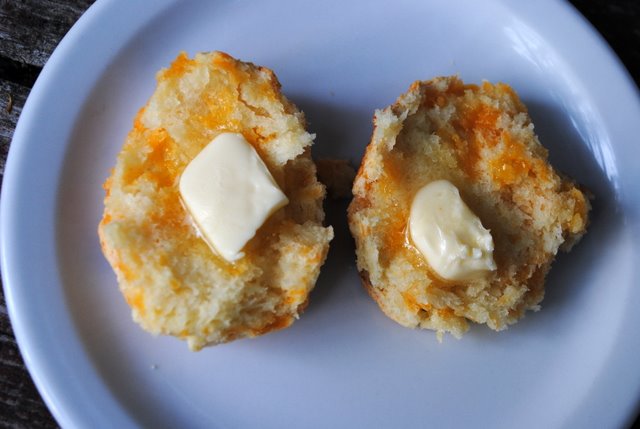
A delectable soft crunch of crust, followed by a featherlight, slightly sweet, flakiness, riddled with sharp cheddar cheese – in every bite.
A whole convergence of things brought us here today, like mighty rivers flowing toward the sea and meeting up before reaching destination, becoming a single unstoppable force.
We've been wallowing in sunny, unusually hot, late summer days here in the Okanagan for the past couple of weeks. Then just a few days ago, it was like someone flipped the switch to the 'Autumn' setting. It's still nice and warm most days, but the evenings and star-filled nights are decidedly cooler.
Alas, summer is gone and, oh-oh, before long that OTHER season will be here. But first, gorgeous, colourful, bittersweet Fall is starting to toy with us. I love this time of year. Roadside fruit and veggie stands are bulging with the bounty of the season, the sun throws a warm, golden glow across the hills and even the moon is full of the glories of harvest, puffing itself up to almost fill the night sky.
Now that the sweltering, keep-out-of-the-kitchen heat of summer has passed, it's a marvelous time of year to get back into the kitchen and play. Perfect timing, might I add, as September is one of those birthday months for us, and as luck would have it our first-born grandson, Palmer, was in house to celebrate his milestone 13th birthday yesterday.
When asked what he wanted for his birthday dinner, he didn't answer with the expected, homemade pizza or BBQ chicken or spaghetti. Without hesitation he ordered, "Corn chowder please, Tutu-ma".
 Corn chowder it was. And comfort laden, butter smeared, pillowy layered, hot-from-the-oven, cheese oozing, biscuits.
This biscuit recipe, which is more like a scone in some ways, comes from my mom-in-law who is the most trustworthy source, period, for all things to do with breads.
And just for you, in the name of biscuit perfection, I have tweeked and re-tested this recipe. I tried and I tried and I tried, another batch, and another batch…….by george I think I've got it!
One bite will lead to another, will lead to another, will lead to a cheesy, crumb-tickled smile of satisfaction. Mick, was wrong. I can me some satisfaction and some fine biscuit lovin' happiness too.
So let the forces of time, the changing of the seasons roll. Bring it, Mother Nature! With comfort from our kitchens warming our bellies we can take whatever you throw at us.
Happy Birthday Palmer! (And River boy too! We miss you!) Thanks oodles Mar for the best damn cheese biscuit recipe to be had and all the love baked into every sinful mouthful.
MAR'S CHEESE BISCUITS – Makes 12
2 cups flour
1/4 cup sugar
4 teaspoons baking powder
1/2 teaspoon salt
1/2 cup cold butter, cut into small bits
1 1/2 cups grated sharp cheddar cheese, or your favorite cheese
1 egg beaten in a measuring cup, with canned milk, milk or cream added to make 1 cup
Preheat oven to 425F.
In large bowl, whisk together flour, sugar, baking powder and salt. With fingers or pastry cutter lightly work butter into dry ingredients, being careful just to break the butter pieces up a bit, but not to completely incorporate. Mixture should resemble coarse crumbs.
Stir in cheese. Pour in egg-milk mixture and lightly stir with a fork 'til dough forms a soft, slighty sticky, ragged dough ball.
Turn dough onto a lightly floured surface, kneading gently into a disk. With floured rollling pin roll dough into a 1/2 thick rectangle. Fold the dough over onto itself in three sections as if folding a letter. Again with floured rolling pin roll dough to about 3/4" thickness. Using floured, approximately 2-inch cutter, cut out rounds, placing onto buttered baking pan or baking dish. Gather scraps and pat out to cut or form remaining dough into biscuits.
Bake for 15-20 minutes until deep golden brown and scrumptiously aromatic. Let cool just a bit. Serve hot with butter, crab apple jelly or golden syrup.

by TheLastWonton | Aug 8, 2011 | Appetizers & Snacks, Beef, Pork & Lamb, Main Dishes, Mexican, Sauces, Dips & Condiments
Chewy sweet niblets of grilled corn crowded into spicy, herby, citrusy guacamole is fantastic on just about anything. On soft flour tortillas loaded with chili-rubbed, grilled steak, ha cha cha. Ole!
It was a slow burning, blue-hot August afternoon. The stillness in the forest begged to be quenched. From somewhere in the house, Chris Isaak sensually crooned of a Wicked Game.
A pair of pebble skinned, dark green avocados stared at me, unblinking. Hot chilies lay helter skelter on the kitchen counter taunting me. A heat-blasted whisper of a breeze rustled the silk of fresh picked corn cobs that lazed on a nearby table top. Plump limes eased out of the fruit basket landing on the floor with a soft plop, plop. A stack of soft flour tortillas were emitting some sort of primal chant honouring the searing summer sun. Spicy flecks of chili powder were dive bombing a tiny dish of salt splashed olive oil, then rebounding onto a tender flank steak, spelling out the words, 'grill me'.
Ay, ay, ay, carumba!!! ALRIGHT ALREADY! I get the drift!
 That's how it all came together that one hot August afternoon I was persuaded into my forest kitchen to conjure.
First up, spicy guacamole loaded with grilled corn. Two of my flavour favorites, together, at last. Yum-O! This corn blessed guac is great as a dip with crispy tortilla chips or dolloped on fried chicken or grilled fish, or just about anything else you can think of. But it's killer fantastic on steak tacos! Which brings me to another one of my fave foods, carne asada.
It was quickly becoming deliciously obvious, that I had no choice but to give a flank steak a good massage with olive oil, sea salt and lots of spicy hot Hatch chili powder. Post massage, a little chill time before grilling that baby to tender scrumptiousness.
It was all we could do to stop ourselves from sampling the grilled steak while it rested so all those precious, luscious juices stayed put. When we couldn't wait another second, a slicing frenzy followed and before we knew it we were tucking mouthwatering steak into warm soft tortillas with big plops of grilled corn guacamole on top. Mmmmm….mmmm….mmmmm!
Muchas gracias to I Will Not Eat Oysters food blog for the delicious dog day afternoon inspiration.
ROASTED CORN GUACAMOLE & CARNE ASADA TACOS
Serves 4-5
Carne Asada
1 1/2 pound flank or skirt steak
2 tablespoons good quality extra virgin olive oil
1 tablespoon sea or Kosher salt
3 tablespoons, mild, medium or hot chili powder (we use Hatch's Hot, cuz we like it 'hot'!)
Guac
4 fresh cobs of corn, husked
2 medium, perfectly ripe avocados
Juice of 2 plump limes
1/2 Walla Walla, Vidalia, Maui or sweet onion, finely chopped (about 1/2 cup)
2 fresh jalapenos or other hot chile pepper, seeded, finely chopped
1/4 cup fresh cilantro, chopped
1 teaspoon sea or Kosher salt
8-10 small flour tortillas
Lime wedges, for squeezing
For the carne, mix together olive oil, 1 tablespoon salt and chili powder and massage over entire surface of the steak. Cover or pop into a large ziplock bag and refrigerate 1-6 hours.
Meanwhile preheat barbecue to medium high. Place corn cobs directly on the grill and close the top. Grill corn 12-18 minutes, turning every few minutes, until some kernels are bright yellow, some deliciously brown and caramelized and some slightly charred. Let cool.
Mash avocado with a fork, leaving it a bit chunky. Put mashed avo into a large bowl with lime juice, chopped onion, chopped hot pepper and cilantro. Mix to combine. Cut kernels off the cob and add to avocado mixture. Season with sea salt, to taste. Cover and chill under ready to serve.
Preheat barbecue to high. Place steak on grill and reduce heat to medium-high and grill 5-9 minutes per side, turning once, until medium-rare to medium. Remove the steak to a cutting board and let rest 5 minutes to allow the juices to settle. While steak is resting, pop tortillas on the grill for 20-30 seconds on each side. Keep grilled tortillas warm by wrapping in a clean kitchen towel.
Thinly slice steak across the grain on a diagonal. To make tacos, tuck a few steak slices into a warm tortilla, top with a good scoop of grilled corn guacamole and a squeeze of fresh lime. Devour. Repeat. If you want to make a full meal deal, these tacos go rather fantastico with frijoles and Mexican rice.

 winter days. One piece of this silken lime pie easily sends you, smiling, on a sweet, sunny sojourn, even if ever so briefly.


