by TheLastWonton | Jun 13, 2021 | Drinks & Cocktails
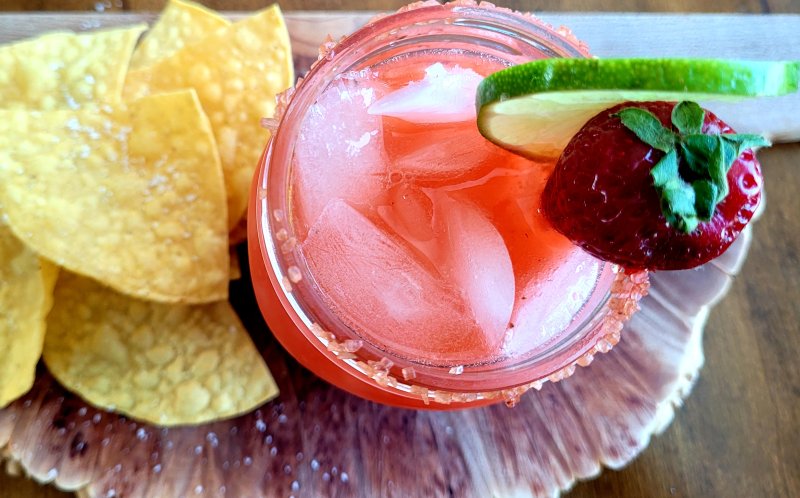
Tongue-tingling tangy, taste-bud-dancing strawberriness and that familiar Tequila whoopaaah, over oodles of ice. Oh, sí, sí, por favor!
 It was the twelfth of June, another sunny, cloudy, valley day
I was in choppin' berries, to make Margaritas my way…..
And chop, chop, I did. There's something so ambrosial about local fresh strawberries, no matter where you are. So, of course, it was way too fun, and almost kind of exciting to work on 'perfecting' my version of the best Fresh Strawberry Margarita.
Once the fresh strawberries were roughly chopped I buzzed them to smithereens with my immersion blender, then plopped them onto a fine mesh sieve. Next armed with a big spoon I pushed and smushed the buzzed berries, through the sieve, to get all of the luscious, ruby-red, juice out.
Oh mama, that's quite the juice. My goodness.
Next came freshly squeezed lime juice, and some fine Tequila and Cointreau. Stir, stir, stir. I had planned on waiting to let the Margs chill in the fridge for a bit, but after tasting a spoonful, wham bam out came a glass, quickly rimmed with lime juice and Hawaiian salt, filled to the brim with ice, and in with the rosy red potion.
Sip….mmm…..sip, sip……mmm. Yup, a damn fine Margarita, if I do say so myself.
These particular Margaritas are best with oodles of ice, it just compliments the berriness, perfectly. And even if you are not so inclined, do try Sublime Strawberry Margaritas with a salted rim. Arriba! Salud!

* * * * * * * * * * * * * * * * * *
Adapted from Spicy Southern Kitchen food blog,
for The Last Wonton. Thanks, Christin.
* * * * * * * * * * * * * * * * * * * * *
SUBLIME STRAWBERRY MARGARITAS (Makes a generous 3 cups ~ 4 cocktails)
1 pound fresh, ripe strawberries, hulled and chopped (just short of 3 cups)
1/2 cup freshly squeezed lime juice
1 1/4 cups Tequila
1/2 cup Cointreau
**Lots of ice, fresh lime, sea salt**
Put strawberries in bowl and buzz, buzz, with immersion blender until completely juicy. Or, of course, throw into the blender, and blend until smooth. Pour onto a fine mesh sieve, using a spoon to push all the juices through. You want at least 1 cup of juice.
Place all ingredients in a jug and whisk away, until all happy, happy. Run a lime wedge around glass rims. Pour sea salt onto a saucer, and dip the glass rims into it. Fill glasses with ice and Sublime Strawberry Margarita mixture. Sip, sip…..Mmmm…..
by TheLastWonton | Jun 11, 2021 | Appetizers & Snacks, Holiday & Seasonal, Recipes
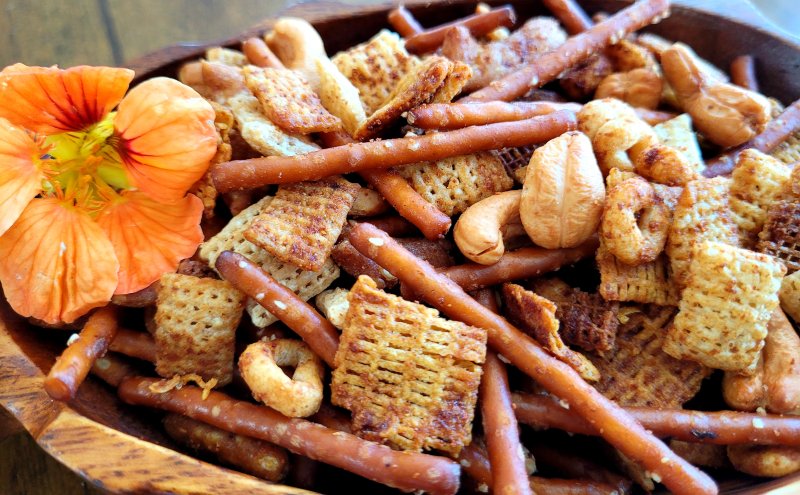
A gloriously buttery, crunchy, rahther kicky version of that old, down-home, snack of snacks, Nuts and Bolts. It's not just for Christmas, anymore! Roll out those lazy, hazy, crazy days of summer……Crunch, crunch.
TOP TEN REASONS TO MAKE SPICY NUTS 'N BOLTS
10. They are crazy delicious anytime of year.
9. They're damn good with an icy brewski, or tasty cocktail.
8. They are soooo easy peasy to make ahead.
7. Your friends and family will appreciate you just a teensy, weensy bit more.
6. You can nibble them, crunch them, or scarf them down.
5. Short, long, square, round……they are a bodacious muddle of goodness.
4. They make a boom-shaka-laka hostess gift.
3. Every single biteful is a little bit different than the last, salty, sweet, nutty, buttery….
2. You'll be in the running to win the coveted SPICY CRUNCH award.
1. They will make you smile out loud when you serve them.
* * * * * * * * * * * * * * * * * * * *

* * * * * * * * * * * * * * * * * * * * *
SPICY NUTS 'N BOLTS ~ Makes 22 cups
5 cups Life cereal
4 cups Corn Chex
3 cups Honey Nut Cheerios
2 cups Shreddies
3 cups cashews
3 cups pretzel sticks
2 cups sesame sticks
1 pound butter
4 tablespoons Worcestershire sauce
2 tablespoons granulated garlic
1 tablespoon onion powder
1 tablespoon chili powder
1 tablespoon Tabasco
2 teaspoons sea salt
1 1/2 teaspoons cayenne pepper
Heat oven to 275-285F.
Put all cereals, cashews, pretzels and sesame sticks in a large roaster. Gently mix to evenly combine.
Place butter in a heavy pot, over medium heat. Once the butter has melted, add all spices, and stir, stir, stir.
Pour sauce over cereal mixture in 1/2 cup increments, mixing gently but thoroughly, with spatula, after each addition, until spice butter is evenly distributed.
Bake 2 1/2 to 3 hours, stirring every 1/2 hour, or so, being sure to swoop and scoop up the cereal mixture from the bottom of the roaster so as to best distribute all that glorious spice butter.
Now that your kitchen is smiling because of the aroma party that you have created, once you take the Nuts 'N Bolts out of the oven, you better do a taste test, just 'cuz you can.
Winter, Spring, Summer or Fall, store in an airtight container, and serve with a smile, and a song.
by TheLastWonton | Jun 11, 2021 | Baking & Desserts, Holiday & Seasonal
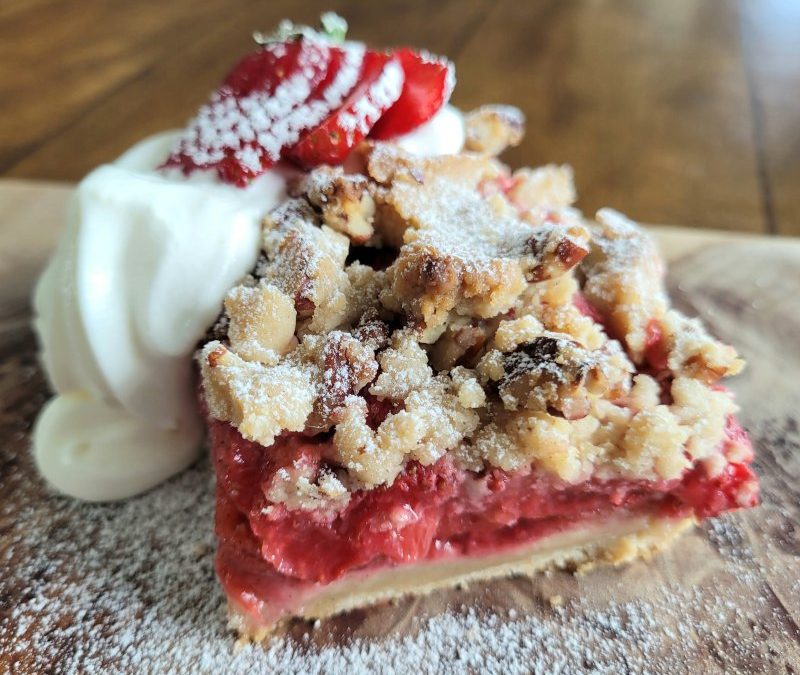
Rich, melt-in-your-mouth shortbread, heaped up with juicy, new season B.C. strawberries, and topped with buttery, pecan-laden goodness. Summer satisfaction, unbridled.

"Hi dee ho, I have arrived! Yippee!! My name is Strawberry Shortbread. Ha! I know right, what a cool name. I just love it. Jude lovingly named me. Hey Jude, thanks!"
"First things first, I am here, front and centre, because we're kicking off, the always deliciously anticipated, strawberry season in the beautiful Okanagan Valley. Oh yeahhh, baby, let the beguiling berries have their way with you, every chance you get!" 
"Secondly I am here, with determined conviction, to give the grand queen of all strawberry desserts, Strawberry Shortcake, a run for her money. With a respectfully brazen blush I am challenging Strawberry Shortcake to scooch over, just a bit."
I know, I know, Strawberry Shortcake is everyone's favorite, of quite mythic proportions."
"But, but, but……..seriously, think about it. It's fairly unanimous that one of all of our fave things about the Christmas season is buttery, rich, scrumptious shortbread, just like Gramma used to make. Right? Well guess what? I have that nailed! My bottom (yeah, ha, ha, very funny….my bottom!) is none other than scrumptious, sultry shortbread."
"But it doesn't stop there, it just keeps on getting better! My middle is a luscious, ruby red, big ol' muddle of fresh strawberries, heaped up, then heaped up a little bit more, creating a bodacious layer of friendship, just for my shortbread bottom. Whooeeee, baby!"
"And if that isn't enough of a magical merger for you, last but not least, my topping, my top hat, as I always say, makes me totally snazzy. Totally! I had a flipping cool, light bulb moment to save a bit of my shortbread bottom, to crumble and mingle with happily crunchy pecan bits. And you guys, when I scattered my top hat goodness over the fresh strawberries they very, very, quietly moaned, with unexpected pleasure. How cool is that?"
"Which brings me here today, to boldly, but ever-so- kindly ask Strawberry Shortcake to scooch over, just a bit. I have arrived!"
"And now I just can't stop singing, Don't Fence Me In!" (Thank-you, thank-you, very much!)

* * * * * * * * * * * * * * * * * * * * *
Delightfully inspired from one of my fave food blogs, Joy the Baker
for The Last Wonton. Thanks, Joy!
* * * * * * * * * * * * * * * * * * * * *

STRAWBERRY SHORTCAKE BARS ~ Makes one 8×8-inch pan.
FOR THE CRUST and TOPPING:
1 cup butter, room temperature
1/3 cup sugar
1/4 cup lightly packed brown sugar
1 teaspoon pure vanilla extract
2 cups flour
3/4 teaspoon sea salt
1/3 cup chopped pecans
1/2 teaspoon ground cinnamon
FOR THE STRAWBERRY FILLING:
2 hefty pints (4 generous cups) fresh strawberries, hulled and sliced
2 tablespoons fresh lemon juice
3 tablespoons sugar
1/4 teaspoon ground cinnamon
1/4 teaspoon ground ginger
2 tablespoons butter, melted
2 tablespoons minute tapioca
Icing sugar, for topping
Place a rack in the center of the oven and preheat oven to 375 degrees F. Line an 8×8-inch square pan with parchment paper so that the paper hangs over two edges of the pan about two inches. This will make the pie bars easier to remove after it's baked. Lightly spray the pan with non-stick cooking spray and set aside.
For the crust, place the butter, sugars, and vanilla in the bowl of an electric stand mixer and beat on medium speed for 3 to 5 minutes, until light and fluffy. Stop the mixer and scrape down the sides of the bowl. Add the flour, salt, and cinnamon and mix on low speed until just combined.
Scatter two-thirds of the dough into clumps in the prepared pan, flour your fingers and press the dough, evenly, across the bottom of the pan and up the sides of the pan about 1/2-inch. Refrigerate for 15 minutes.
Bake for 15 to 18 minutes, until the crust is golden brown and set aside to cool while you prepare the topping and filling.
In a small bowl combine the remaining crust and pecans. Mix with your hands, until the pecans are evenly distributed, set aside.
In a medium bowl toss together the sliced strawberries, lemon juice, sugar, and spices. Allow to rest at room temperature for 15 minutes until some juices develop in the bottom of the bowl. Toss in the melted butter and the instant tapioca. Stir, stir, to combine. Spread the strawberries evenly over the crust.
Pinch medium pieces of remaining dough with your fingers and scatter them evenly over the top of the strawberry mixture. Bake for 30 to 40 minutes until the topping is brown and the strawberry mixture is bubbling. Remove from the oven and allow to cool completely.
Chill in the refrigerator to easily remove the bars from the pan.
Once cooled, remove from the pan and dust with powdered sugar just before serving, and slice away. Yummy with a dollop of whipped cream.
Store in refrigerator, for up to 3 days.
by TheLastWonton | Apr 10, 2021 | Appetizers & Snacks, Baking & Desserts, Breads & Sandwiches, Breakfast & Brunch, Recipes
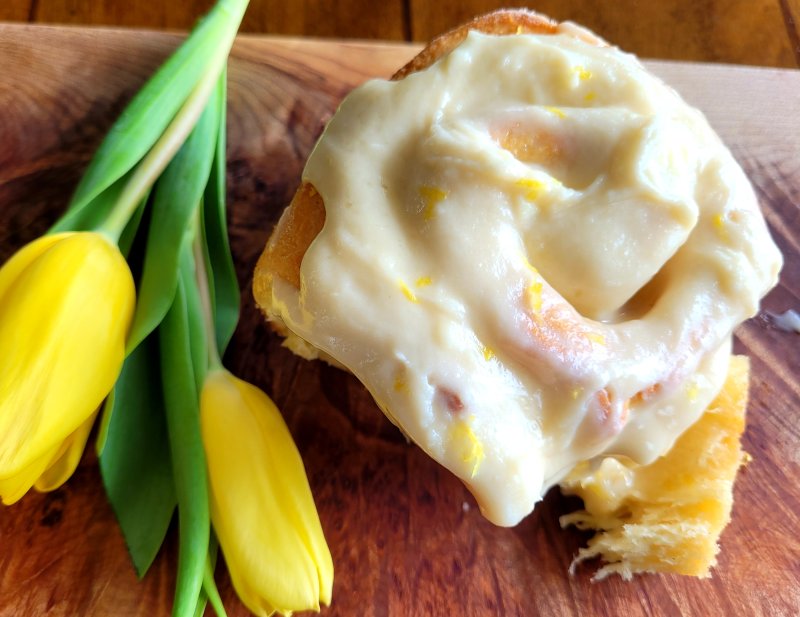
Soft, buttery dough, swirled and twirled with ambrosial lemon sugar, baked to glorious, golden perfection, then topped with smears and plops of decadent cream cheese icing, while still warm. Eat me! Eat me now!
TOP TEN REASONS TO MAKE LEMON SUGAR ROLLS with Cream Cheese Icing
10. They look, and taste, like the weekend. We all love weekends.
9. Friends and family will appreciate you just a teensy, weensy bit more.
8. These are not some silly, foofy, buns, these are cheeky, decadent, look-at-me, buns!
7. Birds may suddenly appear, whenever you are near.
6. You can make them the 'night before', then pop them in the oven, in the morning.
5. Your kitchen will smell like sunshine when they are baking.
4. Sugar and lemons are secretly best friends.
3. They're good for breakfast, brunch, lunch, afternoon tea, dinner, dessert and at bedtime.
2. They're good with coffee, or tea. Or wine. Or milk. Or scotch.
1. They're so delicious, like the best cinnamon rolls, only happier.
* * * * * * * * * * * * * * * * * * * *

* * * * * * * * * * * * * * * *
Delightfully inspired from one of my fave food blogs, Half Baked Harvest
for The Last Wonton. Thanks, as always, Tieghan!
* * * * * * * * * * * * * * * * * *
LEMON SUGAR ROLLS with Cream Cheese Icing ~ Makes 12 rolls
2 1/2 teaspoons active dry yeast
3/4 cup warm whole milk
2 tablespoons runny honey
3 1/2 – 4 cups flour, plus more for dusting
1/4 teaspoon cinnamon
1/2 teaspoon sea salt
3 large eggs, at room temperature
1/2 cup butter, melted
3 tablespoons lemon zest
3/4 cup sugar
6 generous tablespoons butter, at room temperature, plus more for greasing pan
CREAM CHEESE ICING
8 ounces cream cheese, at room temperature
4 tablespoons soft butter, at room temperature
1 cup icing sugar
2 teaspoons good vanilla extract
To make the dough. In the bowl of a stand mixer fitted with the dough hook, combine the milk, yeast, and honey. Let sit 5-10 minutes, until bubbly on top. Add 3 ½ cups flour, the cinnamon, salt, eggs, melted butter, and 1 tablespoon lemon zest. Using the dough hook, mix until the flour is completely incorporated, about 4-5 minutes. If the dough seems sticky, add the remaining ½ cup of flour. (So far, I have only needed 3 1/2 cups flour, to get a nice consistency to the dough)
Cover the bowl and let sit at room temperature for 1 hour or until the dough has doubled in size.
To make the filling. In a small bowl, combine the sugar and the remaining 2 tablespoons lemon zest. Line a 9×13 inch baking dish with parchment, or grease well with butter.
Lightly dust your work surface with flour. Turn out the dough, punch it down, and roll it into a rectangle about 10 x 16 inches. Spread 6 tablespoons softened butter evenly over the dough. Sprinkle the lemon sugar evenly over the butter and lightly push into the butter.
Starting with the long edge closest to you, carefully roll the dough into a log, keeping it fairly tight as you go. When you reach the edge, pinch along the edge to seal. Pinch, pinch, again, to seal. Using a sharp knife (serrated paring knife works great!), cut the log into 12 rolls. Place the rolls in the prepared baking dish. Cover and let rise 30 minutes, or transfer to the fridge to rise overnight (**see note).
Preheat the oven to 375° F. Bake the rolls for 25 minutes, or until golden brown.
Meanwhile, make the icing. Beat together the cream cheese, butter, icing sugar, and vanilla until light and creamy.
Spread the icing over the warm rolls. Ta da! Serve warm and enjoy!
**RECIPE NOTE
Overnight Rising: Cover the rolls and transfer to the fridge to rise overnight. In the morning, remove the rolls from the fridge and let come to room temp while the oven preheats. Preheat the oven to 375° F. Bake the rolls for 25 to 30 minutes, or until golden brown.

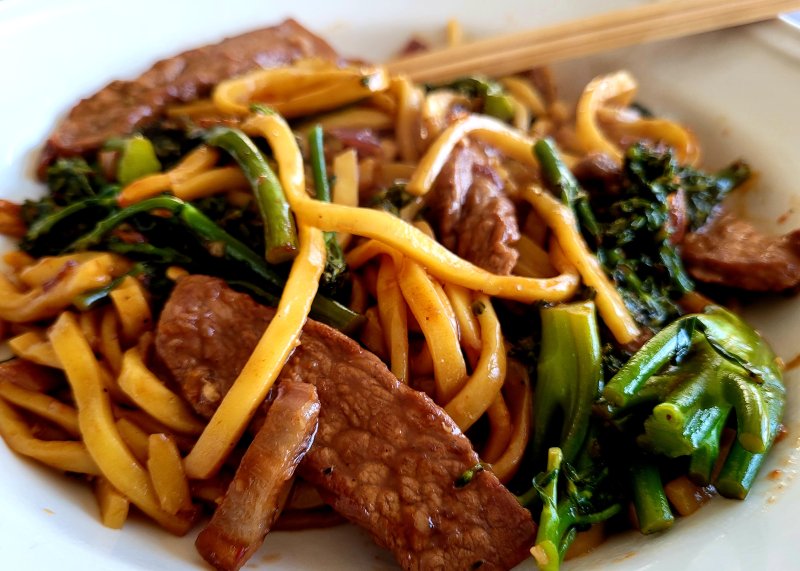
by TheLastWonton | Apr 2, 2021 | Beef, Pork & Lamb, Hawaiian, Main Dishes, Pasta & Noodles, Recipes
A plumply delicious tangle of fresh Shanghai noodles, tender rib eye and earthy broccolini brought together in a quick and easy, Chinese-y, stir fry, with a spicy kick. Pass the chop sticks, please.
This is one of those dishes that as soon as I started playing with it, to get the recipe just right, for us, and for you, I had to keep making. And making. We like it! And it's pretty damn quick and easy to throw together even on those nights when you don't really feel like cooking. Bonus!
Plus now I have one more way to use my latest obsession…..thinly sliced rib eye. I go to T-Bones, a close-by butcher shop, that offers lots of ready to go meat and meal goodies, but also butcher service, for the ribeye. I ask for about 1 pound of ribeye sliced lengthwise into four skinny 'steaks', kind of like Korean BBQ style.
Well, you guys!!! Those skinny little ribeye steaks are soooo good, seasoned and fried hot and fast in just a dob of butter and oil, or grilled, same same. My goodness! The texture, the flavour, the tenderness, the ease. I'd say skinny ribeyes are here to stay, at our house.
Anyway, I digress. Shanghai noodles is why we are here today. And tender fried ribeye. Sheesh, I can't help it!
When making this stir fry I always use the thick, fresh Shanghai noodles. Thick and chewy noodles are the only way to go, to give this dish it's brazen texture. Wham bam!
No weird or unusual ingredients are needed to make this dish, just the usual Chinese/Asian soy sauce, oyster sauce, rice vinegar and chili sauce, like Sambal Oelek.
And, though I use broccolini here, this stir fry is also great using baby bok choy, bean sprouts, mushrooms, whatever suits your fancy. Make it your own.
Also, if you cannot find fresh Shanghai noodles, Japanese udon work well.
I hope you enjoy these quick and easy, restaurant-y noodles as much as we do.

* * * * * * * * * * * * * * * * * * * * *
SPICY RIBEYE AND BROCCOLINI SHANGHAI NOODLES ~ Serves 3-4
1/2 pound ribeye, sliced thin
1 tablespoon dark soy sauce
1 tablespoon sambal oelek
1 1/2 tablespoons cornstarch
1 bunch fresh broccolini = 2 generous cups, roughly chopped
3 tablespoons avocado oil, or your favorite oil, for frying
1/2 small sweet onion, roughly diced
2 plump garlic cloves, minced
1 pound (454gr) fresh Shanghai noodles
1 3/4 cup water
3 tablespoons dark soy sauce
2 tablespoons oyster sauce
1 tablespoon sambal oelek
1 tablespoon rice vinegar
1/2 teaspoon sugar
Place sliced ribeye in bowl, add 1 tablespoon dark soy sauce and 1 tablespoon sambal. Mix, with hands, to coat evenly. Add cornstarch and mix again, coating evenly. Let marinate at least 10 minutes, in fridge. I usually marinate for at least 2 hours, out of ease, of make-ahead.
Steam roughly chopped broccolini for 8-10 minutes, until fork tender, or to your liking. Set aside. This step can be done ahead of time, as well.
Heat large, non-stick frying pan, or wok over high heat, with 3 tablespoons of avocado oil When oil is hot, add sliced rib eye and fry, on high heat, until cooked to desired doneness, 2-4 minutes, flipping, turning, as necessary. Remove from pan, and set aside.
Add diced onion to hot oil in pan, reduce heat to medium-high and cook onion until slightly browning and tender, about 2-3 minutes. Add minced garlic, stirring, fry 1 minute.
Add fresh noodles to the pan, with onion and garlic. Quickly pour in 1 3/4 cup water. Let noodles 'cook' in water 1 minute, and flip. Start to wiggle and move noodles, using a fork and chopstick, to loosen the noodles as they cook. Adjust heat, as necessary. Flip again, and keep wiggling and shimmy-ing noodles until they break right up, 4-5 minutes. *If all the water cooks away, add a bit more, 1/4 cup, at a time.*
Quickly add soy sauce, oyster sauce, sambal, rice vinegar and sugar. Mix, mix, mix. Stir, and wiggle mixture. Add broccolini and ribeye. Using a spatula, or flipper, continue to stir fry mixture until all ingredients are evenly distributed and everything is happy, hot and ready to tantalize your taste buds. Swoop and scoop into bowls, or plates, for serving. Boom-shaka-laka!


