by TheLastWonton | Mar 12, 2021 | Baking & Desserts, Fruits
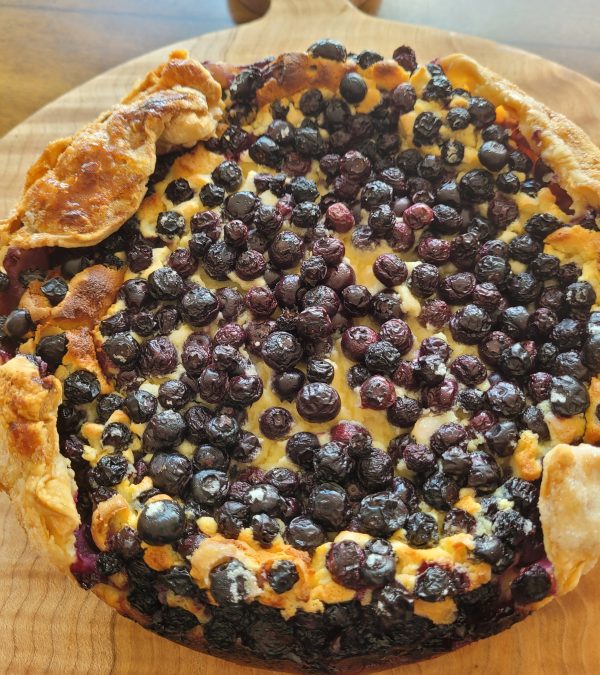
This luscious, blueberry laden cheesecake is like the alter-ego of both a New York-style cheesecake, and a Burnt Basque cheesecake. Dreamy, creamy, innards boasting oodles of fresh blueberries, baked at a high heat, making it pretty much impossible to mess up.

I first found this recipe, a couple of years ago, on Half Baked Harvest, which is one of my all-time fave food blogs. Since then I have made it quite a few times, for friends and family, and it always turns out tasty, delicious.
Here's what Tieghan Gerard, of Half Baked Harvest has to say about it:
"Inspired by the Basque region of France, this cheesecake has a flaky puff pastry crust surrounding the creamy cheesecake filling. Its deep brown top has cracks all around for an old-world look. Sprinkle fresh summer blueberries over top to complete. It’s really not like any other cheesecake you’ve had before. It’s flaky on the outside, but creamy, rich, and bursting with sweet blueberries inside. Bonus? This is the easiest cheesecake to make and (almost) impossible to mess up."
Dat true. Blueberry Basque Cheesecake boasts a kind of down-home goodness, while at the same time being lusciously decadent. That is not an easy combo to achieve. But this one does it! With style.
Starting with a 9-inch, buttered, springform pan, lined with parchment on the bottom, and a so-easily placed puff pastry sheet, to form the crust, makes this cheesecake easy peasy, from the get-go.
The filling is basic and simple to throw together, using your mixer. Then into the prepared pan. Now it's time to load the top of the cheesecake with fresh blueberries, sprinkled with sugar.

Now, into a 400F oven to create your very own Blueberry Basque Cheesecake masterpiece. Once the cake has cooled, just slice, sprinkle with a little powdered sugar, and enjoy. I like it best at room temperature. Joie de Vivre!

* * * * * * * * * * * * * * * * * * * * *
Thanks, yet again, Half Baked Harvest, for the glorious
inspiration to get making and baking. Cheers, Tieghan!
* * * * * * * * * * * * * * * * * *
BLUEBERRY BASQUE CHEESECAKE ~ 8 Servings, 1 9-inch cheesecake
1 sheet frozen puff pastry, thawed
2 – 8 ounce packages cream cheese, at room temperature
3/4 cup sugar
3 large eggs, at room temperature
3/4 cup whipping cream
1 teaspoon vanilla extract
1/2 teaspoon sea salt
3 tablespoons flour
2 – 3 cups fresh blueberries
1 – 2 tablespoons sugar
Confectioners sugar, for dusting
Place a rack in the middle of the oven. Preheat the oven to 400 degrees F. Grease a 9-inch spring-form pan and line the bottom with parchment paper. 
Gently roll the puff pastry out on a clean surface to 1/4 inch thickness. Press the pastry inside the pan and up the sides of the pan. It is OK if the pastry does not go all the way up the pan (see above photos). Transfer to the fridge and chill while you prepare the batter.
In a medium-sized mixing bowl, beat together the cream cheese and sugar on medium speed, scraping down the sides of the bowl until very smooth and creamy, about 2 minutes. Add the eggs, 1 at a time until the eggs are fully incorporated. Scrape down the sides of the bowl, then reduce the mixer speed to medium-low. Add cream, vanilla, and salt, and beat until combined, about 30 seconds.
Sift the flour into the batter, then beat again to combine, about 30 seconds. Pour the batter into the prepared pastry-lined pan. Gently sprinkle the blueberries over the batter, some will sink. Gently fold the corners the pastry over the berries. Sprinkle the top of the cake with 1-2 tablespoons granulated sugar.
Transfer to the oven and bake for 55-75 minutes, (ovens can vary) until deeply golden brown on top and still very jiggly in the center. Let the cake cool 5 minutes, then unmold. Let cool completely. Slice into wedges and serve at room temperature or chilled. I like room temperature best.
by TheLastWonton | Mar 10, 2021 | Appetizers & Snacks, Breakfast & Brunch, Mexican, Recipes, Salads & Bowls, Sauces, Dips & Condiments
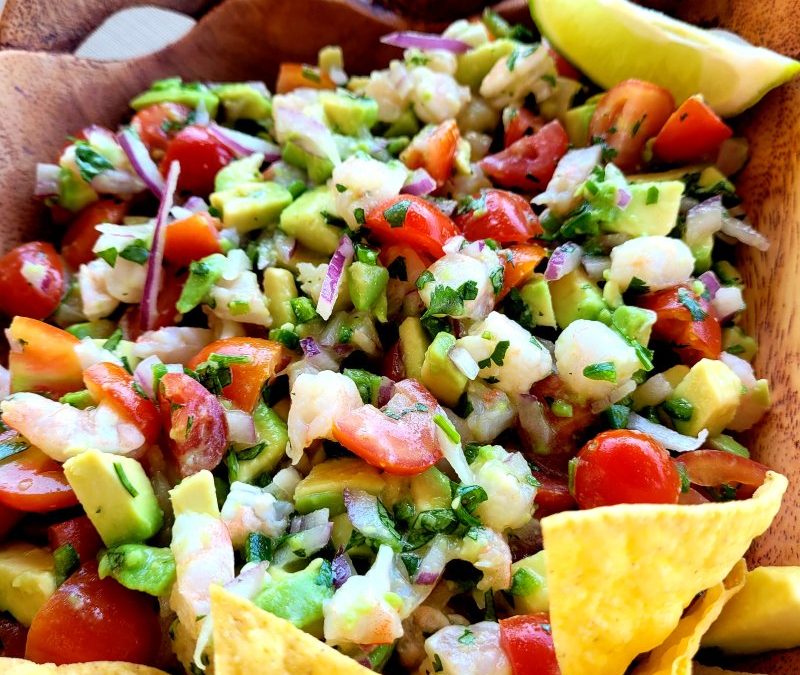
It's like the best Pico de Gallo, Guacamole and Mexican Shrimp Cocktail, are having mucho fun doing The Mexican Hat Dance, together, in your mouth. 'Ole!

Homemade salsa is just something we always have stocked up, in the fridge. It's a fave go-to for mid-day, Happy Hour, or late night munching. Almost always the go-to, around here, is salsa fresca. Simple, fast to make, and addictively pleasing.
But…..playing with salsa, adding new twists, or old, and maybe tomatillos instead of tomatoes, and roasting jalapenos or poblanos, and all that jazz, is definitely fun kitchen play, for me. You might even say, "Salsas R Us."
Awhile back when I came across this Shrimp Avocado Salsa, on the Smitten Kitchen food blog, I knew it was time to play. So play I did, and ended up with this salsa symphony that rather seductively smiles at you, urging you to pick up a chip, and have a nibble.
So far, everyone I've served this to, are so very polite with their first chip-and-salsa nibble. Ahhh but, after that, very pronto, there's a lot of swooping, and scooping, and munching of freshly fried corn tortilla chips overflowing with sunny Shrimp Avocado Salsa. Coolio!
Por favor, adjust this salsa to your tastes. Maybe you want more tomatoes or shrimp or lime. You might want extra heat and no onions. This recipe is intended to share, so make it your own, and get munching.

* * * * * * * * * * * * * * * * *
Thanks, yet again, Smitten Kitchen, for the glorious
inspiration to get making. Cheers, Deb!
* * * * * * * * * * * * * * * *
SHRIMP AVOCADO SALSA ~ Makes about 5 – 6 cups
1 pound small shrimp (I used 71/90 count), shelled, deveined, cooked.
2 medium, firm-ripe avocados, peeled and small diced
About 2 cups grape tomatoes, quartered
About 1/2 small red onion, very thinly sliced and diced
1 small-ish jalapeno, seeded and finely chopped (for more heat, leave the seeds in)
Handful of cilantro, chopped
Drizzle of avocado, or good olive oil
Juice of 1 to 2 limes
Generous sprinkling of sea salt
Tortilla chips, for serving
Chop shrimp into small bites and put in medium bowl, add diced avocados. Add tomatoes, onion, jalapeño, cilantro and a drizzle of avocado or olive oil. Add the juice of one lime, and a second one, if needed. Add salt to taste Serve with tortilla chips, and get nibbling. Ole!
by TheLastWonton | Nov 10, 2020 | Appetizers & Snacks, Breakfast & Brunch, Mexican, Recipes, Sauces, Dips & Condiments, Sides, Vegetarian
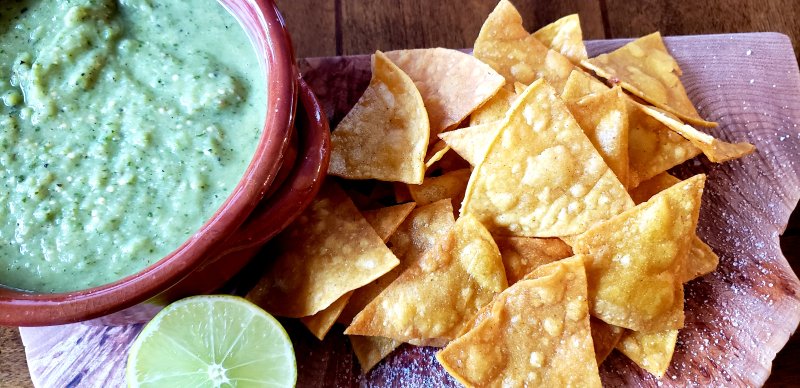
It's tangy, it's bright, it's a spicy, green delight. With an irresistibly, creamy backside that makes you want to bite, and bite, and bite.
One of the Food network TV shows that I so enjoy watching is The Best Thing I Ever Ate. A great program highlighting clips of 'famous' chefs/cooks eating out and munching on their favorites.
As soon as I saw Alton Brown show-and-telling about the Tomatillo-Avocado Salsa at Cosecha Cocina, in Columbus, Ohio, I was instantly hooked.
I mean, seriously, who doesn't love plunking down, and starting any and every, Mexican meal with chips and salsa?! And a Margarita, of course. Same, same, at home, right?
We almost always have a batch of homemade pico de gallo salsa in the fridge, ready for snacking or a nacho feast. Just the way it is.
It hasn't been very long since I discovered this new salsa, that Alton touts, but since then I've already made it three times. As we speak there are fresh tomatillos, cilantro, limes and avocado in the fridge, waiting for me.

There are a couple of wham-bam-thank-you-ma'am differences between this salsa and the more usual salsa verde.
First of all, half of the tomatillos are roasted 'til the skins get wonderfully charred, the rest of the tomatillos are added, fresh, just as they are. This sublime combo gives you an unbridled depth of flavour, from the char, that is in potently in cahoots with a fruitiness from the addition of the fresh tomatillos.
Ah but now, throw in a fresh avocado and oh baby, you've just created a creamy backside to this salsa. Perfectamundo!
I don't always fry up fresh tortilla chips, when we are munching chips and salsa, but for the debut of this new Tomatillo-Avocado Salsa, I couldn't resist. I'm so glad I did. Saludos!

* * * * * * * * * * * * * * * * * * * *
TOMATILLO AVOCADO SALSA
8 fresh tomatillos, husks removed
3 plump garlic cloves
1 tablespoon olive or avocado oil
1-2 fresh jalapenos, cut in quarters (remove seeds for a less spicy salsa)
1 ripe avocado, cut into chunks
2 teaspoons ground cumin
Generous 1/4 cup fresh cilantro, roughly chopped
Juice of 1 plump lime
1 teaspoon sea salt
Preheat oven to 425F. Cut 4 of the tomatillos in half and place on baking sheet with garlic cloves. Drizzle with 1 tablespoon of olive or avocado oil and toss to coat. Place tomatillos cut-side down. Roast 20 minutes. Put broiler on, continue to cook 5-7 minutes more, watching carefully, until those tomatillos are blistered and charred, just right. Set aside to cool.

Place cumin in a heavy, non-stick pan, over medium heat. Scoot cumin about with a spatula, shaking the pan, for 2-3 minutes until slightly darkened and toasty. Remove from pan.
Cut the remaining 4 tomatillos in half and add to blender container or food processor along with roasted tomatillos and garlic (and all pan juices), jalapenos, avocado chunks, toasted cumin, cilantro, lime juice and salt. Buzz, buzz, buzz, until mostly smooth.
Serve immediately or let laze, for 1-2 hours, for the flavours to mingle and mellow. Serve with fresh fried tortilla chips, or your favorite dippers. Will keep in refrigerator 4 days, but it won't last that long!
by TheLastWonton | Sep 20, 2020 | Appetizers & Snacks, Mexican, Recipes, Sauces, Dips & Condiments, Vegetarian
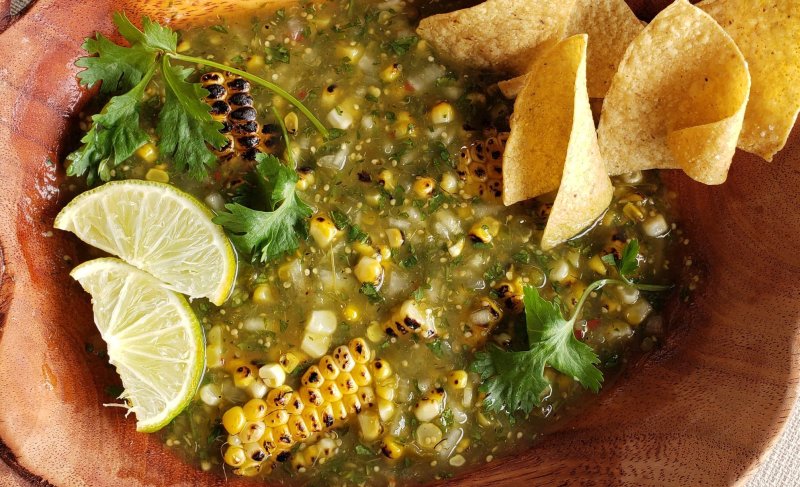
Store-bought tomatillo salsa kicked up with grilled, fresh-picked corn, a friendly zap of sweet onions, aromatic cilantro and the tang of just-squeezed lime juice. A muddle of sunshiney goodness.
I don't know if you guys are the same, but when summer is upon is and I first eye-spy fresh corn on the cob, I make a beeline for that bin. Oh yessirreebob! There's nothing like it. Thankfully, these days, the grocery stores seem to carry shucked corn on the cob, most of the year. A dandy fill-in indeedy. But, nothing beats fresh corn on the cob, grown nearby. Yum!
One fine day when the lazy, hazy, crazy days were having their way with us I wanted a quick and easy starter for a family pool gathering. That's how Shortcut Summer Salsa came to be. Who knew it was going to be so damn popular. Seriously, they munched and crunched, they shot me silly smiles, they filled those paper plates again and then used the rest of the tortilla chips to scrape up any leftover bits of salsa, from the bowl.. I love it when this happens. Yay!
Needless to say this salsa became my go-to summer appie, this year, and still gets the mmmm's…..
* * * * * * * * * * * * * * * * * * * *

Shortcut Summer Salsa
1 16-ounce jar green (tomatillo) salsa. (I used either Herdez or La Costena)
2 ears of fresh corn
1/2 medium-sized sweet onion, finely chopped
1/4 cup fresh cilantro, chopped
Juice of one plump lime
1 1/2 teaspoons sea salt
Tortilla chips
***Note – I sometimes add a very finely chopped fresh jalapeno, but mostly, this summer, I skipped the heat to keep the salsa kid-and-all-user friendly. Ha-cha-cha! ***
Pour green salsa into mixing bowl.
Shuck corn, remove silks. Either grill until cooked and a bit charred, or, as I do, pop onto a gas burner, on my stove top, over medium-low heat. Keep turning with tongs, about 10 minutes, until evenly cooked, with some of those delicious charred bits. Set aside to cool. Then cut kernels from cobs.
Add corn, chopped onion, cilantro, lime juice and salt to salsa, in bowl. Stir, stir, stir. Pour your Shortcut Summer Salsa into a funky serving bowl and serve, with tortilla chips on the side. Enjoy!

by TheLastWonton | Sep 15, 2020 | Baking & Desserts, Breads & Sandwiches, Breakfast & Brunch, Recipes
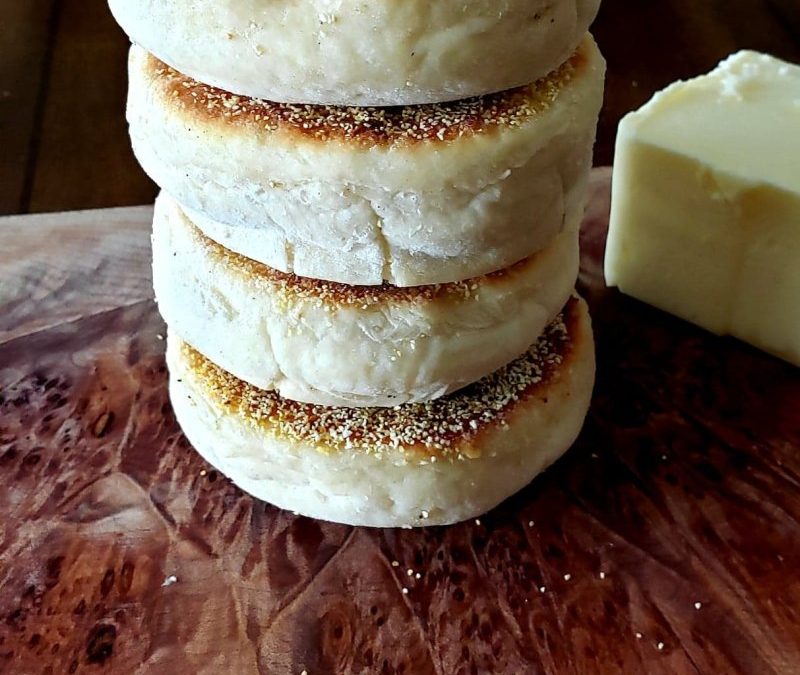
Crispy, crunchy, toasty outtards, give way to soft, chewy, craggy innards = Homemade English Muffins. And not only that, they're fun and easy to make.

English Muffins and I are now on a nickname basis. It's a bit of a story that involves butter, homemade strawberry jam, and Taleggio cheese. Oooh yes, but that's for another time.
For now I've just got to tell you that these EM are not your ordinary EM. No sirreebob!
You throw the ingredients in a bowl, knead, knead, roll, circle cut, rise and cook in hot skillet. No oven! No fiddling. Not only that, the cooking-in-a-skillet part of the recipe will make you smile. Cool, right?!
And as easy as that, Ta da, you just made sooo-good EM, in your very own kitchen. Quickly now, pull a freshly made EM open with a fork, toast and indulge. Repeat.
The trickiest thing about homemade, toasty EM is what to put on them, besides butter of course. A bit of a dilemma that occurs often, at our house. Forest Grump almost always goes for peanut butter and Donna's homemade marmalade. I like to mix it up a bit more, from Brie that kind of melts into the EM, drizzled with hot honey, to just-plucked-from-the-garden, fresh Green Zebra tomato slices. And don't even get me started on Eggs Benny!
Moral of the story, make your own EM. Why not?

* * * * * * * * * * * * * * * * * * * *
Very slightly adapted from The Woks of Life
food blog for The Last Wonton. Thanks Sarah!
* * * * * * * * * * * * * * * * * * * *

HOMEMADE ENGLISH MUFFINS ~ Makes 12-14
1 envelope, or 2 1/4 teaspoons of active dry yeast
1 tablespoon sugar
1 cup warm water
3 2/3 cups flour (plus more for kneading)
1 teaspoon sea salt
2/3 cup plain yogurt
1/4 – 1/3 cup fine cornmeal (for sprinkling)
2 tablespoons oil (avocado, olive, canola)
Add the yeast and sugar to 1 cup lukewarm water. Stir to dissolve, and let stand for 10 minutes to allow the yeast to activate.
In a large mixing bowl, add flour and salt. Stir to combine. Add the yogurt and activated yeast mixture
Mix together with a fork or wooden spoon until the mixture forms a soft, shaggy dough. Knead for 10 minutes, dusting your hands and the dough with a sprinkling of flour if needed (the dough will get a bit sticky as you knead it).
After kneading, let the dough rest for 5 minutes. Sprinkle the cornmeal onto a large rimmed sheet pan.
Roll the dough out to a thickness of about 1/2 an inch. Cut out circles with a 3 inch round cutter. (I use a glass.) Re-roll any excess and form more muffins. You should get 12-14 muffins total. (I always seem to get a baker's dozen.) Slide the muffins around on the cornmeal, a bit, to ensure they don't stick to the pan. Cover with a damp towel and let rise in a warm place for about an hour, until almost doubled in size.
Heat a flat griddle pan, cast iron pan, or similar skilliet, until hot and brush with oil. Add the muffins and reduce heat to low. Cook for six minutes, then flip, and very gently push down on each muffin with spatula. Cook another 6 minutes on this side, until firm and golden brown. 12 minutes total cooking time. Turn only once.
You may have to fiddle with your burner heat a bit. On my gas burners, I have to cook on very low heat.
The best way to break the muffins apart is with a fork, to make sure you get great nooks and crannies. Serve toasted with butter and jam, or of course peanut butter, or Taleggio cheese, or honey. Simply good!


