by TheLastWonton | Sep 3, 2020 | Asian, Main Dishes, Pasta & Noodles, Recipes, Sides
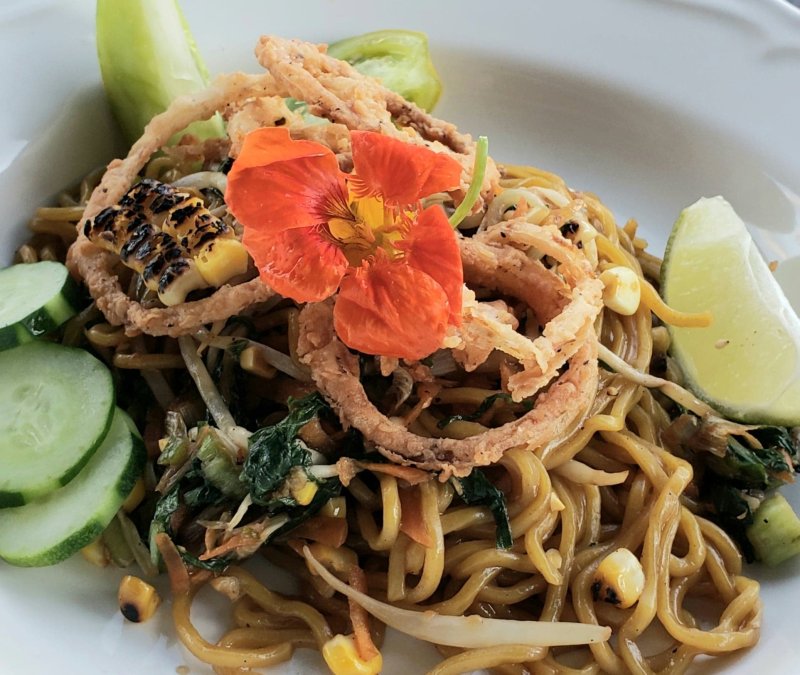
Rustic, aromatic, savory-sweet-spicy, stir-fried noodles, loaded with fresh veggies, tasting of the passion of Balinese tradition, topped with crispy-fried, golden strands of sweet onion. Oh my!
It was just last year that I had my very first taste of Mie Goreng. Not only that, lucky duck am I, that my first Indonesian noodles were deliciously munched down, in Bali.
It seems like forever that us four dearheart girlfriends (Deb, Donna, Lynnea, I love the way you rock!) dreamed and schemed of getting ourselves to that faraway Indonesian Island, to a gorgeous villa, hidden away, on a jungle slope, in rural Ubud. Villa Sagitta is perfectly perched near the top of the hillside on a gorgeous UNESCO World Heritage river gorge. Wow, right?
We arrived at the villa, travel bedraggled, tired and hungry, but immediately enchanted by the bewitching beauty surrounding us.
We had only one immediate agenda, dinner, then bed.
The always friendly, attentive, charming, villa staff were at our beck and call, from the get go. Aaaahhh, life is good. Before we knew it, more magic was upon us. Our dinner table on the lanai was set, enticing aromas were coming from the kitchen, and our view………intoxicating.

Just a smidgen of our panoramic view, from the dining table, as dusk approached.

And then, drum roll please, my first Mie Goreng, Yande style. 
Chewy, tender noodles boasting oodles of exotic flavours, yet comfortably familiar. And this is how, when and where my cravings for Mie Goreng all started.
As like most traditional dishes, anywhere in the world, every family and restaurant have their own authentic version. I looky-looed online at many Mie Goreng recipes, and of course I consulted our talented, Sagitta Villa cook, Yande, on his method and ingredients. Then I played with noodles, and flavours, and textures of course, 'cuz any good Mie Goreng is texture-ific.
Which brings us here today, with my Okanagan Summer version of my fave Balinese noodles. Cool!
'Goreng' translates as 'fried', 'mie' means 'noodles'. Traditionally, this dish is served with either eggs, scrambled, stir-fry style, or a fried egg is decorously plopped on the finished noodles. I left the eggs out of this particular recipe, as I have a couple of non-eggers. But by all means, muddle a couple of eggs into your mixture, if you are so inclined. Yummy.
Also, chicken and/or shrimp are most often, stir-fried first, then removed from the wok, as the veggies and noodles come together, and then added back in. My version is riddled with fresh veggies, no meat or seafood. But again, mie goreng is so delicious with either or both. Mmmm.
Noodles, well you could use, rice noodles, angel hair, thin egg noodles, fresh or instant ramen noodles. I opted for fresh ramen noodles, which I buy regularly from the Oriental Market in Kelowna.
One more thing, mie goreng is often finished with a topping of crispy fried shallots. I thought, hmmm, I think I'll try using Frizzled Onions. So glad I did.
There you have it, try it, make it, make it your own, as this iconic, happy food is so easily adaptable.
* * * * * * * * * * * * * * * * * * * *
Loosely adapted from WhatToCookToday,
TravelAlphas and RecipeTinEats blogs.
Thanks, so much!
* * * * * * * * * * * * * * * * * * * * *

But of course, most importantly inspired by the charming, talented Yande,
at Villa Sagitta. Suksma, Yande!
* * * * * * * * * * * * * * * * * * * * *

MIE GORENG ~ Serves 8
6 individual packages fresh ramen noodles, 5 ounces each (you can also use instant ramen)
3 ears of corn
About 3 tablespoons oil (I used Avocado oil)
1 cup leek, cut into 1/2 nch thick rounds
4 cloves garlic, minced
3 cups chopped baby bok choy
3 smallish carrots, grated
2 cups bean sprouts
3./4 cup good chicken broth, or water and powdered chicken broth
Sea salt & freshly ground pepper, to taste
Sauce :
4 tablespoons kecap manis (sweet soy sauce)
4 tablespoons dark soy sauce
3 tablespoons oyster sauce
1-3 tablespoons sambal oelek
2 teaspoons fish sauce
Garnish – Fresh tomato slices, fresh lime slices, fresh cucumber slices and Frizzled Onions, if desired. Frizzled Onions can be made earlier in the day.
Bring a pot of water to a boil, add ramen noodles and simmer, stirring, about 2 minutes, until just slightly undercooked. Drain, plunge or rinse noodles with cold water, to stop cooking. Set aside.
Shuck corn, remove silks. Either grill until cooked and a bit charred, or, as I do, pop onto a gas burner, on my stove top, over medium-low heat. Keep turning with tongs, about 10 minutes, until evenly cooked, with some of those delicious charred bits. Set aside to cool. Then cut kernels from cobs.
Make sauce by combining kecap manis, soy sauce, oyster sauce, sambal and fish sauce. Whisk. Set aside.
Preheat wok, or large pan, add oil. Add leeks and stir-fry for about 5 minutes until softened, and golden edged. Add garlic and stir-fry 1 minute more. Add bok choy and chicken broth, cook for about 4 minutes. Add carrots and stir-fry another 1-2 minutes. Add salt and pepper to taste.
Add noodles, corn and sauce. Tumbling, mixing carefully to make sure the sauce is coating the mixture. Add bean sprouts and continue mixing and cooking for about 3 minutes.
Garnish and serve immediately. Tastes like Bali.
by TheLastWonton | Aug 31, 2020 | Appetizers & Snacks, Recipes, Sides, Vegetarian, Veggies
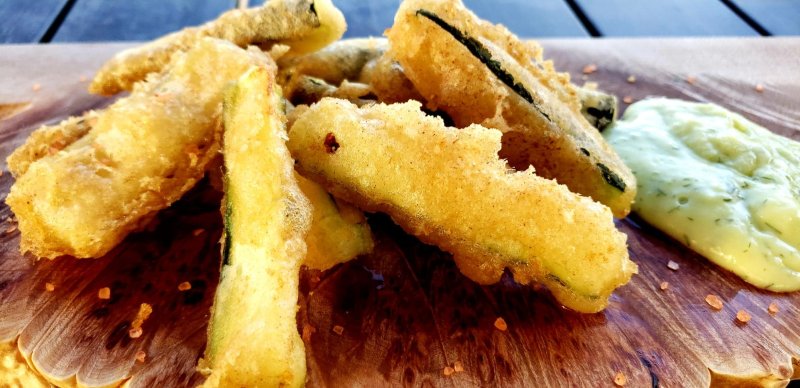
Crispy, crunchy, light as sunshine, batter, hiding tender, garden-fresh zucchini sticks. Munch, munch. Every bite tastes like summer garden goodness. More please.
Summer in the Okanagan means a bounty of fresh fruit and veggies, at every turn. From cherries and cantaloupe, to heirloom tomatoes and cucumbers, and everything in between. Oh yeah, and zucchini. Come mid to late summer, and into the fall, lots of zucchini.
You'll find zucchini everywhere. Everywhere = our little backyard garden, roadside fruit stands, weekend markets, front porches and in the hands of dinner guests as they arrive.
Needless to say we make quite a few zucchini dishes. But the one friends and family seem to never get enough of is Beer Battered Deep Fried Zucchini sticks. Which makes it such a fun and easy appetizer to make for almost all of our summer gatherings.
And bonus, big bonus for me, is that Forest Grump (aka Cliff, the husbando) almost always fries it up perfectly, leaving me to chat and visit with whatever charming little gang is in house. And he's got the batter and the fry down pat. Yay, all the way around.
 We serve it with your choice of soy sauce, sweet chili sauce or what has now become the 'house sauce' for zucchini sticks, dilled hollandaise. Yup! Aaaaannnnndddd, again, because it's summer and in the summer time the living is easy, I use packaged Knorr Hollandaise sauce, made just as the envelope says, but add a tablespoon of dried or fresh chopped dillweed. It's a damn good dipping sauce for hot, crispy, zucchini sticks. You'll have to try it, and see for yourself.
* * * * * * * * * * * * * * * * * * * * *

BEER BATTERED ZUCCHINI STICKS ~ Makes 4 to 6 to 8 appetizer servings.
2 medium sized zucchini, cut into 3-inch long, quite skinny, sticks
1/2 cup flour, plus 1/4 cup
1/2 cup cornstarch
2 teaspoons baking powder
2 teaspoons sea salt
1/2 -1 teaspoon freshly ground black pepper
1 cup+ cold beer
Oil for frying
I put the dry ingredients for the batter together ahead of time, so when it's time to fry, just whisk in the beer.
For the batter 1/2 cup flour, 1/2 cup cornstarch, 2 teaspoons baking powder, salt and pepper. Whisk dry ingredients to combine, then add 1 cup beer. Whisk, whisk. The batter should be really quite thin, but not too thin. We often add a bit more beer at this point.
Put the extra 1/4 cup flour in a bag or bowl, and gently toss zucchini sticks.
Heat at least 3 inches oil, in a wok, or deep sided pot to 375F. Working with one batch of zucchini sticks at a time, drop them into the batter, to cover, and gently add them to the oil. Using tongs, slotted spoon, or chopstick, move sticks around a little while frying until golden brown, about 4-5 minutes. Drain on paper towels. Sprinkle lightly with sea salt, and serve them up to your eager guests, with soy sauce, sweet chili sauce and maybe try our dilled Hollandaise.
DILLED HOLLANDAISE ~ 1 package Knorr Hollandaise sauce, made to the directions on envelope, then stir in 1 tablespoon of dried or fresh, chopped dillweed.

by TheLastWonton | May 26, 2020 | Appetizers & Snacks, Main Dishes, Mexican, Recipes, Seafood
Big, crispy-tender, fried shrimp, with a drizzle of creamy, sweet chili sauce, tucked into taco shells, with avocado-tomatillo dressed cabbage slaw. Hit me!
Tasty taco fun, every damn time we make Shrimp Tacos, at our place. Oddly, we don't have one 'set' way that we must have. Nosirreebob, we mix it up, and then some.
Sometimes we grill marinated shrimp, make more of a salad, than a slaw, using iceberg lettuce, and a real blasting-hot salsa fresca, tucked into homemade soft, corn tortillas.
But lately, often, I've happily defaulted to buying already crispy taco shells. After all, Fresh is Best brand taco shells and tortilla chips are the next best thing, to homemade. So what's a girl to do? Especially a girl who is known to thoroughly embrace 'easy peasy'.
Awhile back, I found lots of versions of the Bonefish Grill's rather famous Bang Bang Shrimp Tacos, online.
Yay! I love good finds, and I cannot lie. Let the kitchen tootling-about begin. Which, pretty much brings us here, now.
The slaw for the tacos is sassy and simple – just green cabbage, cut supah' thin, tossed with Kaloko Salsa, made by buzzing up fresh avocado, cilantro, jalapeno and lime juice, with a bit of good quality, store-bought tomatillo salsa. Yummers.
And, leftover slaw dressing is great served on the side, for dipping and swooping.
You don't need to deep fry the shrimp, as the batter and panko fry up ridiculously crispy in a large skillet, with 1/2 cup oil, or so. Bonus. Then, just stir together a bit of Greek yogurt, sweet chili sauce and Tabasco, for drizzing, and wham bam, thank-you, senorita.

* * * * * * * * * * * * * * * * * * * *
Adapted from Damn Delicious food blog, for The Last Wonton.
Thanks Chungah, as always, for your delicious inspiration!
* * * * * * * * * * * * * * * * * * * * *
CRISPY SHRIMP TACOS a la Bang Bang ~ Makes 8-10 tacos
1/2 cup vegetable oil, for frying
1 cup buttermilk (or 4 tablespoons fresh lime juice in 1 cup measure, topped with milk)
3/4 cup flour
1/2 cup cornstarch
1 large egg, beaten
1 tablespoon Tabasco, or other hot sauce
Sea salt & freshly ground black pepper, to taste
1 pound 16-20 count shrimp, peeled and deveined (2-3 shrimp, per taco)
1 cup panko
8-10 crunchy, corn taco shells
SLAW:
1 ripe, medium-ish avocado, peeled, seeded, cut into chunks
1 cup good, store-bought tomatillo salsa
1/3 cup fresh cilantro
1 jalapeno, roughly chopped
3-4 tablespoons fresh squeezed lime juice
3/4 teaspoon sea salt
3 cups thinly sliced green cabbage
SAUCE:
1/4 cup plain Greek yogurt, or sour cream
1/4 cup sweet chili sauce
1 tablespoon Tabasco
To make the slaw, put avocado, tomatillo salsa, cilantro, jalapeno, lime juice and sea salt in bowl of food processor, and buzz, buzz, buzz, until mostly smooth. Pour about half of the dressing over the cabbage, in a large bowl, and toss, toss, toss. Add more dressing, as needed. Set aside.
To make the sauce, whisk together yogurt or sour cream, sweet chili sauce and Tabasco, in small bowl. Set aside.
Heat vegetable oil in a large skillet, over medium-high heat. In a large bowl whisk together buttermilk, flour, cornstarch, egg and Tabasco; season with salt and pepper. Working one at a time, dip shrimp into buttermilk mixture, then dredge in Panko, pressing to coat.
Working in batches, add shrimp to the skillet, and cook until evenly golden and crispy, about 3-4 minutes. Transfer to paper towel-lined plate. Serve immediately with taco shells and slaw, and drizzled with sweet chili sauce.
by TheLastWonton | May 20, 2020 | Appetizers & Snacks, Breakfast & Brunch, Main Dishes, Mexican, Recipes, Sides, Vegetarian
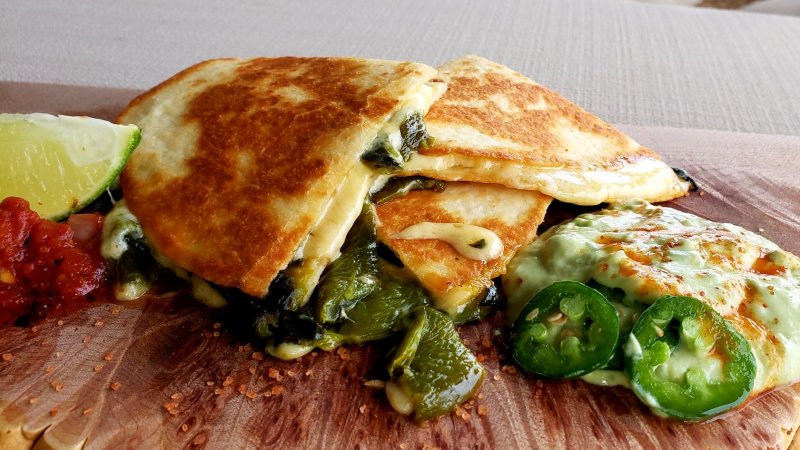
Mild mannered, indulgently tender, Poblano peppers, snuggled up to creamy Havarti and sauteed sweet onions, tucked into flour tortillas, then pan grilled 'til toasty brown. Si, si, si!
This house loves to munch on pretty much any kind of Mexican food. One of our long-standing, always and forever loves. Ole!

So if something South of the Border-ish catches my eye on TV, or in a magazine, or online, you might say I'm very easily inspired to get playing in my kitchen. Mexi-Can!
These quesadillas are fun to make, and you get to have your way with Poblanos! I mean, after all, taking the essence of chile rellenos, fiddling a little, in all the right ways, piling your relleno-ness onto buttered tortillas, then softly frying until tortillas are golden, and the cheese is all oozy is way fun! See, I told you.
First you get to broil the heck out of the Poblanos. Then the silly things just want to hang out in a ziploc or paper bag, for 20 minutes or so, to get their skins all loosey goosey, and ready to peel, seed and slice.
From here on in the recipe easily comes together with a little sauteing, scattering of goodies, relaxed pan grilling, and then Ta Da!
We served our sea-salt sprinkled quesadillas with Avocado Crema, spoonfuls of salsa fresca, and fresh lime wedges. Perfectamundo. Well, if you like these kinds of things.

* * * * * * * * * * * * * * * * * *
Adapted from Fine Cooking, for The Last Wonton.
Thanks plenty, Fine Cooking.
* * * * * * * * * * * * * * * * *
CHILE RELLENO QUESADILLAS ~ Makes 4 quesadillas
2 medium-sized fresh Poblano peppers
1 tablespoon olive oil
1 tablespoon butter, plus more for buttering the tortillas
1/2 of a nice, plump, sweet onion, thinly sliced
Sea salt & freshly ground black pepper
4 – 8-inch flour tortillas
2 – 3 cups grated Havarti or Monterey Jack cheese
Garnish – salsa fresca, lime wedges *optional*
AVOCADO CREMA
1 good-size, ripe avocado, peeled, seeded
3-4 tablespoons fresh squeezed lime juice
1/2 cup sour cream
10 drops Tabasco
Sea salt
AVOCADO CREMA: Mash avocado, in medium bowl, then whisk in remaining ingredients. Whisk, whisk, whisk, until smooth and completely combined. Cover and set in fridge.
Preheat broiler. Lay the peppers on a foil-lined baking sheet, so you can char the bedickens out of them, adding all kinds of flavour, flavour. Place pan up on top rack, close to the broiler, and let them bask about 5-10 minutes, until the skins are dark and bubbly. Keep an eye on these! Flip peppers over and repeat on the other side.
When they're finito most of the skins should be black(ened). You don't want to leave them under the broiler too long or they will overcook and become mushy.
Now, while they're still very hot, placed charred peppers into a large Ziploc, or paper bag, seal and leave them be for about 20 minutes. This will allow the peppers to steam, which will loosen the charred skin and make it easy to remove.
When they're ready, remove peppers from bag and with your fingers, or paring knife, pull off the charred skin. Pull out and discard the stem and seed clusters.
Slice the peppers into 1/4-inch wide strips and set them in a bowl.
Butter one side of each tortilla.
Put a baking sheet in the oven and heat the oven to 150F, or it's lowest setting.
Put 1 tablespoon olive oil and 1 tablespoon butter in a non-stick skillet over medium-high heat. Add the onion and cook, stirring frequently, until soft and lightly browned, about 3-5 minutes. Add the poblano strips, season with a generous pinch of sea salt and a few grinds of black pepper, and cook, stirring occasionally, until the peppers are heated through, another 1-2 minutes. Transfer to plate, and wipe skillet clean.
Heat non-stick skillet over medium-high heat, add 1 tortilla, buttered side down, and scatter over it 1/4 of the cheese and 1/4 of the onion-poblano mixture. Fold tortilla in half, over fillings, press down with spatula, and grill until toasty golden brown on both sides, and the cheese is all melty, 3-4 minutes, per side. Transfer to baking sheet, in oven, to keep warm. Repeat with remaining ingredients, to make 3 more quesadillas.
Sprinkle each quesadilla with sea salt, and cut each one into wedges. Serve with avocado crema. And of course salsa fresca and lime wedges, if it suits your fancy. Comamos!! (Let's eat!)
by TheLastWonton | May 19, 2020 | Baking & Desserts, Breads & Sandwiches, Breakfast & Brunch, Fruits, Recipes
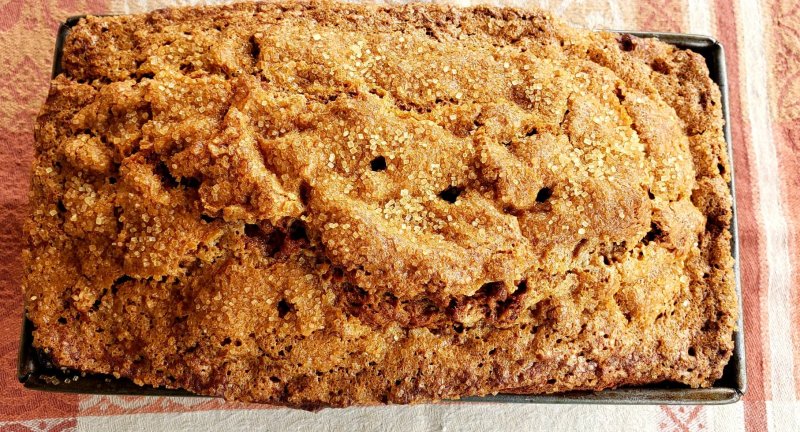
Moist, plush, banana loaf, with a tender, soft crumb, riddled with toasted pecans, and a sassy hit of cinnamon, boasting an irresistibly crunchy top crust.
TOP TEN REASONS TO MAKE GOOD BANANA BREAD
10. It doesn't matter if it's Spring, Summer, Autumn or Winter, it's always in season.
9. Bananas are a Superfood, loaded with nutrients.
8. Banana bread is comfort food, timeless goodness.
7. Comfort = Happiness.
6. The aromas, when banana bread is baking, will make your oven smile.
5. Your friends and kinfolk will appreciate you, just a little bit more.
4. You concoct a, yummy, crunchy, topping, being willy nilly with Turbinado sugar.
3. It's so good schmeared with butter.
2. It's called bread, but really, it's moist, sweet and cakey.
1. It's even better, the next day!

* * * * * * * * * * * * * * * * * * *
Adapted from Smitten Kitchen food blog, for The Last Wonton.
Thanks Deb, as always, for your delicious inspiration.
* * * * * * * * * * * * * * * * * * * * *
GOOD BANANA BREAD ~ Makes 1 loaf
1/2 cup butter, melted
1 cup packed, light or dark, brown sugar
1 3/4 cup mashed bananas, from 4-5 medium-ish bananas
2 large eggs
1 teaspoon vanilla extract
1 teaspoon sea salt
1 teaspoon ground cinnamon
1 teaspoon instant espresso powder (optional)
1 teaspoon baking soda
1 teaspoon baking powder
1 3/4 cups flour
3/4 cup chopped pecans, toasted
2 tablespoons raw, or turbinado sugar (on top)
Heat oven to 350F. Butter a 6-cup (9×5 inch) loaf pan. Set aside.
In bowl of stand mixer, whisk together melted butter and brown sugar until smooth, then with mixer on low, stir in mashed banana. Whisk in eggs and vanilla, until well combined. Sprinkle the surface of the batter, evenly, with salt, cinnamon, instant espresso powder (if using), baking soda, and baking powder, and whisk until the ingredients are fully dispersed in the batter, and then whisk just a little bit more, just to be sure you have no sneaky, hiding, unmixed pockets. Add flour, and whisk, on low, until combined. Stir in pecans.
Scrape batter into prepared loaf pan. Sprinkle the top of the batter with the raw/turbinado sugar; it might seem like a lot, but it will bake up beautifully.
Bake banana bread for 55 to 65 minutes. It is done when a skewer or skinny knife is inserted into the bread is batter-free.
Let cool in pan. This banana bread is good on the first day, but my oh my, on the second and third day, it's all happy, and tasty, and often, I find, it makes you smile, when you partake.


