by TheLastWonton | May 13, 2020 | Appetizers & Snacks, Beef, Pork & Lamb, Hawaiian, Main Dishes
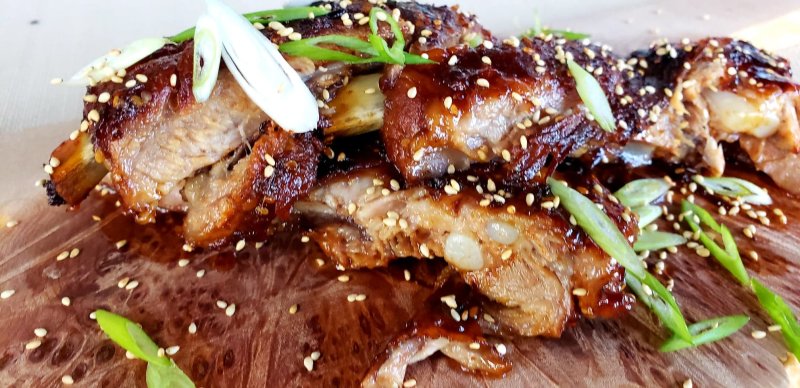
Korean-style BBQ, baby back, or side spareribs, oven baked 'til delectably tender, spicy sweet, and crispy edged. Easy peasy-ness that tastes like the Islands. Da kine!
Kona Ribs! Never heard of them, right? Well, I just thought after so many years of Maui Rib deliciousness, that Kona should share in the glory of a namesake.
After all, Kalbi beef shortribs, all tender and touting those unmistakable Korean BBQ flavours, are readily available on all Hawaiian Islands, not just Maui. Up here too, our grocery stores, and butcher shops, usually have 'Maui Ribs'. Yum, lucky are we, but what the heck?!
Soooo, I've got such a good idea. Skip the beef! It belongs to Maui.
What if we use Pork Baby Back Ribs or Side Spareribs, and slather those racks with pretty much the same Island flavahs, but more fiery, kicked up a notch, just for Madame Pele, Goddess of Volcanoes.
And instead of having to grill these ribs, wham-bam, in the oven they go. Damn good idea, right?
Easy prep, easy cook, easy clean-up. Sweet and spicy, just like Kona!
Now, because our 'ohana likes these Kona Ribs, quite a bit, I've had time in making and re-making to play around with the sauce ingredients and proportions, 'til the flavours pop, just right. For us.
You could always do the same, if you are so inclined.
For baking, make sure you seal the ribs completely in foil, and then lay on a foil lined, raised edge cookie sheet. Also I found lately, that instead of baking meaty side up, I put the meaty side down and then there is no need to finish under the broiler, as the ribs have already become perfectly crispy edged. Cool!
But you might want to try it both ways, meaty side up, one time, then the next time, meaty side down, to see which way you like best. Damn good reasons to make Kona Ribs, at least twice.
In true Mixed Plate, or Plate Lunch style, Kona Ribs go perfectly with steamed rice and macaroni salad. Onolicious!
")
Because this recipe calls for fresh ginger, or ginger root, I cannot resist showing you some of the fresh ginger I got at a Kona Farmers Market last winter.
Happiness is……

* * * * * * * * * * * * * * * * * * * * *
Adapted from The Steamy Kitchen food blog, for The Last Wonton.
Thanks Jaden, as always for all your delicious inspiration.
* * * * * * * * * * * * * * * * * * * * *
KONA RIBS in the Korean BBQ, Hawaiian-style way ~ 4 servings
Sauce:
1/2 sweet onion, finely chopped
3 plump garlic cloves, minced
1 generous tablespoon grated, or minced fresh ginger
2 tablespoons runny honey
1/4 cup brown sugar
1/4 cup dark soy sauce
3 tablespoons rice vinegar
2 tablespoons ketchup
1-2 tablespoons sambal oelek
1 tablespoon toasted sesame seeds, plus more for garnish
1 teaspoon dark sesame oil
4-5 pounds baby back ribs, or side spareribs
Sea salt & freshly ground black pepper
Green onion, sliced thin, on the diagonal, for garnish
In bowl, mix together all sauce ingredients. Set aside. Heat oven to 375F.
Cover large baking sheet with foil. Lay out a large piece of foil, for the ribs. Optional, using butter knife, to pry it up, separate the membrane from the back of the ribs, and discard. Generously season both sides of ribs, with salt and pepper. Lay ribs on foil and slather both sides of ribs, with all of the sauce.
Wrap the ribs, meaty side down, in the foil, completely sealing. Place on baking sheet. Bake for about 90 minutes. If you are using really, big, meaty, side spareribs, they may take a few minutes longer than baby back ribs, but still check done-ness, after 90 minutes. They might be a-okay. Be careful of hot steam, and sauce, when opening up the foil.
If your ribs are not already touting crispy caramelization, here and there, heat the broiler to high, keep foil open, and broil 3-5 minutes, watching carefully, until you've hit the jackpot of Kona Rib 'char'. Da Kine!
Throw on some John Cruz tunes, garnish the ribs with green onion slices and sesame seeds, and serve up Kona Ribs with a big, saucy smile. And maybe some icy, cold beer. Aloha!
by TheLastWonton | May 7, 2020 | Appetizers & Snacks, Baking & Desserts, Breads & Sandwiches, Breakfast & Brunch, Main Dishes, Recipes
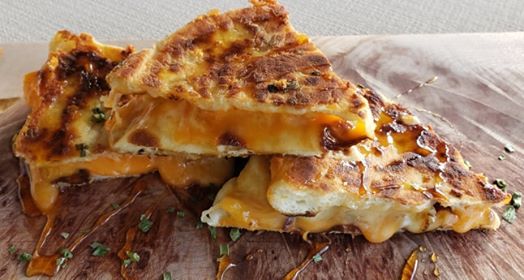
Classic grilled cheese sandwich gone deliciously rogue. Melty Cheddar and Havarti overflowing from toasty, garlic-butter-grilled, Naan bread. Oh me-o, my-o!
So, there I was with left-over, homemade, Naan bread. That usually doesn't happen, around these here parts.
Ponder, ponder, what to make…….hmmmm…….
Then I remembered seeing Naan grilled cheese on one of my fave food blogs, Half Baked Harvest. Quick as I wink I checked it out and then dove into my own version.
You should have seen the silly smile on my face, as I tootled about, preparing. And right away, I started singing, "I Got you Babe,". I don't even know why I told you that, other than to give you the mood, the vibe, in my kitchen as I threw this together. Feels good, doesn't it?
 I mean, really, we all love grilled cheese, right?
So wham bam, a bit of garlic butter, riddled with chives, was done in no time. Grated some Cheddar and Havarti. (Some cheeses love each other.) Hot (spicy) honey, ready to drizzle. And, of course, it wouldn't be grilled cheese, for Forest Grump, without ketchup.
Just moments later I was gently plopping a couple of Garlic Butter Naan Grilled Cheese sandwiches onto the cutting board.
In the blink of an eye, photos were taken and we were partakin'…….Crispy, almost crunchy grilled naan bread, touting a fine garlic blast, with some sublime, sticky sweet heat, from the hot honey, giving way to ooey, gooey, cheesy, goodness. Boom-shaka-laka!
Next time I make these, I think I might just have to concoct some homemade tomato soup, for dipping. Yeah, kicked up comfort, baby!

Okay, so, I must mention my 'Hot Honey' addiction. Hot, being spicy. If I don't have any of Mike's Hot Honey or the farm honey I get in Kona, from the Farmers Market, that's laced with chili peppers, I just make my own. Any liquid honey takes well to a sprinkle or a teaspoon of dried red chile flakes. Then, just let the honey and the chiles get to know each other, right there, in the cupboard.

* * * * * * * * * * * * * * * * * * * *
Thanks, yet again, Half Baked Harvest, for the glorious
inspiration to get making and baking. Cheers, Tieghan!
* * * * * * * * * * * * * * * * * * *
Garlic Butter Naan Grilled Cheese ~ Makes 2 sandwiches
Just in case you want to make your own Naan, here's my recipe.
3 tablespoons butter, at room temperature
1 plump garlic clove, minced
1 scant teaspoon dried chives, or fresh!
2 pieces naan, homemade, or store-bought
1 cup shredded sharp cheddar cheese
1 cup shredded havarti
Hot honey, or ketchup, for serving
In a small bowl, mix together butter, garlic and chives.
Slather one side, of each naan, with garlic butter. Flip the naan over, and layer the cheeses, over one half of each naan. Fold the other half of the naan over the cheese, like a taco.
Heat a large skillet over medium heat. Carefully place the naan, buttered sides out, in the skillet, one at a time, and cook until toasty golden, on both sides, and cheeses are all melty, about 3-5 minutes, per side. Serve drizzle with hot honey, yummy old plain runny honey, or ketchup. Enjoy!
"Too few people understand a really good sandwich."
~ James Beard
by TheLastWonton | May 6, 2020 | Appetizers & Snacks, Breads & Sandwiches, Recipes
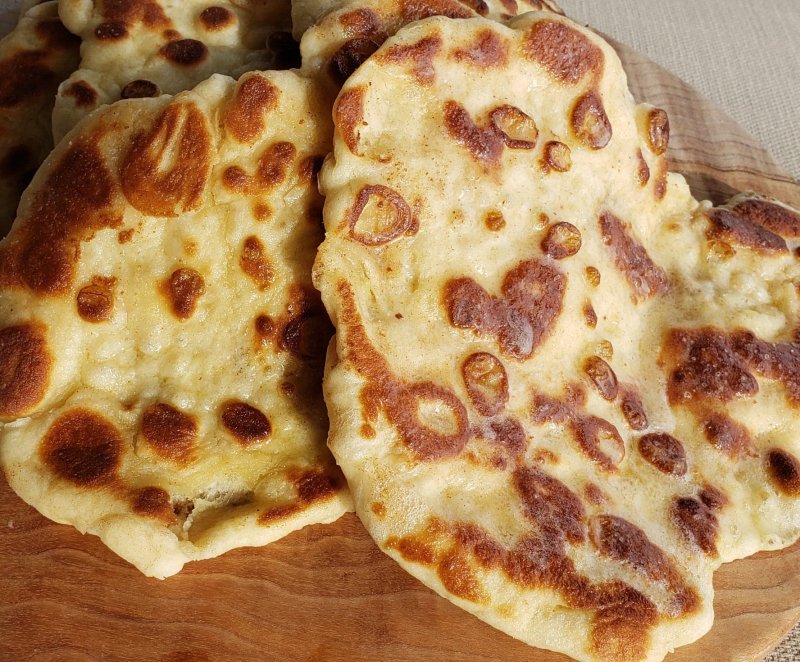
Pillowy soft, addictively chewy, easy-to-make, flatbread, sporting giant, poofy, air pockets, and golden brown, toasty, polka dots. More please!
I don't know what it is that is so satisfying about making bread. It just never fails to give me that oomph of pleasure, of indulgent accomplishment. And then of course the seductive rewards. Aaaaahh …….food for staying in.
Naan is an Indian style flat bread, that is traditionally cooked in a tandoor clay oven. Lucky for us we can easily replicate the process by using a hot, cast iron, or good, non-stick skillet. Cooks up like a charm, every time.
Ingredients and method are simple, and the yogurt in this recipe, adds a whisper of tang. Bonus! 
As if naan needs any help in being sassily addictive, just before cooking, in a hot skillet, each naan is brushed with melted butter, so when you pop the naan out of the pan, it's already plush with buttery goodness.
Not too say it's not groovy to add a little more butter to a hot piece of naan, especially if having, that I-cannot-wait taster, with peanut butter or golden syrup, or crab apple jelly Ohhhh, I am so easily sidetracked. Sorry!
Most of the time we have our warm-from-the-pan Naan with Ethereally Smooth Hummus or Avocado Tzatziki or our family fave Tzatziki or Baba Gnanoush.
Needless to say, Naan bread is also good with curries, and soups, or alongside your favorite charcuterie.
Hope you guys enjoy making and partaking of this flatbread that has been known to turn heads, when it enters the room.
")
* * * * * * * * * * * * * * * * * * * * *
Thanks, yet again, Half Baked Harvest, for the glorious
inspiration to get making and baking. Cheers, Tieghan!
* * * * * * * * * * * * * * * * * * * * *
Homemade Naan ~ Makes 8 naans
1/4 cup hot tap water
1 tablespoon sugar
1 scant teaspoon active dry yeast
3/4 cup warm milk
1 cup plain Greek yogurt
4 cups flour
1 1/2 teaspoons baking powder
1 teaspoon baking soda
1/2 teaspoon salt
Melted butter, for brushing
In medium mixing bowl, combine hot water, sugar and yeast. Stir gently. Let sit for 10 minutes, or so, until the yeast rises and gets all happy and frothy.
Add the milk, yogurt, flour, baking powder, baking soda and salt. Mix with a wooden spoon until the dough comes together. It should be sticky, but will form a soft ball. Cover bowl with damp towel, or plastic wrap, and let sit in a warm place, for 1 hour.
Or if not using, right away, store overnight, in fridge.
When ready to cook, divide the dough into 8 equal balls, and using a rolling pin, roll each piece of dough, into an oval shape. Oval should be about 6-8 inches long, and about 1/4 inch thick. Repeat this process, with the rest of the dough balls.
Warm a cast iron, or non-stick, skillet over medium-high heat (you want a hot pan). Brush both sides of the naan, with melted butter. Place the naan in the hot skillet, cover with a lid, and cook for about 1 minute, until you see bubbles starting to form. Cool, hey?
Flip and cook for 1-2 minutes on the other side, until large toasted spots appear, on the underside. Brush with a bit more butter, if desired, sprinkle with a little sea salt and place in a tea towel lined dish. Repeat with the rest of the naans, and serve up with a smile, or maybe a bit of a buttery, salty, grin. Best eaten fresh! Chew on that.
by TheLastWonton | Apr 2, 2020 | Baking & Desserts, Breads & Sandwiches, Breakfast & Brunch, Recipes, Treats
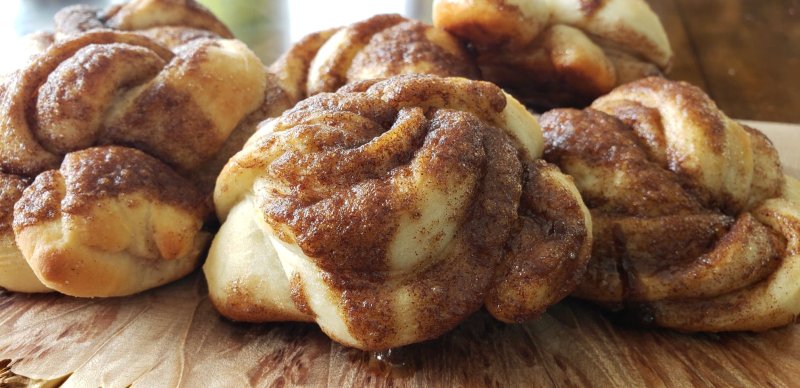
They're quick, and fun, to throw together. They're addictively yeasty soft, but intriguingly chewy, but sublimely crunchy. And, of course, gloriously cinnamon-y. Yeast + cinnamon sugar = Timeless comfort.
They're delicious, unadorned, warm-from-the-oven, or…….

…..drizzled with a coffee-tinged glaze.
Winter chills are lingering, comfort has become a mission, using ingredients we have on hand is simply protocol, and we're all being lured by any possibilities of deliciousness. 
Enter Easy Peasy Cinnamon Crunchy Knots. Minimal ingredients, all pretty much pantry staples. The dough is basically a quickie pizza dough, that works beautifully for these treats, and they're fast and simple to make. And might I add, really fun to make.
The dough comes together very quickly, and only takes about an hour to rise. Then roll out the dough, smear with butter, sprinkle the cinnamon sugar, fold and cut into strips. Then, oh yeah baby, twist and shout. No, no, twist and tie in a knot, and place on parchment lined baking sheet, snuggling the dangling little ends close around the knot. Each knot is quirkily different, and they're all fun little works of edible art. Almost makes you smile out loud.
Then – Ta da da da – the crowning glory. Time to put the Crunch in the Easy Peasy Cinnamon Knots. 
Just swoop up the buttery, cinnamony, brown sugar goodness and top each knot with this simple concoction. Please note, sometimes the brown sugar mixture is a little more granular than this batch of mine. I'm pretty sure it has to do with the particular brown sugar we use. But the great thing is, no matter the texture of the crunch mixture, it always makes the perfect finish.
Now, to state the obvious, these knots are so good for breakfast, or brunch, or snacking, anytime. But, here's a little something, something, I didn't think of. My sister happily emailed me saying, "Just so you know, your Cinnamon Knots go very well with red wine". Thanks, Mary-Anna. Cheers!

* * * * * * * * * * * * * * * * * * * * *
Thanks, yet again, Half Baked Harvest, for the glorious
inspiration to get making and baking. Cheers, Tieghan!
* * * * * * * * * * * * * * * * * * * *
Easy Peasy Cinnamon Crunch Knots ~ Makes 12
1 cup warm water
1 package instant yeast (2 1/4 teaspoons)
1 tablespoon honey
2 1/2 cups flour, plus more if needed
1/2 teaspoon salt
1 tablespoon olive oil
6 tablespoons butter, room temperature
1/4 cup sugar
2 teaspoons cinnamon
1/4 cup brown sugar
GLAZE
2 tablespoons cream cheese, room temperature
2 tablespoon cold, strong coffee
1 cup icing sugar
In the bowl of a stand mixer fitted with the dough hook, combine the water, yeast, honey, flour, salt, and olive oil. Knead until the dough comes together, about 2-3 minutes. Cover and let sit in a warm place for 45 minutes to 1 hour.
Preheat the oven to 375 degrees F. Line a baking sheet with parchment paper.
In a bowl, combine the granulated sugar and 1 teaspoon cinnamon.
On a floured surface, roll the dough out into a rectangle about 1/4 inch thick, adding flour to the dough if it is sticky. Smear the dough with 4 tablespoons butter and sprinkle with cinnamon sugar. Fold the dough in half and cut into 12 strips. Twist each strip, pull a bit, and then tie into a loose knot, it doesn't need to be perfect. Place on the prepared baking sheet.
Melt the remaining 2 tablespoons butter. Stir the melted butter together with the remaining 1 teaspoon cinnamon and the brown sugar. Spoon clumps, or puddles, of the brown sugar mix over the knots This is going to be your "crunch" layer. Transfer to the oven and bake for 15-19 minutes or until golden, brown.
Meanwhile, make the Glaze. In a medium bowl, beat together the powdered sugar, cream cheese, and 2 tablespoons cold coffee until smooth and combined.
Drizzle glaze over the knots, if desired. Boom shaka laka! Enjoy!
by TheLastWonton | Mar 22, 2020 | Breakfast & Brunch, Main Dishes, Recipes, Sides
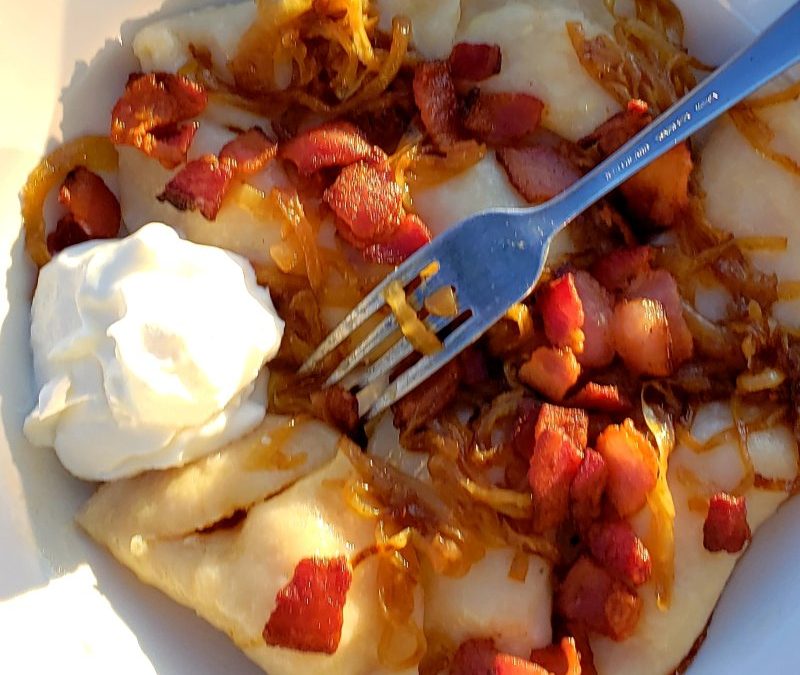
Soft, tender, ever-so-slightly-tangy, pasta pockets filled with cheddary-smooth, mashed potatoes, crowned with hot-sauteed onions, and salty bacon bits. Oh mama!!

Sunny, chilly, March weekends = Comfort Food.
Homemade Cheddar Perogies = Soul Satisfying Comfort Food.
Homemade Cheddar Perogies, topped with golden-brown-edged, fast fried, sweet onions and oodles of crispy, salty, bacon chunks, and of course, a smear of melted better and a dollop of sour cream = Robust, Bodacious, Yes Please, Comfort Food.
Boom shaka laka.
I don't know about you, but I love it when I can confidently justify these rather naughty, down-home, delicious feasts. Especially on early Spring days, when chilly, winter breezes linger. Or, maybe, when we're all supposed to just stay indoors, for fun, for health and for making the world a better place.
Cue, homemade perogies. 
I like to serve perogies as a side dish when I'm having roast chicken, BBQ steaks, or sometimes, for Christmas Dinner But this time around perogies were the main event.
The dough is simple – flour, salt, melted butter, egg, and for a moist, tangy, little blast, plain Greek yogurt. Cool, right?!
Then, for the easy peasy filling, cheddar-riddled, mashed potatoes, touting just a dash of this, and a little schwack of that. Ta da!


Making perogies is pretty darn easy, just a bit fiddly. This dough cooperates well, and the filling consistency lends itself perfectly to being plopped, and wrapped. You can make them for same day gobbling, or freeze, for later. If cooking frozen perogies, they just take a tich longer to cook.
Once the perogies are boiled, or fried, serve them up, topped with brazen helpings of aromatic, fried onions and bacon chunks. Don't forget to offer up some butter and sour cream (or tangy Greek yogurt) just to amp up the comfort quotient. Irresistible!
Did you know??
The small town of Glendon, Alberta, Canada unveiled its roadside tribute to Ukrainian perogy, in 1991. Glendon’s perogy is a huge statue of one perogy, put on the fork. The statue is 25-foot height, weights 6000 pounds and is made of fiberglass and steel.

* * * * * * * * * * * * * * * * * * * * *
Adapted from Half Baked Harvest, for
The Last Wonton. Thanks oodles, Tieghan. You rock!
* * * * * * * * * * * * * * * * * * * *
Cheddar Perogies ~ Makes 35-40
FILLING:
2 large-ish russet potatoes, peeled, quartered
1 1/2 cups shredded 'old' cheddar cheese
2 tablespoons butter, room temperature
1 heaping tablespoon plain Greek yogurt
1/2 teaspoon onion powder
Sea salt and freshly ground black pepper
DOUGH:
2 cups flour
1 teaspoon sea salt
2 tablespoons butter, melted
1 cup plain full fat Greek yogurt
1 egg, beaten
TOPPING:
1 large sweet onion, thinly sliced
2 tablespoons butter and 1 tablespoon avocado or olive oil
4-6 slices thick bacon, roughly chopped
Butter
Sour cream or plain Greek yogurt
To make the filling: Boil potatoes in a pot of salted, cold water, under fork-tender, about 20-30 minutes. Drain. Return potatoes to pot, and mash over low heat, adding cheddar, 2 tablespoons butter, 1 heaping tablespoon yogurt and onion powder. Season to taste with salt and pepper. Set aside to cool. Filling, done.
To make the dough: In a medium bowl, combine the flour, salt, butter, yogurt and egg. Mix until combined. Knead the dough, for 2 – 3 minutes. Cover and let sit for at least 30 minutes. Dough, done.
Roll the dough, onto a floured surface to 1/8 inch thickness. Using a biscuit cutter, or glass, cut out 3-inch circles. Spoon about 2 teaspoons filling into the centre of each round. Brush the edges with water and fold half of the dough over the filling to enclose it. Press down the edges to seal, pressing out all the air. Place on parchment paper lined baking sheet. Perogies, made.
At this point, the perogies can be flash frozen, on the baking sheet for an hour, then transferred to a freezer bag, and frozen for up to 3 months.
Or refrigerated until ready to prepare comfort feast.
Just before cooking the perogies, heat a large skillet over high heat, with 2 tablespoons butter and 1 tablespoon avocado oil. Add the onions and fry and stir, about 5 minutes, adjusting the heat, if necessary, until onions are softened and have some of the marvelous toasty-golden-brown edges. Transfer to small serving bowl.
Wipe the skillet clean and cook bacon, over medium heat, until crisp. Drain on paper towlels.
When ready to cook, bring a large pot of salted water to a boil. Boil perogies, in batches, if necessary, for 1-4 minutes, or until they float. Drain.
Divide the perogies onto plates. Top with fried onions and bacon. Set out butter, sour cream or plain yogurt, for swooping. Boom Shaka Laka!

")


")


