by TheLastWonton | Feb 27, 2013 | Baking & Desserts, Cake, Fruits, Hawaiian
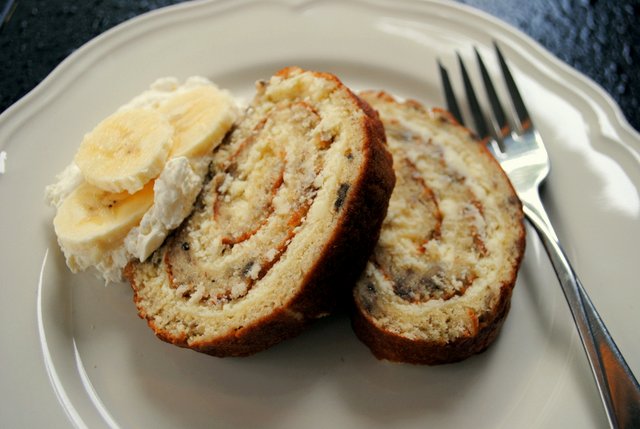
Moist, crumbly-tender, indulgently-banana flavoured cake hugging a creamy, decadent cheesecake filling. Cake and filling bake together! Total cake making grooviness.
I can't wait to make this again!
We like roulades at our house, so I've made quite a few roulade style cakes. But, never one where you bake the filling along with the cake. How flippin' cool is that?
This cake was fun to make, turned out just as it should have, was so tasty-good and keeps well in the fridge for up to 3 days. It's easy enough to throw together for an anytime treat, but it would also be a perfect dinner party dessert.
This time around we happily munched our cake down with just a dollop of sweetened whipped cream and a few stray fresh banana slices. Big, silly, sugar-coated, monkey-like grins everywhere.
But as we munched and critqued, Forest Grump and I both agreed a warm, rich, buttery caramel sauce, with or without a few fresh banana slices, would take this roulade over the top in all the right ways. Next time, for sure!!
Man oh man, I so wish I had a couple of bananas right now!
********************
Thanks to Eat Cake for Dinner food blog where I found this gem of a keeper recipe,
who adapted the recipe from Better Homes and Gardens. Couldn't have done it without you!
********************
BANANA ROULADE with Cheesecake Filling – 6-8 servings
Cheesecake filling:
1 (8oz) + 1 (3oz) package cream cheese, softened
1/2 cup sugar
1 large egg
3 tablespoons milk or cream
1 teaspoon good vanilla extract
Banana roulade:
1/2 cup + 2 tablespoons flour
1/2 teaspoon baking powder
1/4 teaspoon baking soda
Pinch sea or Kosher salt
4 large egg yolks
1 teaspoon good vanilla extract
1/3 cup + 1/2 cup sugar, divided
2/3 cup (2 small, or 1 large) ripe banana
4 large egg whites
1/4 cup sugar, for spinkling on towel
Preheat oven to 375F degrees. Lightly grease 15x10x1-inch jelly roll pan. Line with parchment paper and lightly butter parchment, making sure to coat the entire surface and sides of pan; set aside.
For filling: In a small bowl, combine cream cheese and 1/2 cup sugar and beat with an electric mixer until smooth. Add the egg, milk (or cream) and vanilla and beat until combined and lovely and smooth. Spread evenly in prepared pan; set aside.
For roulade: In a small bowl, whisk together the flour, baking powder, baking soda and salt; set aside. In a medium bowl, beat egg yolks and vanilla on medium speed until thick and lemon coloured. Gradually add 1/3 cup sugar and beat well. Stir in mashed banana.
In a large, clean bowl with clean beaters, beat the egg white on medium until stiff peaks form. Gradually add 1/2 cup sugar, beating on high speed until stiff peaks form.
Gently fold yolk mixture into whites. Gradually sprinkle flour mixture evenly over egg mixture and fold together, just until blended.
Carefully spread the batter evenly over the filling in pan. Bake for approximately 20 minutes or until the top springs back when lightly touched.
Immediately loosen cake from sides of pan. Carefully turn cake out clean kitchen towel that has been evenly sprinkled with 1/4 cup sugar (cake side down). Carefully peel off parchment paper. Starting with the short side, roll up cake as tightly as possible (don't roll up the towel with it!). Allow to cool completely. Slice and serve. Good at room temperature or chilled.
Wrap any leftover cake in saran and keep in fridge, up to 3 days.
by TheLastWonton | Feb 16, 2013 | Appetizers & Snacks, Breads & Sandwiches, Greek Food, Sides
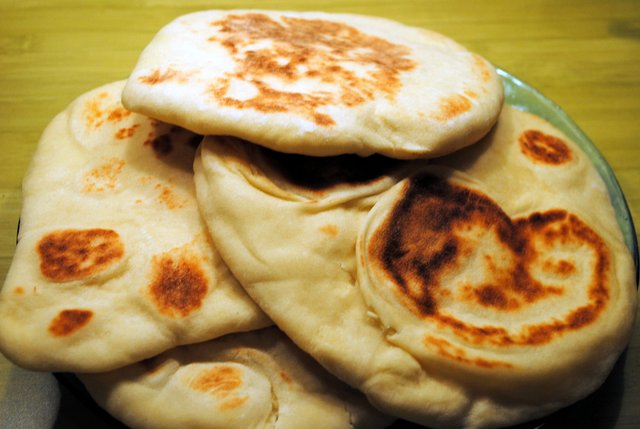
Pillowy soft, tender-chewy, rather addictive, homemade pita bread, reminiscent of naan, that begs to be swooped, stuffed or torn. You know you waaahnt it.
Yes! Finally.
After quite a bit of trial and error with more than a handful of different recipes, I now happily exclaim, "Eureka!" I have found the pita bread recipe.
Silly me! I should have looked at one of my all time fave food blogs, Smitten Kitchen, right from the get go. Yessirreebob, Deb has done it again. Thank-you, thank-you, lady-who-makes-delicious.
You see, at our house, we're forever scooping, swooping and munching hummus, baba ghanoush and tzatziki.
Or, on a good day, really needing to wrap slices of succulent, garlicky roast lamb up with sweet onions, ripe red tomatoes, chopped fresh oregano and tangy feta.
Yes, yes, of course, store bought pita is good, and fits the bill. But, as Sinead so aptly swoons, "nothing compares to you". Yes, you, my lovely homemade pita bread.
 This is one fine recipe. The pitas puff up beautifully in the pan. They're light, but have the innate good nature to offer up a pleasing bite and beguiling texture.
"A long rise in the fridge lends itself to a developed flavour we associate with high-end, artisanal breads."
Simple ingredients, a tried and true method and a perfectly timed cook, will have you smiling smugly with accomplishment.
Oh my tasty pita, where, oh where, have you been all my life?
PITA BREAD – Makes 10
3 cups plus a scant 1/4 cup unbleached flour
2 teaspoons salt
2 teaspoons instant yeast
3 tablespoons olive oil
1 1/4 cups warm water
About 1 1/2 hours before shaping, or for best flavour development, 8 hours to 3 days ahead, mix the dough.
Make dough: In the bowl of a stand mixer, combine all ingredients. With the paddle attachment, mix on low speed just until all the flour is moistened, about 20 seconds. Change to the dough hook, raise the speed to medium and knead for 10 minutes. The dough should clean the bowl and be very soft and smooth and just a little sticky to the touch. Add a little flour or water if necessary.
Let the dough rise: Lightly oil or grease a 2-quart, or larger, bowl. Press the dough down and lightly oil the top of it. Cover bowl with plastic wrap. With a piece of tape, mark the side of the bowl at approximately where double the height of dough would be. Refrigerate the dough 8 hours, overnight, or up to 3 days, checking every hour for the first 4 hours and pressing down if it starts to rise.
Shape the dough: Cut the dough into 10 pieces. Work with one piece at a time, keeping the rest covered with a damp cloth. On a lightly floured counter, with lightly floured hands, shape each piece into a ball and then flatten it into a disk. Cover the dough with oiled plastic and allow it to rest for 20 minutes at room temperature.
Roll each disk into a circle a little under 1/4 inch thick. Allow them to rest, uncovered, for 10 minutes before cooking.
To cook the pitas: Preheat griddle, cast iron skillet or pan over medium-high heat. Lightly grease the surface and cook the pitas one at a time. Cook for about 20 seconds, then turn the dough and continue cooking for 1 minute or until big bubbles appear. Turn the dough again and cook until the dough balloons. If the dough begins to brown, lower the heat. (We like our pitas with little golden brown patches, so we regulate the heat accordingly) The entire cooking process for each pita should be about 3 minutes.
Now serve 'em up all toasty warm. Ta da!
by TheLastWonton | Feb 16, 2013 | Appetizers & Snacks, Asian, Chicken & Poultry, Main Dishes
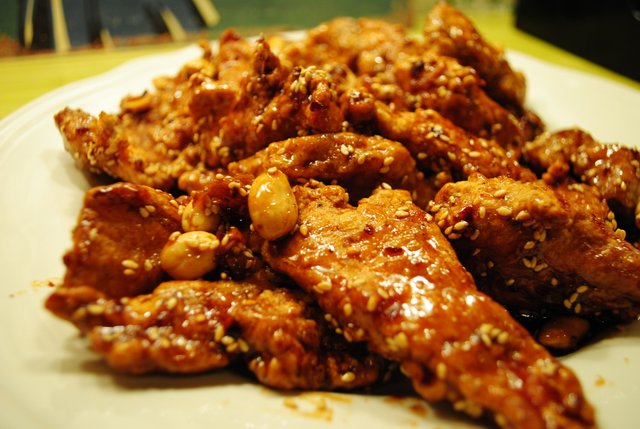
Quickly crispy-fried, to keep the succulence in, where it belongs, Korea's Dak Kang Jung delivers seriously spicy and brazenly candied chicken. Sublime.
The lingering of winter. The laments of February. The daydreaming of exotic far off lands. The craving for heat. The love of hot, sticky, gooey.
Yup, that's the breadcrumb sesame seed trail that led me directly to Korean Crispy Chicken or Dak Kang Jung. I think Korea should seriously consider renaming this traditional dish, Dak Kang Jung Yum!
 Chicken breasts cut into strips, gently dry coated and egged, then fried to golden crispiness will have you patting yourself on the back (already!) that it was so easy to make this amazing looking fried chicken. Not yet! Just wait, my lovelies!
The spicy, sweet sauce is speckled with thin slices of ginger root that get gloriously chewy and candied, lending their own brand of warmth to the punch of heat from the dried chiles.
Then there's the tossing in of toasted sesame seeds and really roughly chopped roasted peanuts. Texture baby, and layers of flavours. Mmmmm……
****************************
I changed things up a bit to make this one my own, but many gamsahabnida to 'Notions & Notations of a Novice Cook' food blog where I serendipitously happened upon this drool worthy Dak Kang Jung, Yum!
******************************
KOREAN CRISPY CHICKEN with SWEET & SPICY SAUCE – 4-6 servings
1/2 cup water
1/2 cup packed brown sugar
1/4 cup rice vinegar
1/4 cup honey or corn syrup
3 inch piece of ginger root, peeled and very thinly sliced
2 tablespoons dark soy sauce
1 heaping teaspoon dried red chile flakes (or less if you're not craving the heat)
4 boneless, skinless chicken breasts, cut into strips or pieces
5 tablespoons flour
5 tablespoons cornstarch
1 teaspoon sea or Kosher salt
1 teaspoon freshly ground black pepper
1 large egg, beaten
Canola oil, for frying
2 tablespoons toasted sesame seeds
1/3 cup roasted, salted peanuts, very roughly chopped
Make Sweet & Spicy Sauce: In medium pot, combine water, brown sugar, rice vinegar, honey or syrup, sliced ginger, soy sauce and chile flakes. Bring to a boil, reduce heat medium low-ish to keep mixture at a gentle, but steady boil. Cook until mixture become syrupy and thick and starts to foam. It should have the consistency of honey. Remove from heat. Set aside.
In a medium bowl, combine flour, cornstarch, salt and pepper. Place chicken pieces in large bowl, add flour mixture and turn and toss to evenly coat chicken. Add the beaten egg and mix until chicken pieces are coated in batter.
Heat oil in a wok or pan and deep fry the chicken pieces, in batches, approximately 5-7 minutes, until golden. Keep warm while frying the rest of the chicken.
Meanwhile heat the sauce on medium-low. Pour warmed sauce, sesame seeds and peanuts over crispy cooked chicken pieces and toss until coated. Serve hot with sticky rice and a tall, icy one. Or two.
by TheLastWonton | Jan 20, 2013 | Appetizers & Snacks, Greek Food, Sauces, Dips & Condiments, Sides, Vegetarian
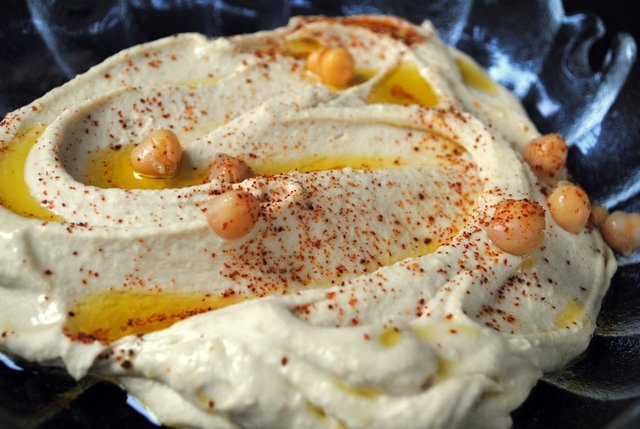
Heavenly smooth, plush swirls of lemony, garlic riddled, chickpea-tahini dip. This is not your Ya-ya's hummus!
Thank-you, thank-you, thank-you, Deb of Smitten Kitchen food blog fame. You rock!!
Who woulda' thunk, that the simple, and unexpectedly therapeutic act of skinning chickpeas would change my life? Seriously.
You see, I love hummus. But I had no idea, not an inkling, that this long time favorite Greek dip of mine, could, in fact, be ambrosia.
There's no looking back now. I already cannot wait to make another batch ….. and another batch….of ethereally smooth hummus that whispers softly, "Swoop me. Swoop me now!"
It makes sense really. You know how deliciously good it feels just to be naked? Same, same for chickpeas. See….
At this point, I know you don't really want to, but you're already considering possibly, just possibly, peeling some peas they call chick. Aren't you?
 Sure, sure, it might take an extra 10-15 minutes out of your day, but I promise you it is worth it. And, you'll be very pleased to know that though this task seems unnecessarily tedious, it is not.
It is, in fact, quite pleasurable.
You likely have not even noticed before that chickpea skin, is well, really quite precariously draped there, as if begging to be defrocked.
Each little chickpea, takes but a gentle squeeze, with your thumb and peter pointer, and 'Pop', off comes the skin, and 'Plink', goes the pea into the bowl. Pop, plink, pop, plink, pop, plink. Percussive little peas. Ba dum bum ching.
Okay, your turn. I just know you've got a can in the cupboard filled with chickpeas who would love to go skinny dipping. Gnarly!
ETHEREALLY SMOOTH HUMMUS
1 (19 ounce) can chickpeas, drained, liquid reserved
1/3 -1/2 cup tahini paste
4 tablespoons fresh squeezed lemon juice
3 plump garlic cloves, minced
3/4 teaspoon sea or Kosher salt
Good quality olive oil, smoked paprika or Hatch chili powder – for garnish
Peel your chickpeas. I find the easiest way, is to take a chickpea between your thumb and next one or two fingers, and 'pop' the naked chickpea out. Discard the skin. Find your rhythm and keep peeling.
In a food processor, blend the chickpeas, until a powdery smooth paste forms, about 1 full minute, scraping down sides. Do not under process. Add the tahini, lemon juic, garlic, salt and about 3 tablespoons of the reserved chickpea 'juice'. Blend until well pureed and the mixture is very smooth, light and creamy. If you find you want to add a little bit more of the chickpea juice, do so with the machine running, 1 tablespoon at a time.
Transfer the hummus to a bowl and rest in the fridge for at least 30 minutes, longer if you can. To serve, drizzle it with a little great quality olive oil and a sprinkle of paprika or, our fave, Hatch chili powder. Serve with warm pita bread wedges or carrot sticks.

by TheLastWonton | Nov 25, 2012 | Chicken & Poultry, Hawaiian, Main Dishes, Pasta & Noodles, Recipes, Soups & Stews, Veggies
Hot savory broth, soft noodles, tender chicken, fresh veggies and a delicious blast of Aloha.
Saimin (ˈsī-ˈmin). Comfort, Hawaiian style. Inspired by Japanese udon, Chinese mein and Filipino pancit, saimin is uniquely Hawaiian. Saimin is a compound of two Chinese words, 'sai', meaning thin and 'miàn', meaning noodle.
In the early 20th century at the end of a long hard work day, as Chinese, Filipino, Japanese, Korean, Portuguese and Hawaiian sugar and pineapple plantation workers made their way to their humble abodes, meals often became a community effort with everyone throwing what they had to spare into the pot.
All those ethnic goodies mixed in with the noodley broth, from fresh laid eggs to green onions and Portuguese sausage to kimchi and bokchoy, added up to the birth of a down-home delicious, harmoniously cultural dish.
Saimin became so popular in Hawaii in the glory days, that instead of hotdogs, locals munched and slurped saimin at Honolulu Stadium as they watched Babe Ruth and Joe DiMaggio. Lengendary! And for years school kitchens have offered saimin lunches. Lucky keikis!
These days you'll find saimin on Hawaiian menus in little mom and pop joints and fancy schmancy establishments. Heck, saimin is one of McDonald's Hawaii's most popular menu items. That indicates what a mainstay saimin has become throughout the Islands.
Just like it is at our house. Aloha-in-my-kitchen days rock! We do bend the authenticity rules, but hey, isn't that how saimin started? I've happily just about perfected a wiki wiki (quick, quick), throw-it-together version that's good enough for company. Hot savory broth, soft, chewy noodles, tender chicken and the goodness of fresh veggies. Sip, slurp, munch. Mmmm. Onolicious!!
SIMPLE SAIMIN - 4 main course servings
3 tablespoons olive oil
10 green onions, chopped
4 cups broccoli, chopped into large bite-size pieces
9 cups water
4 (100g/3.5 oz) packages Sapporo Ichiban or similar dry ramen/Asian soup mix
1/2 cup chopped fresh cilantro
1 deli-cooked rotisserie chicken, removed from the bones, chopped or broken into large, bite-size pieces
4 handfuls crunchy, fresh bean sprouts
Fresh lime for squeezing
Shoyu (soy sauce) for drizzling
Hot chili paste, for embellishing
Lime wedges and thinly sliced jalapenos, for garnish
In a large pot heat olive oil over medium-high heat. Add chopped green onions and saute 2-3 minutes, until starting to caramelize. Add chopped broccoli and stir-fry another 2-3 minutes.
Add water and broth season packets from noodle mix. Bring to a boil. Boil 2 minutes. Add noodles and cilantro and cook just 3 minutes, until noodles are al dente.
Have 4 large soup bowls ready. Distribute noodle soup mixture evenly between the bowls. Top each bowl with 1/4 of the chopped chicken and a good handful of bean sprouts. Squeeze a generous bit of lime juice over each bowl. Drizzle with shoyu. Serve right away, garnished with a fresh lime wedge and thinly sliced jalapenos, if desired. Oh yum!!


