by TheLastWonton | Nov 18, 2012 | Baking & Desserts, Holiday & Seasonal, Mexican, Treats
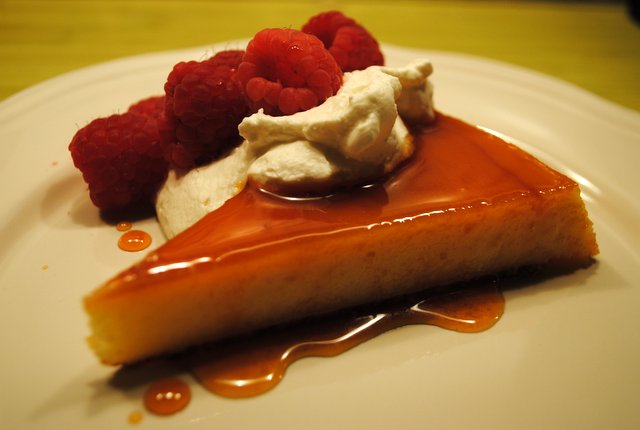
Creamy, rich, custardy, Mexican style almond flan.
It's that time of year again. The holidays are sneaking up on us. Makes a girl warm and tingley jingley all over. Time to start planning and preparing for Christmas present. Which always, delightfully, carries my thoughts and daydreams back, back, back……. to the wonderful memories of Christmas past.
Oh, the Christmases I have had!! Heart-tugging, laughter filled, wooly mitten wrapped, twinkling light draped, giddy excitement laden, palm tree fringed Christmases. Jingle all the way!
My memories effortlessly draw on a kind of festive yin and yang. Over the years, the tapestry of my Christmases is interwoven with happy, holly jolly memories from where I was born, in the yippee, ky-o-ky-yay ol' cowtown of Calgary, from my beloved Okanagan Valley and from that other Home Sweet Island Home, The Big Island of Hawaii. Mele Kalikimaka!
The Hawaiians' sense of 'ohana (family) strengthens my own deeply entrenched enchantment for the undeniable warmth of the celebrations of kith and kin at this time of year.
Memories and traditions come tumbling into these anticipation-filled November days. I think of my Mom often. Christmas and my Mom just go together. Mom did Christmas like nobody's business. She wove magic into each and every festive season.
And the goodies we had! Melt in your mouth shortbread, honey baked ham tucked into pillow soft Parkerhouse rolls, hand-crafted candy canes, fruit filled, brandied Christmas pudding with rich, boozy, hard sauce.
 Yesterday, with the spirit of the upcoming season toying with me, and some of the best friends anyone could have, coming for dinner, I made Mom's old-standby dessert, Almond Flan. This delicious, creamy rich, almost cake like dessert recipe, that was a part of so many of our family gatherings in days of yore, came from one of Mom's closest friends, a lovely, gracious Mexican lady, who eagerly shared many passed-down-through-the-generations recipes with us. Muchas gracias Ana.
And I'm not absolutely sure, but I bet I made Mom grin from ear to ear last night, from her heavenly perch, as I served up her favorite almond flan to our very dear friends gathered around a happy dinner table laden with merry chitchat and cheery expectations for the mistletoed jubilations, straight ahead.
MOM'S FAVORITE ALMOND FLAN – Serves 8
1 cup sugar
3/4 cup ground almonds
1 tin sweetened condensed milk
3/4 cup heavy cream or whipping cream
6 eggs = 3 whole eggs and 3 yolks
1 1/2 cups whipping cream
3 tablespoons sugar
1 teaspoon good vanilla extract
*Optional – 1/2 teaspoon almond extract
Fresh fruit for serving
Preheat oven to 325F degrees. Melt 1 cup sugar in heavy-bottomed, medium skillet over medium-high heat. Once the sugar starts to melt and caramelize, shake the pan, periodically to melt evenly until rich golden in colour. This will take a few minutes, but must be watched carefully so it doesn't get past that rich golden colour. Remove from heat immediately and pour carefully onto the bottom of a 9-inch deep pie plate.
In a blender container buzz the ground almonds, sweetened condensed milk and 3/4 cup cream for 20 seconds. Add 3 whole eggs and 3 yolks (Discard whites or freeze in a baggie for the next time you make Cloud Forest Banoffee or Pavlova). Blend at high speed for 20 seconds or until well mixed. Pour onto caramelized sugar in pie plate. Set pie plate carefully in another baking dish and fill outer pan with hot water that comes just half way up the sides of the pie plate.
Bake flan in water bath for 45 minutes. Remove pie plate from outer pan. Let cool at least 3 hours, or can be made day ahead and refrigerated. Cut around edges with a thin knife and turn flan upside down onto serving platter. Spoon any sticky syrup left in pie plate onto top of flan. Cut into wedges and serve with dollops of whipped cream and fresh fruit, if desired.
WHIPPED CREAM
Put 1 1/2 cups chilled whipping cream into medium or large bowl of electric mixer and beat until soft peaks form. Add sugar and extracts and beat just until slightly stiff peaks form.
by TheLastWonton | Nov 15, 2012 | Baking & Desserts, Cookies, Holiday & Seasonal, Treats
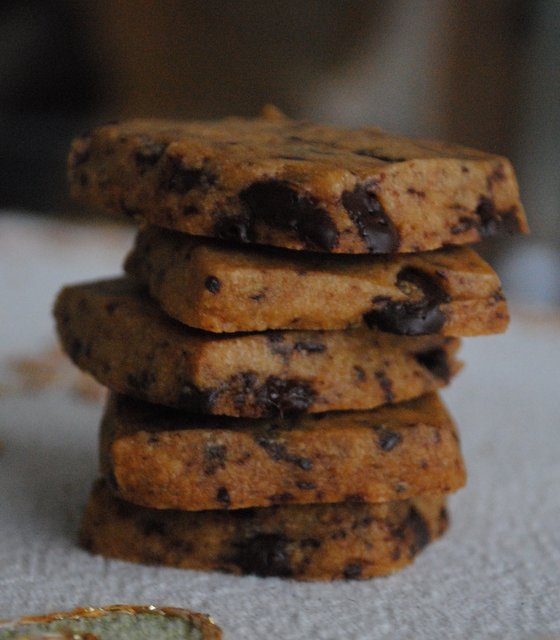
Coffee blasted, dark chocolate tinged, buttery shortbread goodness. Comfort and Joy!
What happens when a charming old Scotsman, a sexy Italian, a darkly delicious Swiss guy and two classy American chicks who handcraft luscious food play around with the inclinations of an unsuspecting, whistling-a-merry-tune, Canadian girl?
ESPRESSO CHOCOLATE SHORTBREAD. That's what happens!
Enter stage left, installment number two of DIY, brazenly delicious Christmas Cookie Boxes.
Passionate gratitude to the guy in the kilt for the quintessential Scottish cookie, shortbread; to the Italian for the bold blast of espresso, to the Swiss guy for gloriously smooth, addictive chocolate, and of course to those American chicks. Crumb-coated, big-smily thanks to Dorie Greenspan, culinary guru, for this keeper of a recipe, and to Deb of Smitten Kitchen food blog fame, who elevates writing, photography and cooking to one divinely enticing artform and who got my attention, wham bam, with her take on this recipe of Dorie's.
 To the rest of you out there, thinking about revving up your holiday cooking possibilities, make these!! These are seriously delicious cookies. The dark chocolate snuggles up to the espresso making each tender, buttery bite a bit of a seductive, under-the-mistletoe, tease.
And, Halleluja, these babies just get better with age. Joy to the World!
I cannot dash off for another nibble without mentioning one of the coolest things about this recipe is that you roll the dough out in a big ziplock bag. Dorie, that's sheer genius! Pa ra pa pum pum.
**I've made only a couple of small changes from the original recipe**
ESPRESSO-CHOCOLATE SHORTBREAD COOKIES – Makes about 42
1 tablespoon instant espresso powder
1 tablespoon boiling water
1 cup butter, at room temperature
2/3 cup confectioners' sugar
1 teaspoon good vanilla extract
2 cups flour
About 4 ounces dark, semi-sweet, or bittersweet good quality chocolate, finely chopped, or 3/4 cup mini chocolate chips (I used a 100gr (3.5oz) Lindt 'Ecuador' 75% cacao chocolate bar, with superb results) (Last year I used mini chocolate chips, but far, far, far prefer the finely chopped Lindt)
Confectioners' sugar, for dusting (optional)
1. Dissolve the espresso in the boiling water, and set aside to cool to tepid.
2. Working with a stand mixer, preferably fitted with a paddle attachment, or with a hand mixer in a large bowl, beat the butter and confectioners' sugar together on medium speed for about 3 minutes, until the mixture is very smooth. Beat in the vanilla and espresso, then reduce the mixer speed to low and add the flour, mixing only until it disappears into the dough and the dough bunches. Don't work the dough too much, once the flour is incorporated. Fold in the chopped chocolate with a sturdy rubber spatula.
3. Using the spatula, transfer the soft, somewhat sticky dough to a large (gallon size) (26.8 x 27.3cm), zipper-lock, plastic bag. Put the bag on a flat surface, leaving the top open, and roll the dough into about a 9 x 10.5 inch rectangle that is 1/4 inch thick. As you roll, turn the bag occasionally and lift the plastic from the dough so it doesn't cause creases. When you get the right size and even thickness, seal the bag, pressing out as much air as possible, and refrigerate the dough for at least 2 hours, or for up to 2 days.
4. Preheat oven to 325F. Line baking sheets with parchment or silicone mats.
5. Put the plastic bag on a cutting board and slit it open. Turn the firm dough out onto the board (discard the bag) and, using a ruler as a guide and a sharp knife, cut the dough into 1 1/2-inch squares. Transfer the squares to a baking sheet and carefully poke each one twice with a fork, gently pushing the tines through the cookies until they hit the sheet.
6. Bake for 20-22 minutes. The cookies will be quite pale – they don't take on much 'baked' colour. Transfer cookies to a rack.
7. If you'd like, dust the cookies with confectioners' sugar while they are still warm. Cool to room temperature before serving.
by TheLastWonton | Nov 13, 2012 | Baking & Desserts, Cookies, Holiday & Seasonal, Treats
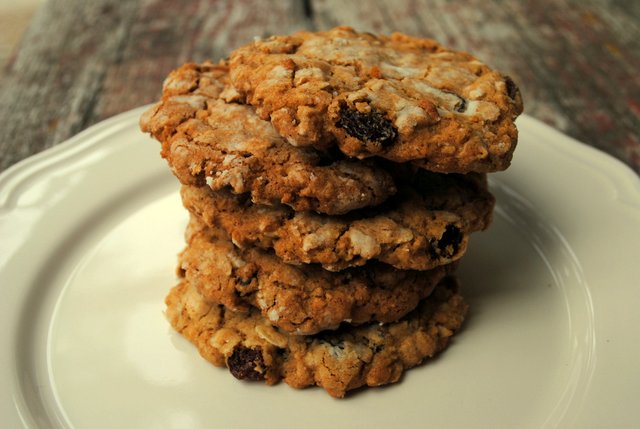
Crispy, crunchy, chewy, buttery, old-fashioned oatmeal cookies that taste like home. Great anytime of the year, but naughtily nice when the holly, jolly season is upon us.
A couple of Christmases ago I decided I wanted to make up some really special cookie boxes for gifts. But I didn't want to just make cookies, because I could. I wanted to make exquisite cookies. I wanted cookies to rival the amazing offerings from Mrs. Barrie's in Kona. I wanted all my eager giftees to moan with pleasure and smile with delight with every single sweet bite.
Enter, Project Christmas Cookie Box. Good idea.
Out came all my dog-eared, book marked, sticky-noted, old December issues of Bon Appetit, Saveur, Canadian Living and a stack of other assorted cooking magazines. Coffee stained, butter smeared, highly treasured vintage cookbooks were reached down from the shelves. My computer was busy with a few too many windows open at once, all boasting my favorite food blogs.
Armed with recipes that screamed addictive, festive, munching pleasures, like Espresso Shortbread, Double Fudge Meltaways, Coconut-Macadamia Nut Chocolate Dipped Shortbread, Soft Chewy Ginger Sparkles and of course divinely buttery, old fasioned Oatmeal Cookies, in the wink of an eye and the twist of my head, I was ready, ready, Rudolph, to make and bake.
My kitchen was busier than Mrs. Claus' kitchen at the North Pole. Warm, sweet, cinnamon scented, chocolate tinged, almond laced, rum punched aromas wafted through every room in our house. I love it when my kitchen gets all Christmasy on me!
Let Heaven and Nature sing! I did manage to hit on some kind of glorious jingle-those-bells kismet, 'cuz my cookie boxes were a hit. I think I earned myself an enviable spot on the much touted 'NICE' list too.
 Yesterday morning we woke to find that, overnight, our forest had been magically, silently, beautifully, transformed into a winter wonderland.
Fa la la la la la la la la.
A tich early, but, hey, when that Ho! Ho! spirit hits, it hits! Stripe me all pepperminty, stick some reindeer deely boopers on me and push me, smiling into the holly jolly fray.
So, this morning, ever so quickly, before Forest Grump even suspected what was happening, I threw on some tunes, and revved up my forest kitchen to welcome the most wonderful time of year. Oh the aromas as one batch after another of warm-from-the-oven, may-I-please-have-another, buttery, crunchy, chewy, delicious Oatmeal Cookies lay, smiling, cooling, on the counter.
Thanks oodles LiveFire food blog for sharing your all-time, childhood favorite and heirloom 100-year old recipe for Aunt Irva's Oatmeal Cookies with us.
I think Aunt Irva would be quite tickled with my new Christmas tradition. 
OUR FAVORITE OATMEAL COOKIES
1 1/2 cups flour
1/2 teaspoon salt
1 teaspoon baking powder
1 teaspoon baking soda
2 cups packed brown sugar
1 cup butter
2 large eggs, lightly beaten
1 teaspoon good vanilla extract
3 cups old-fashioned oats
Powdered sugar for coating
**Optional ~ 1 cup of raisins, currants, lightly toasted walnuts or pecans, chocolate chips, or butterscotch chips. (I almost always opt for raisins.)
You don't need to preheat the oven while mixing the ingredients; the batter is chilled first. You can even make the batter 1 to 2 days ahead. Bonus!
Cream the brown sugar and butter. Add the eggs and vanilla. Beat well. Stir in the dry ingredients and oats. Mix well. Chill dough.
Preheat oven to 350F.
Once the dough is chilled, roll it into walnut sized balls. Roll the dough balls in powdered sugar and place on greased cookie sheet. (or use a Silipat or parchment) Lightly butter the bottom of a glass and dip the buttered glass bottom in powdered sugar, then flatten the cookie balls on cookie sheet.
Bake 8-11 minutes, until golden. I bake mine 10-11 minutes, 'cuz we like them rather crunchy. And I have it on good authority that so does the big, jolly elf himself. Ho! Ho! Ho!
by TheLastWonton | Jul 15, 2012 | Appetizers & Snacks, Sauces, Dips & Condiments, Sides, Vegetarian, Veggies
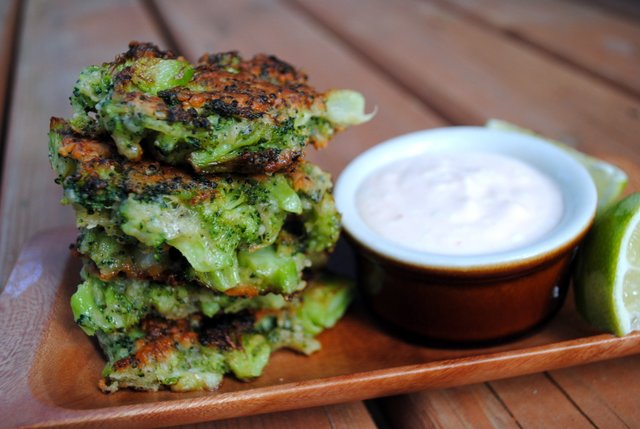
Crispy edged, gloriously textured, tasty little mounds of fried veggie goodness.
Once upon a time in a beautiful valley filled with lakes and vineyards there lived some broccoli. This broccoli was very appealing, with deep green florets and tender, juicy stems. But, sadly, the broccoli knew it was, well, just plain. And that's the last thing this broccoli wanted to be.
This broccoli had high hopes and delicious aspirations of being part of something out-of-the-ordinary. So, thinking it was now or never, the broccoli took a big deep breath and leaped out of the box, landing plunk…….plunk…… plunk……… on the kitchen counter.
Scared, excited, and a little bewildered, the broccoli just lay there, waiting for the adventure to have its way with it.
The broccoli felt it before it saw it. (You know that feeling?) Big, hungry, smiling, brown eyes transfixed the broccoli with a steady gaze. The broccoli gulped.
Then the best thing that ever could have happened, happened. A soft voice eagerly exclaimed, "I know what I'm going to make! Oh, these are going to be so good. Broccoli Parmesan Fritters coming right up!"
The broccoli never dreamed it would be part of something this good.
THE END

Every once in awhile I like to share the background story on how I came to make a certain something. Sheds a whole different light on the recipe, doesn't it? Very inspiring.
And I knew in an instant as soon as I came across this recipe on Smitten Kitchen that I had no option but to make these fritters. Then with the broccoli landing on my counter, and all that jazz, what was a girl to do?
Forest Grump and I both really like these fritters. I'll definitely make them again. And again. They are more broccoli than fritter, with just enough batter to bring the veg and cheese together into little mounds of crispy edged, chewy middled, tasty bites. The texture is marvelous.
Like Smitten Kitchen we dipped our fritters in a garlicky lemon yogurt sauce, but we kicked ours up a bit with a good wallop of sriracha. Mmmm. We couldn't resist trying a couple of the fritters with an indulgent smear of butter and a sprinkling of salt and pepper. Yum. I mean really, how can you go wrong with butter and a fritter, right?
I would just have to say, if you like broccoli, or even if you're on the broccoli fence, make these. I think you'll really like them too.
**Thanks Deb of Smitten Kitchen fame, your recipes are divinely crafted and always
keep me coming back for more.**
BROCCOLI PARMESAN FRITTERS
with Garlicky Lemon, Sriracha Yogurt Dipping Sauce
Yield: 8-9, 2 to 2 1/2-inch fritters
8 ounces (1 small-to-medium bundle, 225 grams) fresh broccoli (3 cups chopped)
1 large egg
1/2 cup (65 grams) all-purpose flour
1/3 cup (30 grams) finely grated, good quality, Parmesan cheese
1 small clove garlic, minced
1/2 teaspoon Kosher salt, plus more to taste
A pinch of red pepper flakes or several grinds of black pepper
Olive or vegetable oil for frying
Prepare your broccoli: Separate the florets from the biggest stem(s). Cut the florets into 1-inch chunks. Slice the stems into 1/2-inch lengths. You should have about 3 cups of chopped broccoli total.
Steam your broccoli until just tender but not mushy. Set broccoli aside to cool slightly.
In the bottom of a large bowl, lightly beat your egg. Add the flour, cheese, garlic, salt and pepper. Then, add the somewhat cooled broccoli and, using a potato masher, mash the broccoli just a bit. You’re looking to keep the bits recognizable, but small enough (1/4- to 1/2-inch chunks) that you can press a mound of the batter into a fritter in the pan. Once mashed a bit, stir or fold the ingredients together the rest of the way with a spoon. (I started with a spoon and then decided the only way to bring the mixture together was to get in there with my hands, which worked perfectly).
Heat a large, heavy skillet over moderate heat. Once hot, add a good slick of oil (I usually use a mix of olive and vegetable oil), about 2 to 3 tablespoons. Once the oil is hot (you can test it by flicking a droplet of water into it; it should hiss and sputter), scoop a two tablespoon-size mound of the batter and drop it into the pan, then flatten it slightly with your spoon or spatula. Repeat with additional batter, leaving a couple inches between each. Once brown underneath, about 2 to 3 minutes, flip each fritter and cook on the other side until equally golden, about another 1 to 2 minutes.
Transfer briefly to paper towels to drain, then to a serving plate if you’ll be eating them shortly or a baking sheet in a 200 degree oven if you’d like to keep them warm for a while until needed. Repeat with remaining batter, adding more oil as needed. Serve with Yogurt Dipping Sauce, or smeared with creamy butter.
YOGURT DIPPING SAUCE
1 cup full fat, Greek style, plain yogurt
2 tablespoons fresh squeezed lemon juice
1 teaspoon sriracha
1/2 teaspoon lemon zest
1 small garlic clove, minced
Couple of pinches of sea or Kosher salt
Stir all ingredients together in a small bowl. Adjust flavours to your tastes. Dollop on each fritter before serving or on the side as a dip.
THE MORAL OF THE STORY
Take a leap of faith and everyone will realize how delicious you really are.
by TheLastWonton | Jul 12, 2012 | Appetizers & Snacks, Fruits, Salads & Bowls, Sauces, Dips & Condiments, Sides, Vegetarian, Veggies
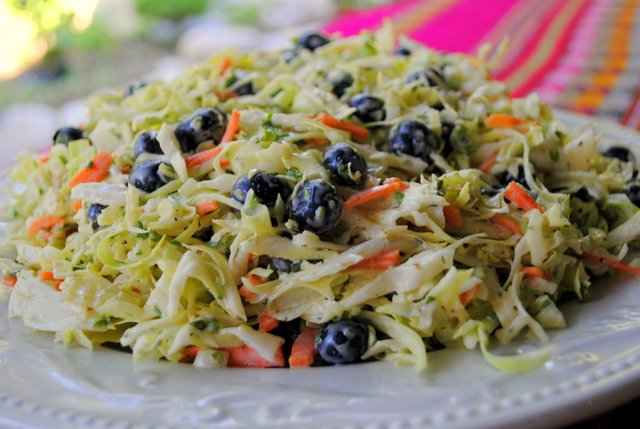
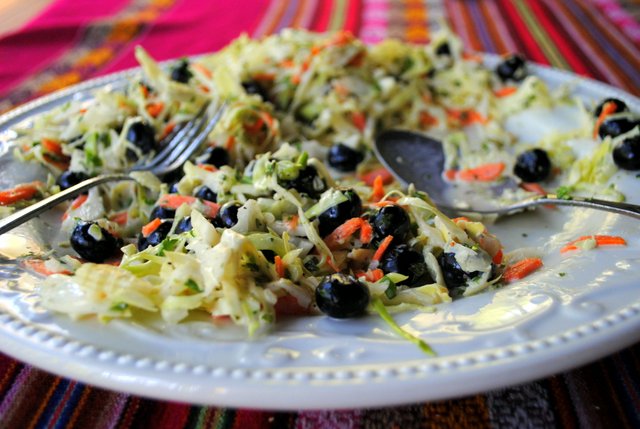
Gloriously crunchy slaw, deliciously interrupted with the juicy pop of luscious summer blueberries, all brought together with the tangy, sweet goodness of a creamy dressing, boasting a wee hit of a peppery punch.
Mother Nature has a hilarious sense of humour this year. Turns out we weren't just complaining and bellyaching about all that rain in June. We set new records!
Local website, Castanet, states, "June 2012 will go down as the wettest June on record in Kelowna (and Peachland!) ….since 1968".
But, ah ha! Crafty ol' Mom Nature is not done with us and our raisiny fingers yet! She didn't skip a beat, from "monsoon season on steroids" right into the blast of a scorching heatwave.
Summer has arrived in the Okanagan and baby it's hot outside! 
You know what that means?
Time to fire up the grill, whack some veggies and handcraft some rather tasty slaw, with……wait for it…….wait for it…….fresh blueberries. Yum-O.
Seriously, just try it. This coleslaw really wants you to shred, slice and julienne all the veggies really, really, super, duper thinly, then toss in the blues and creamy dressing. Every mouthful is a cool, crunchy tangle of garden freshness.
Warning: This is not your mamma's coleslaw.
*Loosed based and definitely inspired by Michael Symon's recipe.* Thanks heaps Michael!
BLUEBERRY COLESLAW – Serves 8
CREAMY DRESSING
3/4 cup mayonnaise
3 tablespoons red wine vinegar
2 tablespoons whole grain Dijon mustard
2 tablespoons chopped fresh cilantro
2 tablespoons fresh lemon juice
1 generous tablespoon honey
1 teaspoon freshly ground black pepper
1 teaspoon sea or Kosher salt
COLESLAW:
1/2 of a large head of cabbage
5 green onions, thinly sliced
1/4 cup chopped fresh parsley
2 medium carrots, finely julienned
2 celery stalks, super thinly sliced (shave those babies!)
1 1/2 cups fresh blueberries
Make dressing: In small mixing bowl, combine mayonnaise, vinegar, mustard, cilantro, lemon juice, honey, pepper and salt. Whisk to combine. Transfer to a jar or container, refrigerate at least 1 hour to let the flavours mellow and get happy.
Shave or very, very finely shred the cabbage. Combine cabbage, green onions, parsley, carrots, celery and blueberries in a large bowl. Pour the chilled dressing over the mixture, toss and serve.

 Yesterday, with the spirit of the upcoming season toying with me, and some of the best friends anyone could have, coming for dinner, I made Mom's old-standby dessert, Almond Flan. This delicious, creamy rich, almost cake like dessert recipe, that was a part of so many of our family gatherings in days of yore, came from one of Mom's closest friends, a lovely, gracious Mexican lady, who eagerly shared many passed-down-through-the-generations recipes with us. Muchas gracias Ana.


